Hello! Welcome back to our module on "Practical Bash Automation Projects."
In our last lesson, you upgraded the system_monitor.sh script to be "smarter" by adding threshold checks. It can now detect when CPU, memory, or disk usage is too high and print a warning directly to the console. This was a huge step forward, but it still requires someone to be actively watching the terminal to notice a problem.
Today, we'll close that loop and make our monitoring system truly automated.
Today's Learning Outcome: By the end of this lesson, you will be able to extend a monitoring script to send an email alert when a threshold is exceeded.
This transforms your script from a simple information display into a proactive alerting tool, a cornerstone of automated system administration and DevOps.
1. Sending Email from the Linux Command Line
To send an alert, our script needs to be able to send an email. There are several ways to do this from a Bash script. We will explore two common methods: one that is simple and traditional, and another that is more modern and flexible.
Method 1: The Traditional mail Command
The simplest way to send an email from a Linux system is using the mail command. It's designed to be straightforward and has been a part of Unix-like systems for decades.
This command relies on a Mail Transfer Agent (MTA), such as Postfix or Sendmail, being installed and configured on your system. On many server distributions, a basic MTA is configured by default to handle local mail delivery.
Prerequisites
The mail command isn't always installed by default. You can install it on Debian/Ubuntu systems with:sudo apt-get update && sudo apt-get install mailutils
On RHEL/CentOS systems, you would use:sudo yum install mailx
Basic Usage
The syntax is very intuitive. You can pipe the body of your message to the mail command and specify the subject and recipient.
echo "This is the body of the email." | mail -s "This is the subject" recipient@example.com
Let's see how this is used within a full script.
Shell script to watch the disk space and send an email
The article 'Shell script to watch the disk space and send an email' from cyberciti.biz provides a classic example of a monitoring script using the mail command. Pay close attention to how it's integrated into the script's logic.
First, quickly read the 'Prerequisite' section (right before 'Step # 3') which mentions installing the mail command. Then, carefully study the script in 'Step # 3'. Notice how the if statement you learned about in the last lesson is used to trigger the mail command.
As you saw in the article, the core of the alerting logic is this line inside the if block:
echo "Running out of space \"$partition ($usep%)\" on $(hostname) as on $(date)" | \
mail -s "Alert: Almost out of disk space $usep%" "$ADMIN"
This is a perfect example of how to combine command output (like hostname and date) into a message body and send it as an alert.
Here is another clear, visual example of this technique in a script.
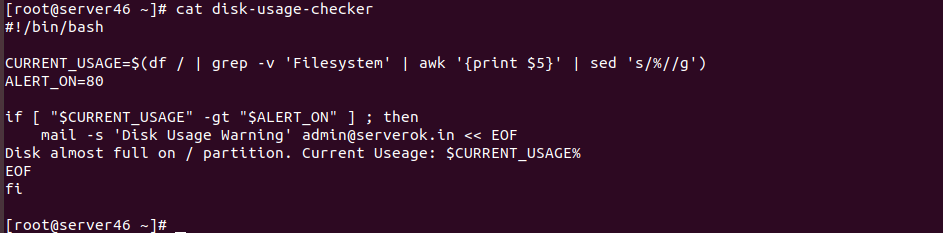
2. Method 2: A More Flexible Approach with msmtp
The mail command is great, but its reliance on a locally configured MTA can be a limitation. In many modern cloud and container-based environments, you might not have a local mail server. It's often preferable to use an external SMTP service, such as Gmail, Office 365, or a dedicated service like Amazon SES or SendGrid.
This is where msmtp comes in. It is a lightweight SMTP client that allows you to send emails from your script through any external SMTP server.
Day 4 : Mastering Server Monitoring and Email Alerts [ 10- ...
The article 'Mastering Server Monitoring and Email Alerts' explains this more modern approach. It introduces msmtp as a versatile tool for sending emails from scripts, which is a very common pattern in DevOps.
Read the sections 'Mail Server' and 'What is msmtp?'. This will clarify why you might choose msmtp over the simpler mail command for more flexibility.
Prerequisites and Configuration
-
Install
msmtp:sudo apt-get install msmtporsudo yum install msmtp -
Create a Configuration File:
msmtprequires a configuration file, typically~/.msmtprc, to store your SMTP server details.Here is a template for using a Gmail account.
# Set default values for all accounts.
defaults
auth           on
tls            on
tls_trust_file /etc/ssl/certs/ca-certificates.crt
logfile        ~/.msmtp.log

# Gmail
account        gmail
host           smtp.gmail.com
port           587
from           your_email@gmail.com
user           your_email@gmail.com
password       YOUR_APP_PASSWORD

# Set a default account
account default : gmail
IMPORTANT SECURITY NOTES:
- App Passwords: Do not use your main Gmail password. Instead, generate an "App Password" from your Google Account security settings. This is a 16-digit password that gives an app access to your account and is much more secure.
- File Permissions: This file contains credentials. You must restrict its permissions so only you can read it:
chmod 600 ~/.msmtprc
Sending Mail with msmtp
With the configuration in place, you can send an email using a syntax similar to the one shown in the medium.com article. It often uses a "here document" (<<EOF) which is a convenient way to pass a multi-line string as input to a command.
#!/bin/bash
recipient="admin@example.com"
subject="High CPU Usage Alert!"
cpu_usage=95

# The 'msmtp -t' command reads recipient info from the headers.
msmtp -t <<EOF
To: $recipient
Subject: $subject
Content-Type: text/plain

WARNING: The CPU usage is currently at ${cpu_usage}%.
Please investigate immediately.
EOF
This method is highly favored in DevOps because it decouples your script from the local machine's mail configuration, making it more portable and easier to manage.
3. Let's Upgrade Your Script!
Now it's time to put this into practice by upgrading the system_monitor.sh script you built in the previous lesson.
Test your understanding!
Choose one of the methods (mail or msmtp) and integrate it into your system_monitor.sh script.
-
Define Recipient: At the top of your script, add a variable
ALERT_RECIPIENTand set it to your email address. -
Install Tool: Install either
mailutilsormsmtpon your system. If usingmsmtp, create and secure your~/.msmtprcfile. -
Modify
ifBlocks: Go to theifblocks where you check for CPU, memory, and disk usage. Inside each block, in addition to theechowarning, add the command to send an email. The email body should be a clear message stating which threshold was breached and the current value. -
Test It: To test your script, temporarily lower one of the thresholds (e.g.,
DISK_THRESHOLD=10) to guarantee an alert is triggered when you run the script. Check your inbox to confirm you received the email!
Show answer
Here is an example of what the modified system_monitor.sh could look like using the mail command.
#!/usr/bin/env bash

# --- Configuration ---
CPU_THRESHOLD=80
MEM_THRESHOLD=80
DISK_THRESHOLD=85
ALERT_RECIPIENT="your_email@example.com"

# --- Functions ---
get_cpu_usage() {
  top -bn1 | grep "Cpu(s)" | sed "s/.*, *\([0-9.]*\)%* id.*/\1/" | awk '{print 100 - $1}'
}

get_memory_usage() {
  free | awk '/Mem/ {printf "%.2f", $3/$2 * 100}'
}

get_disk_usage() {
  df / | awk 'NR==2 {print $5}' | sed 's/%//'
}

# --- Main Logic ---
# (This script is designed to be run by cron, so it runs once and exits)

# --- CPU Check ---
CPU_USAGE=$(get_cpu_usage)
if (( $(echo "$CPU_USAGE > $CPU_THRESHOLD" | bc -l) )); then
  MESSAGE="WARNING: High CPU Usage on $(hostname)! Current usage: ${CPU_USAGE}%"
  echo "$MESSAGE"
  echo "$MESSAGE" | mail -s "CPU Alert: $(hostname)" "$ALERT_RECIPIENT"
fi

# --- Memory Check ---
MEM_USAGE=$(get_memory_usage)
if (( $(echo "$MEM_USAGE > $MEM_THRESHOLD" | bc -l) )); then
  MESSAGE="WARNING: High Memory Usage on $(hostname)! Current usage: ${MEM_USAGE}%"
  echo "$MESSAGE"
  echo "$MESSAGE" | mail -s "Memory Alert: $(hostname)" "$ALERT_RECIPIENT"
fi

# --- Disk Check ---
DISK_USAGE=$(get_disk_usage)
if [ "$DISK_USAGE" -gt "$DISK_THRESHOLD" ]; then
  MESSAGE="WARNING: Disk Space Critical on $(hostname)! Current usage: ${DISK_USAGE}%"
  echo "$MESSAGE"
  echo "$MESSAGE" | mail -s "Disk Space Alert: $(hostname)" "$ALERT_RECIPIENT"
fi
Note: This version is simplified to run once, which is more suitable for automation with cron, rather than using an infinite while loop.
Conclusion
Fantastic work! Your script is now a genuine, automated monitoring tool. It not only identifies problems but also actively notifies the right person. This principle of "detection and notification" is fundamental to building reliable and observable systems.
Key Takeaways:
- Alerting is Essential: A monitoring script without an alerting mechanism is incomplete. You need a way to be notified of issues without watching a screen.
- Two Methods for Email:
mail: A simple, traditional tool that's great if you have a local mail server configured.msmtp: A more modern and flexible SMTP client that can send mail through external services like Gmail, making it ideal for cloud and container environments.
- Secure Configuration: When using tools like
msmtpwith credentials, it is critical to secure the configuration file using strict file permissions (chmod 600).
Next Up
Your monitoring script is now highly effective, but it only runs when you manually execute it. In a real-world scenario, you would want this check to run automatically on a schedule (e.g., every 15 minutes).
In the next lesson, we will shift to another critical automation task: automating the creation of backups for a specified directory using a Bash script with date-stamped archives. This will further build on your scripting skills and prepare you for scheduling tasks with cron.