Hello! Welcome back to our journey through the Django REST Framework.
In our last lesson, you learned how to create a ModelSerializer, a powerful tool that automates the process of converting your Django models into JSON. We focused on the "serialization" part—turning data into a transferable format.
Today, we'll tackle the other side of the coin: deserialization and validation. The learning outcome for this lesson is to use serializers to validate incoming data for create and update operations. You'll learn how to take raw data from an HTTP request, ensure it's valid according to your rules, and then use the serializer to create or update records in your database. This is a critical skill for building any API that accepts user input.
The Validation and Write Workflow
Before diving into code, let's look at the data flow for a "write" operation (like a POST or PUT request). A serializer's job is not just to format data, but also to act as a gatekeeper for your database.
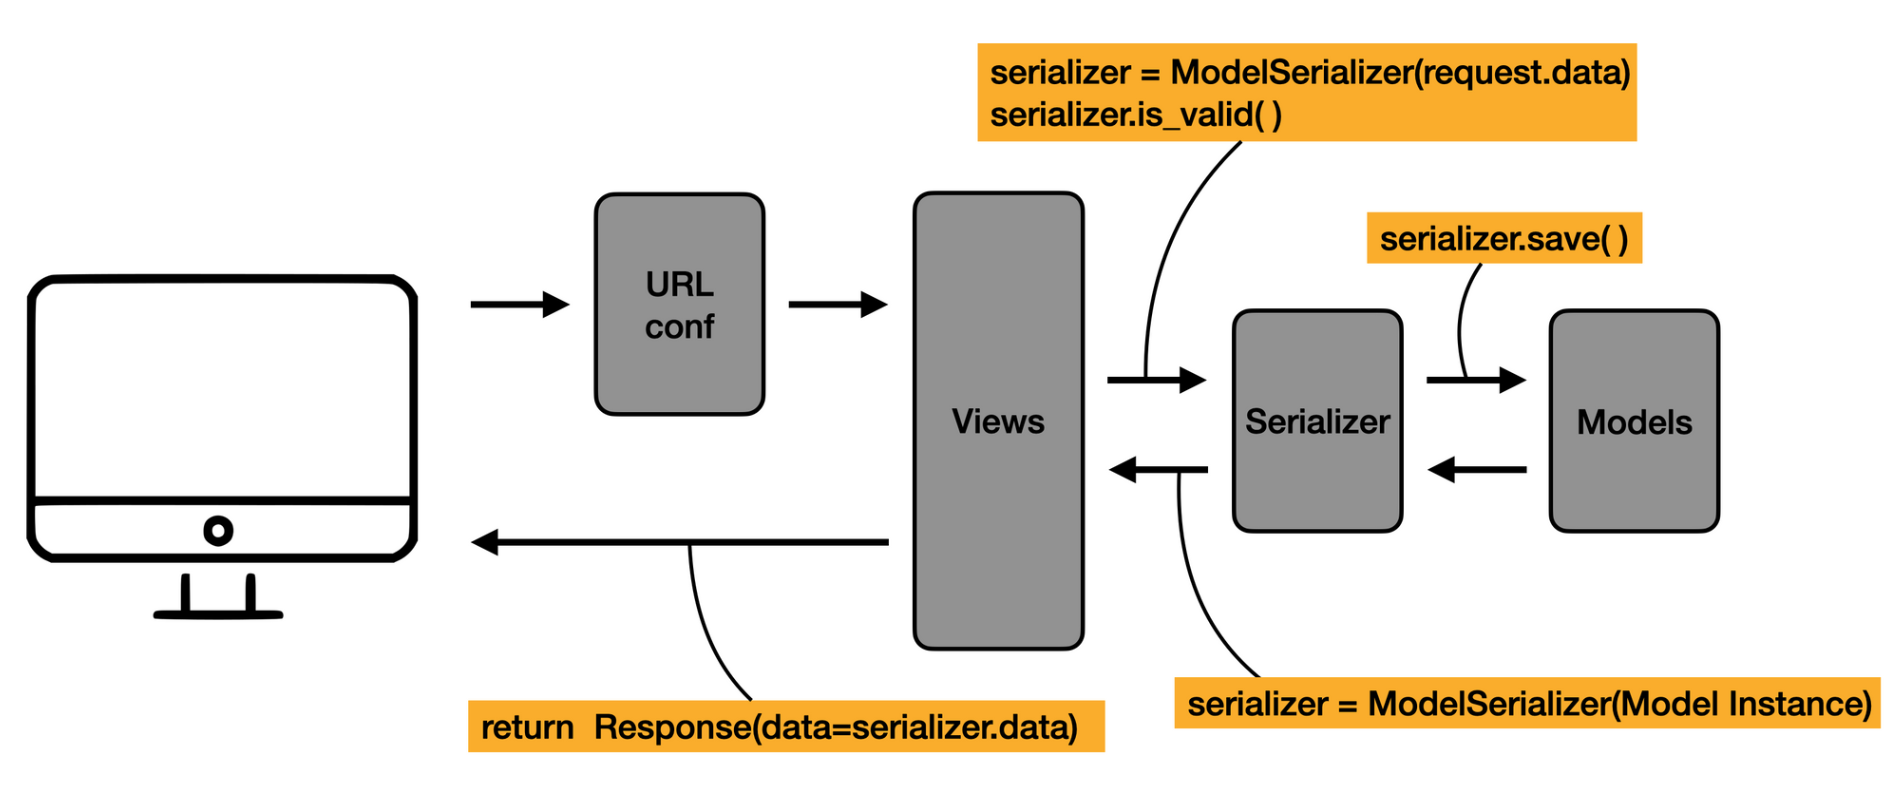
The core process involves three steps, which are fundamental to working with DRF:
- Instantiate the serializer with incoming data:
serializer = YourSerializer(data=request.data) - Validate the data:
serializer.is_valid() - Save the object:
serializer.save()
Let's start by reading the official documentation, which provides the foundational knowledge for this entire process.
The DRF documentation explains the validation process and how the .save() method works. This is the canonical source for understanding these mechanics.
First, read the section titled 'Validation'. Focus on how to call is_valid() and access the .errors dictionary. Note the raise_exception=True flag, which is a common pattern in DRF views. Then, read the section 'Saving instances' to understand how the .save() method intelligently calls either .create() or .update() based on how you instantiated the serializer.
Implementing Create and Update Operations
Now that you understand the theory, let's see it in practice. The key takeaway from the documentation is that the same .save() method handles both creation and updates. The difference lies in how you initialize the serializer:
- For creating a new object:
serializer = YourSerializer(data=...) - For updating an existing object:
serializer = YourSerializer(instance, data=...)
When you provide an instance, DRF knows to perform an update on that object. When you don't, it knows to create a new one. The ModelSerializer you learned about last time comes with default .create() and .update() methods, so this works automatically.
This video provides a clear, practical demonstration of building API views for both creating and updating data.
Django Rest Framework | Serializers & CRUD
This video by Dennis Ivy walks through building API views for create and update operations. It's a great practical application of the concepts you just read about.
First, watch the 'create' implementation from 15:45 to 18:26. Pay attention to how he passes request.data to the serializer and calls .is_valid() and .save(). Then, watch the 'update' implementation from 18:26 to 20:19. Notice the key difference: he first retrieves the object (task) and passes it as the instance to the serializer.
Test your understanding!
You have a Product model and a ProductSerializer. In your update view, you've already fetched the specific product the user wants to modify and have it stored in a variable called product_instance. The incoming JSON data is in request.data.
How would you correctly instantiate ProductSerializer to prepare for an update operation?
Show answer
# The product_instance is the existing object we want to update.
# The request.data is the new data for the update.
serializer = ProductSerializer(instance=product_instance, data=request.data)

# You would then proceed to validate and save:
# if serializer.is_valid():
#     serializer.save()
By passing both the instance and data, you've told the serializer to perform an update on product_instance using the new data.
Adding Custom Validation
DRF's automatic validation based on your model fields (max_length, unique, etc.) is a great start. However, you'll often need to enforce your own business rules. For this, DRF provides two main hooks for custom validation within the serializer class.
This blog post gives a fantastic high-level overview of a serializer's responsibilities, including where validation fits in.
Part 1: Django REST Framework: When (and When Not) to ...
This article frames the serializer as the 'security guard at the door of your database' and clearly explains the 'why' behind different validation methods.
Read the sections 'The Serializer's Core Mission', 'validate_(self, value)', and 'validate(self, data)'. This will give you a strong conceptual model for the two types of custom validation.
1. Field-Level Validation
To validate a single field, you can add a method named validate_<field_name> to your serializer. It takes the field's value as an argument and should either return the validated value or raise a serializers.ValidationError.
Example: Ensure a blog post title contains the word "Django".
from rest_framework import serializers

class BlogPostSerializer(serializers.ModelSerializer):
    class Meta:
        model = Post
        fields = '__all__'

    def validate_title(self, value):
        if 'django' not in value.lower():
            raise serializers.ValidationError("Blog post title must be about Django!")
        return value
2. Object-Level Validation
When you need to validate based on the relationship between multiple fields, use the validate method. It receives a dictionary of the incoming data.
Example: Ensure an event's end_date is after its start_date.
class EventSerializer(serializers.ModelSerializer):
    class Meta:
        model = Event
        fields = ['name', 'start_date', 'end_date']

    def validate(self, data):
        if data['start_date'] > data['end_date']:
            raise serializers.ValidationError("End date must be after start date.")
        return data
This next video provides a very practical demonstration of implementing both field-level and object-level validation.
Blog API with Django Rest Framework 27 of 33 - Serializer Validation
The 'CodingEntrepreneurs' channel shows how to implement custom validation in a user registration serializer. This is a common and highly relevant use case.
Watch from 2:12 to 5:43 to see field-level validation in action. The instructor creates a validate_email2 method to ensure two email fields match. Then, watch from 5:43 to 8:43 to see object-level validation. The instructor writes a validate method to check if a user with the given email already exists in the database.
Architectural Boundaries: What Not to Do in a Serializer
Given your interest in backend architecture, it's just as important to know what a serializer shouldn't do. A serializer that does too much becomes difficult to test and maintain. Its primary job is to handle data validation and transformation.
The dev.to article you read earlier has an excellent section on this. It's worth re-reading to solidify your understanding of good design patterns.
Part 1: Django REST Framework: When (and When Not) to ...
Let's revisit the article by Soldatov Serhii to focus on architectural best practices.
Read the final section, 'So, When Should Serializers Just Say No?'. Pay close attention to the examples of what does NOT belong in a serializer, such as sending emails or calling third-party APIs.
Placing heavy side-effects (like sending an email) inside a serializer's .save() or .validate() method is a common mistake. This logic is better handled in your view or, for more complex workflows, in a dedicated service layer. This separation of concerns is a hallmark of clean, scalable backend code.
Conclusion
Excellent work! You've now moved beyond simple data representation and can wield serializers as powerful tools for data validation and persistence. You can ensure the integrity of the data entering your system, both through automatic checks and custom business logic.
Key Takeaways:
- The validation workflow is
serializer = YourSerializer(data=...),serializer.is_valid(), andserializer.save(). .save()handles both creation and updates. Passing aninstanceduring initialization signals an update.ModelSerializerprovides default.create()and.update()methods, but they can be overridden for complex cases.- Use
validate_<field_name>()for single-field custom validation. - Use
validate()for cross-field (object-level) custom validation. - Keep serializers focused on data validation and transformation. Avoid placing business process logic or heavy side effects within them.
Preview of the Next Lesson:
In our examples today, we worked with single models. But real-world applications almost always involve relationships: a blog post has comments, an author has multiple posts, etc. In our next lesson, we will implement nested serializers to represent related model data in API responses, allowing you to create rich, hierarchical JSON structures that reflect your database relationships.