Hello! Welcome to your first lesson in the Django framework course.
Given your proficiency in Python and familiarity with web fundamentals, we can jump straight into the practical aspects of getting a Django project off the ground. This lesson focuses on the essential first step: installing the Django framework and creating the foundational structure of a new project.
By the end of this lesson, you will be able to:
- Set up an isolated Python environment for your project.
- Install the Django package using
pip. - Use the
django-admincommand-line tool to generate a new project. - Run the built-in development server to verify that everything is working correctly.
This initial setup is the launchpad for everything we will build throughout this course.
1. The Development Environment
Before we install Django itself, it's crucial to create an isolated space for our project's dependencies. As you likely know from your Python experience, a virtual environment ensures that the packages for this project don't conflict with packages for other projects on your system. We will use venv, which is part of Python's standard library.
First, create a new directory for your project and navigate into it. Then, run the following command to create a virtual environment. A common convention is to name the environment directory venv:
# For macOS/Linux
python3 -m venv venv

# For Windows
python -m venv venv
Once created, you need to "activate" it. This adjusts your shell's path to use the Python interpreter and package tools inside the venv directory.
# For macOS/Linux
source venv/bin/activate

# For Windows
.\venv\Scripts\activate
You'll know the environment is active because your command prompt will be prefixed with (venv). From now on, any package you install with pip will be placed in this environment.
2. Installing Django
With your virtual environment active, you can now install Django. It's a package available on the Python Package Index (PyPI), so we'll use pip.
To get a clear demonstration of setting up the virtual environment and installing Django, the following video is a great resource.
Python Django Tutorial for Web Applications (Step-by-Step Setup in 25 Minutes)
Watch this segment from the 'Python Django Tutorial' by Code with Josh to see the virtual environment creation and Django installation in action.
Watch from 02:36 to 03:52. The video demonstrates creating a virtual environment with venv and installing Django using pip.
As shown in the video, the installation is a single command:
pip install django
After the installation completes, you can verify that Django is installed correctly by checking its version:
django-admin --version
This command should output the installed version number.
3. Creating Your First Project
Now that Django is installed, you can use its command-line utility, django-admin, to generate the boilerplate code for a new project. A Django project is a collection of settings for an instance of Django, including database configuration, Django-specific options, and application-specific settings.
The command to use is startproject. It takes the name of your project's configuration package as an argument. A common best practice is to create the project in the current directory to avoid an extra layer of folder nesting.
django-admin startproject mysite .
Let's break this command down:
django-admin startproject: The command to create a new project.mysite: This will be the name of the Python package containing your project's settings (e.g.,settings.py,urls.py). You can name this whatever you like;configis another popular choice..(the dot): This is crucial. It tells Django to create the project in the current directory, which avoids the redundantproject-name/project-name/structure.
The following resources provide both a video walkthrough and the official documentation for this process.
Python Django Tutorial for Web Applications (Step-by-Step Setup in 25 Minutes)
This clip continues from the previous video and shows exactly how to use the django-admin startproject command.
Watch from 03:52 to 04:36. Pay attention to the use of the dot (.) at the end of the command to define the project in the current directory.
Writing your first Django app, part 1
For a textual reference, read this section from the official Django documentation. It explains the startproject command and the files it creates.
In the linked tutorial, read the section titled 'Creating a project'. This will reinforce what the video showed and provide a list of the generated files.
After running the command, your directory should look something like this:
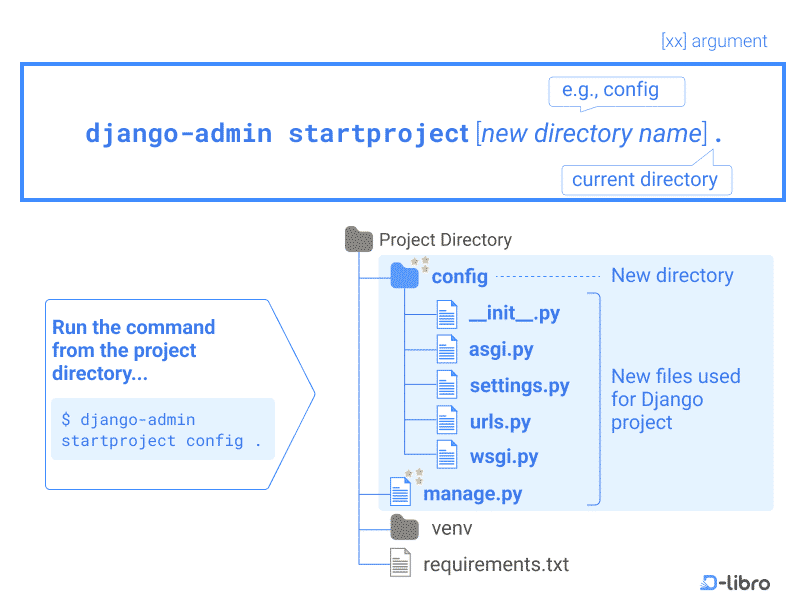
You now have a manage.py file and a mysite directory. We will explore the purpose of each of these files in the next lesson.
Test your understanding!
You are starting a new project for an online blog. You are already inside a directory named blog_project with an active virtual environment. What single command would you run to create a new Django project where the configuration files are stored in a package named config?
Show answer
django-admin startproject config .
This command creates the project in the current directory (.) and names the inner configuration package config.
4. Running the Development Server
The final step is to verify that the project works. Django comes with a lightweight web server intended for development purposes. You can start it using the manage.py script.
The manage.py script is a command-line utility that is automatically created in each Django project. It's a thin wrapper around django-admin that also sets the DJANGO_SETTINGS_MODULE environment variable to point to your project’s settings.py file. From now on, we will use python manage.py for project-specific commands instead of django-admin.
Run the following command in your terminal:
python manage.py runserver
You should see output similar to this, indicating the server has started:
Performing system checks...
System check identified no issues (0 silenced).

You have unapplied migrations; your app may not work properly until they are applied.
Run 'python manage.py migrate' to apply them.

February 07, 2024 - 15:50:53
Django version 4.2, using settings 'mysite.settings'
Starting development server at http://127.0.0.1:8000/
Quit the server with CONTROL-C.
(Don't worry about the "unapplied migrations" warning for now; we'll cover that in a future module.)
Now, open a web browser and navigate to http://127.0.0.1:8000/. You should see a "Congratulations!" page with a rocket. This confirms your Django project was created successfully!
This section from the Django documentation explains the process clearly.
Writing your first Django app, part 1
Read this section from the Django documentation to understand how to use the development server.
Find the section titled 'The development server'. It describes the runserver command and what to expect when you visit the URL.
Conclusion
Congratulations on setting up your first Django project! This is a fundamental skill that you will use every time you start a new Django application.
Here are the key takeaways from this lesson:
- Always use a virtual environment (
venv) to isolate project dependencies. - Install Django from PyPI using
pip install django. - Create a new project skeleton using
django-admin startproject <name> .. - Use the
manage.pyscript for project-specific commands, likerunserver. - The built-in development server is your tool for rapid development and testing.
In the next lesson, we will dive into the files and directories that startproject created. You will learn the purpose of settings.py, urls.py, and manage.py, giving you a clear understanding of your project's architecture.