Hello! Welcome to the third lesson in our Django journey.
In our last session, we created our first function-based views. These are the Python functions that contain the logic for handling requests. However, a view is just a function in a file until we tell Django when to call it. This is where URL routing comes in.
This lesson focuses on Django's URL dispatcher, the mechanism that acts like a traffic cop for your website. It examines the incoming URL from a user's request and directs it to the correct view function. Your background in programming will be helpful here, as URL routing is essentially a form of pattern matching, a concept you're likely familiar with.
By the end of this lesson, you will be able to define clean, robust, and maintainable URL patterns using Django's path() and include() functions to route requests to your views.
1. The URL Dispatcher and urlpatterns
When a request hits your Django project, the first piece of code that really matters for routing is the urls.py file in your project directory (e.g., myproject/urls.py). This file acts as the main "table of contents" for your site. Inside it, Django looks for a list called urlpatterns.
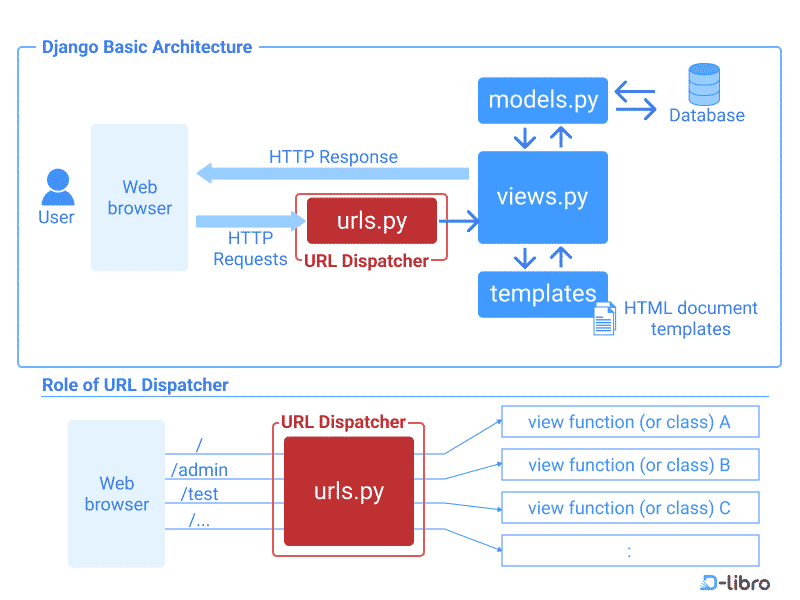
The urlpatterns list is where you define the mappings between URL patterns and views. Each mapping is created using the path() function.
2. Defining Basic Routes with path()
The path() function has two required arguments and one highly recommended one:
route: A string containing a URL pattern.view: The view function that should be called if the pattern matches.name(optional but recommended): A unique name for this URL pattern, which allows you to refer to it easily from other parts of your Django project. We'll see why this is so important later.
Let's see this in practice.
Django 2 URLs Tutorial For Beginners (2018)
This short video demonstrates how to create your first URL pattern using path() to connect a URL like /test/ to a view function.
Watch from 00:10 to 02:12. Pay attention to how the path() function is used inside the urlpatterns list to map a string route to a view function.
As the video shows, if you have a view called about_view in your pages/views.py, you can map it to the /about/ URL like this:
# myproject/urls.py

from django.contrib import admin
from django.urls import path
from pages import views  # Assuming you have a 'pages' app

urlpatterns = [
    path('admin/', admin.site.urls),
    path('about/', views.about_view, name='about'),
    # An empty string '' matches the root URL (e.g., yoursite.com/)
    path('', views.home_view, name='home'),
]
Capturing Data from URLs
Static URLs are useful, but web applications often need dynamic URLs that capture parts of the URL as data. For example, blog/posts/2024/ or products/123/. Django handles this with path converters.
Django URL Routing: The Ultimate Traffic Cop for Your Web App
This article provides a clear explanation and examples of path converters, which allow you to create dynamic URLs.
Read the section 'Capturing Data from URLs: The Real Power'. Note the different types of converters like <int:name> and <slug:name> and see how the captured value is passed as a keyword argument to the view function.
As the article explains, you include converters in the route string. The captured value is then passed as an argument to your view function.
For example, to capture a numeric product ID:
In urls.py:
# The <int:product_id> part captures an integer from the URL
path('products/<int:product_id>/', views.product_detail, name='product_detail'),
In views.py:
from django.http import HttpResponse

# The captured 'product_id' is passed as an argument to the view
def product_detail(request, product_id):
    return HttpResponse(f"<h1>Displaying details for Product ID: {product_id}</h1>")
Now, a request to /products/42/ would call product_detail(request, product_id=42).
Test your understanding!
Write a URL pattern using path() that would match a URL like /articles/my-first-post/. The part my-first-post is a "slug" (a string with letters, numbers, hyphens, or underscores). This pattern should call a view named article_detail. How would you define the article_detail view function in views.py to accept this slug?
Show answer
In urls.py:
path('articles/<slug:article_slug>/', views.article_detail, name='article_detail'),
In views.py:
The view function must accept article_slug as a keyword argument.
def article_detail(request, article_slug):
    # You would typically use this slug to look up an article in the database
    return HttpResponse(f"Displaying article with slug: {article_slug}")
3. Modular Routing with include()
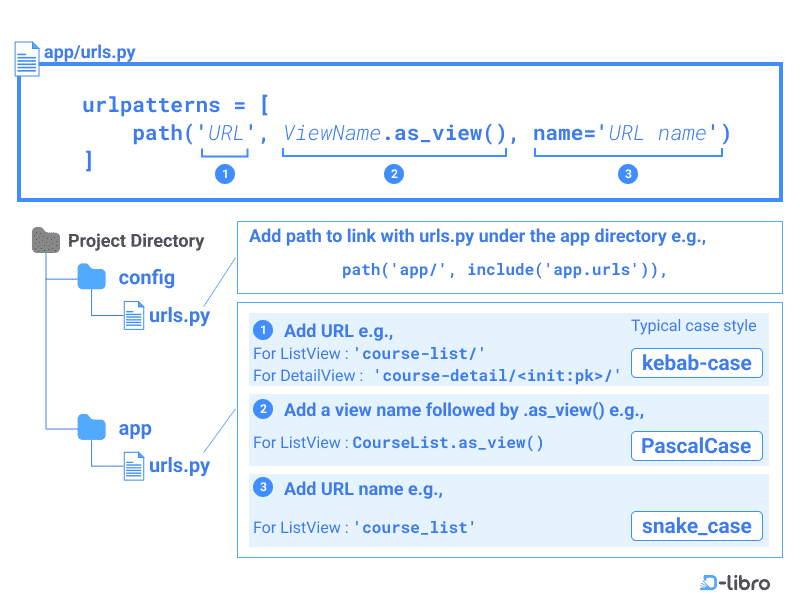
As your project grows, putting all URL patterns into the project's single urls.py file becomes unmanageable. The best practice is to have each app manage its own set of URLs. This makes your apps more modular and reusable—a core principle of Django design.
You achieve this with the include() function.
The process is simple:
- In your project's
urls.py, you usepath()to define a prefix (e.g.,blog/) and tell it toinclude()the URLs from a specific app. - You create a new
urls.pyfile inside your app directory (blog/urls.py) to define the URL patterns specific to that app.
Writing your first Django app, part 1 | Django documentation
The official Django documentation explains the philosophy behind include() perfectly. It's about creating 'plug-and-play' apps.
Read the sections 'Write your first view' and the subsequent section that points the root URLconf at the polls.urls module. Focus on the explanation of why include() is used and how it makes apps portable.
Let's see this structure in action.
This video from Tech With Tim provides an excellent walkthrough of setting up app-specific URLs and connecting them to the main project using include().
Watch from 06:51 to 10:06. The key concept here is how the project's urls.py handles the URL prefix (my_app/) and passes the rest of the URL string to the app's urls.py for further processing.
Here is a summary of the structure:
Project myproject/urls.py:
from django.urls import path, include

urlpatterns = [
    path('admin/', admin.site.urls),
    # Any URL starting with 'blog/' will be handled by the blog app's urls.py
    path('blog/', include('blog.urls')),
]
App blog/urls.py (you create this file):
from django.urls import path
from . import views

urlpatterns = [
    # Matches the root of the included path: /blog/
    path('', views.post_list, name='post_list'),
    # Matches /blog/123/
    path('<int:post_id>/', views.post_detail, name='post_detail'),
]
This powerful pattern allows you to change the base URL for the entire blog app with a single edit in the project's urls.py file (e.g., changing 'blog/' to 'articles/') without touching any code inside the blog app.
4. Naming URLs for Maintainability
We've been adding the name argument to our path() functions. Why? Because hardcoding URLs in your templates and views is a terrible practice. If you change a URL, you'd have to find and replace it everywhere.
By giving a URL a name, you can refer to it by that name, and Django will dynamically generate the correct URL path for you.
- In templates:
{% url 'name_of_url' %} - In views (Python code):
reverse('name_of_url')
Django 2 URLs Tutorial For Beginners (2018)
Let's see how naming works and why it's so critical. This video covers naming URLs and then introduces namespaces, which are essential for preventing name conflicts in larger projects.
Watch from 07:41 to 10:09. First, focus on how a name is added to a path and used with the reverse() function. Then, pay close attention to the concept of namespaces to avoid name collisions between different apps (e.g., if two apps both have a 'detail' view).
To avoid name collisions (e.g., two different apps having a view named detail), we use namespaces. You define a namespace in two places:
- In your app's
blog/urls.py: Add a variableapp_name.app_name = 'blog' # This defines the namespace urlpatterns = [ ... ] - In your project's
myproject/urls.py: Theinclude()function can take the app's URL module and a namespace. However, modern Django practice is to simply let theapp_namein the app'surls.pyhandle this. A clearer way to useincludeis justinclude('blog.urls').
When you have a namespace, you reverse the URL using the format 'namespace:name'.
- In templates:
{% url 'blog:post_detail' post_id=123 %} - In views:
reverse('blog:post_detail', kwargs={'post_id': 123})
This makes your code incredibly robust to changes in your URL structure.
Conclusion
You've now mastered the role of Django's URL dispatcher. You have the tools to design a clean, logical, and scalable URL structure for any project.
Key Takeaways:
- The project's
urls.pyis the main entry point for URL routing. - The
path()function maps a URLroutestring to aview. - Path converters (e.g.,
<int:pk>,<slug:slug>) capture dynamic segments from a URL and pass them as arguments to your view. - The
include()function is essential for modularity, allowing each app to manage its ownurls.pyfile. This is the standard for any non-trivial Django project. - Naming your URLs (e.g.,
name='post_detail') and using namespaces (app_name = 'blog') is critical for writing maintainable, long-lasting applications. Always refer to URLs by their names, not by hardcoded paths.
In our next lesson, we'll start making our views more interesting. Now that we can route requests correctly and even pull data from the URL, our next step is to learn how to pass data from a view into an HTML template using a context dictionary. This will let us move beyond simple HttpResponse strings and start building real web pages.