Hello! In our last lesson, we covered the essential Python data structures—lists and dictionaries—and how to encapsulate logic using functions. This gave you the fundamental tools for manipulating data within a Python script.
Today, we'll bridge the gap between your local Python environment and the vast world of web services. The goal of this lesson is to learn how to parse JSON data and make authenticated HTTP requests. For anyone with a background in web development, these concepts will be familiar, but we will focus on Python's specific and powerful tools for handling them. Mastering these skills is the final step before you can start interacting directly with Large Language Model APIs, which is the central aim of our next lesson.
Understanding JSON in the Python Ecosystem
As a full-stack developer, you're undoubtedly familiar with JSON (JavaScript Object Notation) as the standard format for data exchange between servers and clients. In Python, the relationship is particularly convenient because the structure of JSON is nearly identical to that of a Python dictionary.
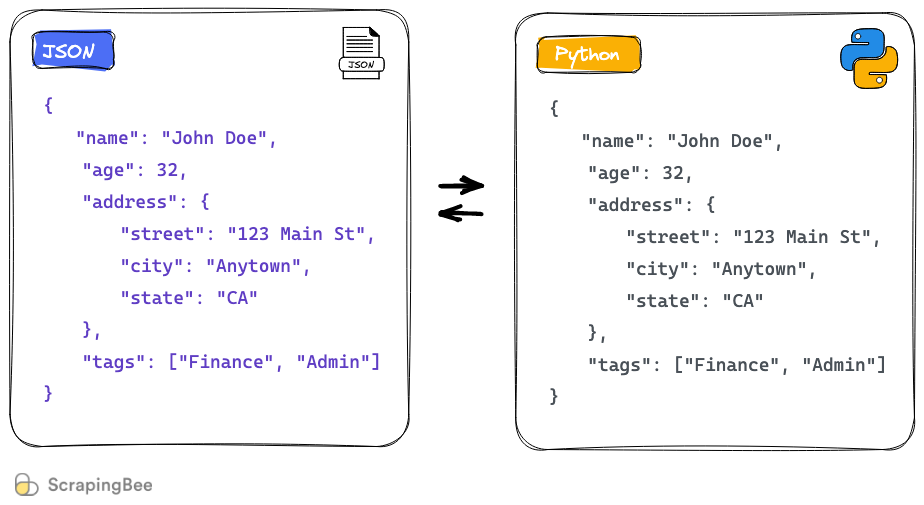
This structural similarity means that converting JSON data into a native Python object you can work with is a very straightforward process. Python provides a built-in module called json for exactly this purpose.
The two primary functions you'll use for decoding (or parsing) JSON are:
json.loads(): Takes a JSON formatted string as input and returns a Python dictionary.json.load(): Takes a file-like object (e.g., from an open file) containing JSON data and returns a Python dictionary.
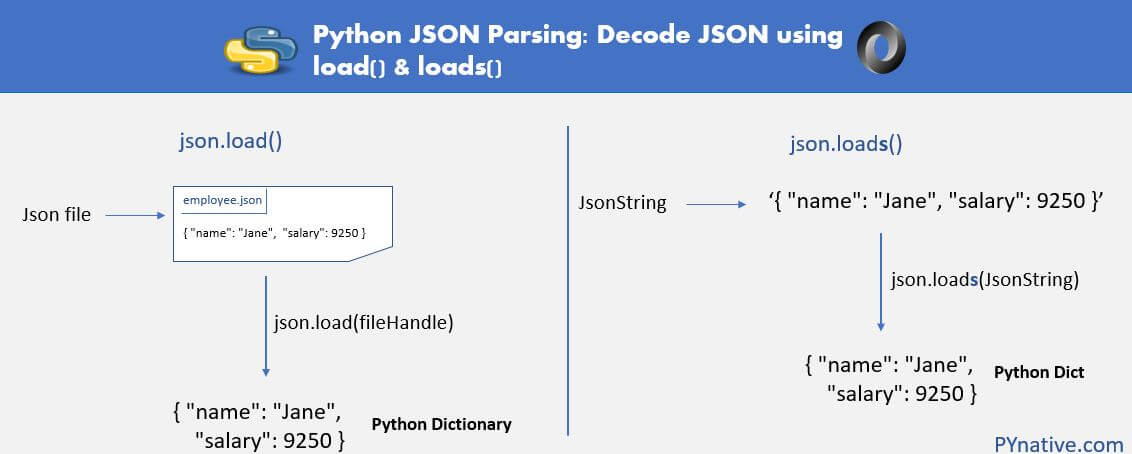
While you'll encounter both, json.loads() is often used implicitly when working with API responses, as we'll see next. The key takeaway is that once you have a JSON response from an API, converting it into a Python dictionary you already know how to manipulate is trivial.
Making HTTP Requests with the requests Library
In PHP, you might have used cURL or a library like Guzzle to handle HTTP requests. In Python, the gold standard is the requests library. It provides a simple and elegant API for what can otherwise be a complex process.
Before we dive into the code, let's watch a short conceptual overview of the request-response cycle.
Master Python Requests In 15 Minutes. Call Any API
This video from Tech With Tim provides an excellent high-level explanation of the components of a web request and response.
Please watch the first part of the video, from the beginning until the conceptual overview. This will refresh your memory on URLs, request methods (GET, POST), headers, and status codes.
Now that we've reviewed the concepts, let's see how to implement them in Python. First, you'll need to install the requests library in your virtual environment, just as you did with other packages in our first lesson:
pip install requests
With requests installed, you can fetch data from an API with just one line of code. The following reading will guide you through making a request and handling the response.
Python's Requests Library (Guide)
This guide from Real Python is a comprehensive tutorial on the requests library. We'll focus on the sections for making a request and parsing the JSON response.
First, read the section Make a GET Request to see the basic syntax. Next, read the section Inspect the Response. Pay close attention to these three parts: Status Codes: How to check response.status_code to see if your request was successful (e.g., 200). Response Content: The difference between response.content (bytes) and response.text (string). JSON Responses: The most important part for us is the response.json() method, which directly converts a JSON response into a Python dictionary. This is the method you will use most often.
To summarize, a typical workflow for a simple GET request looks like this:
- Import the library:
import requests - Make the request:
response = requests.get("https://api.example.com/data") - Check for success:
if response.status_code == 200: - Parse the JSON:
data = response.json() - Work with the data as a standard Python dictionary:
print(data['some_key'])
Authenticating Your Requests
Most useful APIs, including those for LLMs, require authentication to identify the caller and control access. A common method is using a Bearer Token, which is a long string of characters that you include in an Authorization header with your request.
The requests library makes it easy to add custom headers to any request.
Python's Requests Library (Guide)
Let's return to the Real Python guide to see how to add headers and handle authentication.
First, read Customize Request Headers. This shows how to pass a dictionary of headers to a request using the headers parameter. Next, skip down and read the part of the "Use Authentication" section that deals with tokens. Start at the GitHub example. While the guide shows a custom class for creating the token, the key principle is constructing an Authorization header with the value "Bearer YOUR_TOKEN".
The core pattern for bearer token authentication is to create a dictionary for your headers and pass it to your request function:
import requests
import os # We'll use this to securely access the token


# Best practice: Store your API token as an environment variable,
# not directly in your code.
# For now, you can just replace os.getenv("GITHUB_TOKEN") with your token string.
API_TOKEN = os.getenv("GITHUB_TOKEN")


# The URL for the authenticated user endpoint
url = "https://api.github.com/user"


# Create the headers dictionary
headers = {
    "Authorization": f"Bearer {API_TOKEN}"
}


# Make the request with the custom headers
response = requests.get(url, headers=headers)


# Process the response
if response.status_code == 200:
    user_data = response.json()
    print(f"Successfully authenticated as: {user_data['login']}")
else:
    print(f"Failed to authenticate. Status code: {response.status_code}")
    print(response.json())
This pattern—defining a URL, constructing headers with an API token, making the request, and parsing the JSON response—is precisely what you'll need for the OpenAI API.
Your Turn: Putting It All Together
Let's practice by making a real, authenticated API call to GitHub.
Task: Write a Python script that fetches your public GitHub user profile information.
Steps:
-
Generate a Personal Access Token:
- Go to your GitHub settings: https://github.com/settings/tokens.
- Click "Generate new token" -> "Generate new token (classic)".
- Give it a note (e.g., "Python Agent Course").
- Set an expiration.
- Under "Select scopes", you don't need to check any boxes for this task (the default
read:userscope is enough). - Click "Generate token" and copy the token immediately. You won't be able to see it again.
-
Write the Python Script:
- Create a new Python file (e.g.,
github_api.py). - Use the code snippet from the "Authenticating Your Requests" section above as a template.
- Replace
os.getenv("GITHUB_TOKEN")with the actual token string you just generated. Warning: This is not a secure practice for production code, but it is acceptable for this local exercise. In real projects, you should always use environment variables. - Run the script.
- Create a new Python file (e.g.,
If successful, the script should print your GitHub username.
Click here to see the completed solution
import requests


# IMPORTANT: Replace "YOUR_GITHUB_TOKEN_HERE" with the token you generated.
API_TOKEN = "YOUR_GITHUB_TOKEN_HERE"


# The URL for the authenticated user endpoint on the GitHub API
url = "https://api.github.com/user"


# Create the headers dictionary for authentication.
# The f-string inserts your token into the "Bearer <token>" format.
headers = {
    "Authorization": f"Bearer {API_TOKEN}",
    "Accept": "application/vnd.github.v3+json" # Good practice to specify API version
}

print(f"Making a request to: {url}")


# Make the GET request, passing both the URL and the headers
response = requests.get(url, headers=headers)


# Check the status code of the response
print(f"Received status code: {response.status_code}")


# If the request was successful (status code 200-299), process the data
if response.status_code == 200:


    # Use the .json() method to parse the JSON response into a Python dictionary
    user_data = response.json()


    # Print a friendly message using data from the response
    print("---")
    print(f"Successfully authenticated as: {user_data['login']}")
    print(f"Name: {user_data.get('name', 'N/A')}") # .get() is safer than ['key']
    print(f"Public Repos: {user_data['public_repos']}")
    print("---")


# If the request failed, print the error details
else:
    print("---")
    print("Failed to authenticate or fetch data.")


    # Printing the response text can help debug the issue
    print(f"Response: {response.text}")
    print("---")
Conclusion
In this lesson, you've connected your Python skills to the wider internet. You've learned how to handle the ubiquitous JSON data format and how to communicate with web services using the powerful requests library.
Key Takeaways:
- JSON's structure maps directly to Python dictionaries, and the built-in
jsonmodule facilitates conversion. - The
requestslibrary simplifies making HTTP requests in Python. requests.get()is used to retrieve data, and the returnedresponseobject contains the status code, headers, and content.- The
response.json()method is the most direct way to parse a JSON API response into a Python dictionary. - Authentication is typically handled by passing an API key or token in the request headers, using the
headersparameter inrequests.
You are now fully equipped to start working with modern web APIs. In our next lesson, we will use these exact skills to make your first API call to OpenAI, retrieve a response from a powerful language model, and take your first concrete step into building agentic AI.