Introduction
Welcome to the first lesson of our new module, "Understanding Light, Form, and Shadow." In the previous module, you mastered the art of creating accurate line drawings by focusing on proportions and measurement. You now have the skills to build the "scaffolding" of a drawing. Today, we begin the process of turning that scaffolding into a solid, three-dimensional form.
This lesson focuses on the very first and most crucial step in shading: learning to see and analyze light. Before you can draw a shadow, you must understand the light that causes it. Our goal is to be able to look at any reference image or real-life scene and confidently identify the direction, quality (hard/soft), and number of light sources. This skill is the bedrock upon which all believable shading is built.
The Three Fundamental Questions of Light
When you look at a subject you intend to draw, you're not just looking at an object; you're looking at how light interacts with that object. To deconstruct what you're seeing, you need to ask three fundamental questions:
- Direction: Where is the light coming from? (e.g., above, from the side, from behind?)
- Quality: Is the light hard or soft?
- Number: How many light sources are there?
Let's break down how to answer each of these questions.
1. Identifying Light Direction
The direction of the light source is what defines the basic pattern of light and shadow on an object. There are two primary clues to look for:
- The Highlight: The brightest spot on an object is where the light is hitting it most directly. It acts like a signpost pointing back to the light source.
- The Cast Shadow: The shadow an object throws onto a surface will always point directly away from the light source.
To get a better sense of how the light's position affects these clues, let's watch a couple of short video segments.
First, this clip from Proko's video "Painting Light and Form" explains the fundamental difference between a distant light source (like the sun) and a close one (like a lamp). This distinction is key to understanding how cast shadows behave.
Watch the beginning of the video, from 00:00 to 03:46. Pay attention to the concepts of parallel light rays from a distant source versus radiating rays from a close source, and the idea of 'light falloff'.
[TSC 01.04] Understanding Light Types in Art
Now, let's watch a clip from Dorian Iten that provides a clear visual demonstration of these concepts. Notice how the size and shape of the cast shadow change as the light source moves farther away.
Watch from the start until 02:07. Focus on the visual difference between the cast shadows created by close, average, and distant light sources.
So, when analyzing a reference:
- Distant Light (e.g., Sun): Light rays are effectively parallel. Cast shadows from different objects will all point in the same direction and have similar shapes.
- Close Light (e.g., Lamp): Light rays radiate outwards from a single point. Cast shadows will fan out away from the light source.
Take a look at the image below. For each of the twelve heads, a red arrow indicates the light's direction. Trace the light from the source to the highlights on the face, and then notice how the shadows fall on the opposite side.

2. Identifying Light Quality: Hard vs. Soft
The "quality" of light refers to the character of the shadows it creates. This is arguably the most important factor in setting the mood of a drawing.
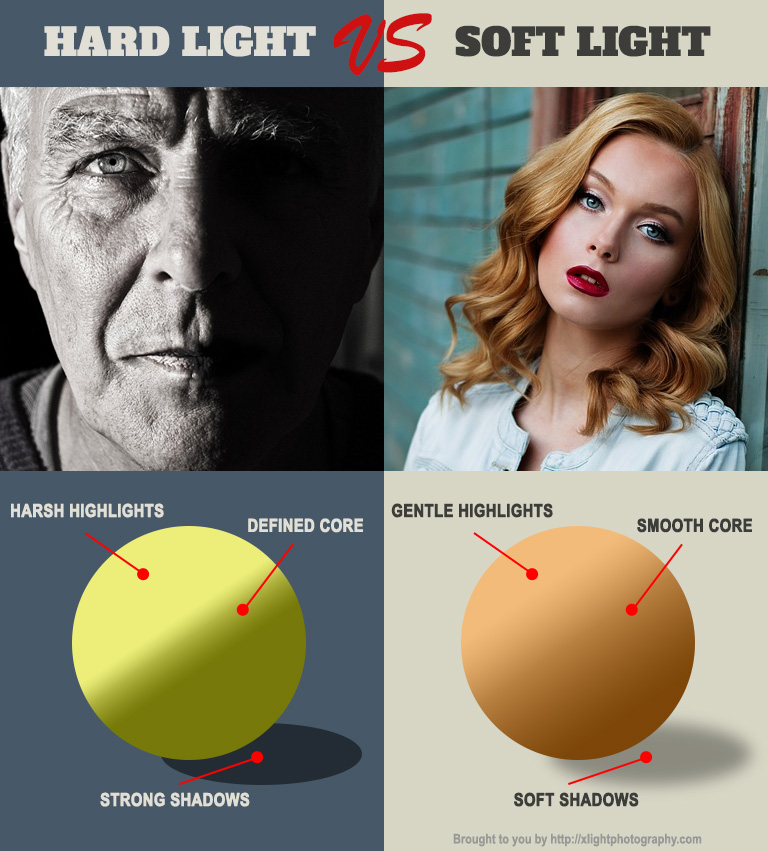
- Hard Light comes from a small, direct source (like the sun on a clear day or a bare lightbulb). It creates high contrast with sharp, clearly defined shadow edges.
- Soft Light comes from a large, diffused source (like an overcast sky or light from a large window). It creates low contrast with blurry, gradated shadow edges.
Why does the size of the light source matter? Let's explore the theory.
This segment from the Proko video explains that soft light is the result of light 'scattering' from many different directions. This conceptual understanding is very powerful.
Watch from 03:46 to 06:59. The key idea here is that a large light source (or a diffused one, like a cloudy sky) acts like an array of many small light sources, which blurs the edges of shadows.
To see this in practice, let's turn back to Dorian Iten's video.
[TSC 01.04] Understanding Light Types in Art
Here, you'll see a practical comparison of a direct light versus one softened by a diffuser. Observe the dramatic change in the shadow edges.
Watch from 02:07 to 03:42. Focus on the difference in the cast shadow and the 'terminator' (the edge of the shadow on the object itself) between the direct and soft light examples.
The image below provides a perfect summary. The main clue for identifying light quality is the edge of the cast shadow. Is it sharp and crisp (hard light) or soft and blurry (soft light)?
3. Identifying the Number of Light Sources
Few scenes are lit by only one light. In most cases, you have a primary (key) light source and one or more secondary light sources. These secondary sources can be other lamps, but more often they are:
- Ambient Light: The general, non-directional light filling a room.
- Bounce Light: Light that reflects off nearby surfaces (like a wall or tabletop) and back onto the object, faintly illuminating its shadow side.
Looking for multiple light sources is how you add realism and subtlety to a drawing. The easiest clue is seeing multiple cast shadows.
[TSC 01.04] Understanding Light Types in Art
Let's see what happens when we introduce a second light source. This clip clearly illustrates the effect.
Watch from 04:33 to 05:34. Notice how the two lights create two distinct cast shadows, and how the area where they overlap is the darkest.
Even a scene with a single bulb or the sun can have multiple functional light sources.
This final clip from Proko puts it all together, showing how a single sunny day scene actually involves three light sources: the sun (key light), the blue sky (fill light), and the ground (bounce light).
Watch from 09:20 to 11:07. This is a crucial concept for understanding realistic outdoor and indoor lighting.
Exercise: Light Analysis (20-25 minutes)
It's time to practice your new analytical skills. This is not a drawing exercise, but an observation one.
- Find 3-5 different reference photos. You can search for "portrait photography," "still life," or look at photos you've taken. Try to find a variety of lighting situations (some indoors, some outdoors, some with dramatic shadows, some soft).
- For each image, take a moment to study it and then write down your answers to our three key questions:
- Direction: Where is the main light source located relative to the subject? (e.g., "High and to the left.") What clue was most helpful (highlight, cast shadow)?
- Quality: Is the primary light hard or soft? What clue told you this (shadow edges)?
- Number: Can you see evidence of more than one light source? (e.g., "Yes, there's a main hard light from the right, but the shadows on the left are a bit illuminated, suggesting bounce light from a wall.") What clues point to this (faint secondary shadows, filled-in dark areas)?
Take your time with this. The goal is to train your eye to deconstruct the light in any scene.
Conclusion
Great work today. You've taken the first and most important step towards creating realistic shading: learning to observe and understand light. You are no longer just seeing "light" and "dark," but are beginning to analyze the specific properties that create the forms you see.
Key Takeaways:
- To understand shading, you must first analyze the light by asking three questions: What is its direction, quality (hard/soft), and number?
- Direction is revealed by highlights and the direction of cast shadows.
- Quality is revealed by the sharpness of shadow edges. Sharp edges mean hard light; soft edges mean soft light.
- Number is revealed by multiple cast shadows or by filled-in shadows, which indicate ambient or bounce light.
In our next lesson, we will build directly on this foundation. Now that you can identify the light sources, we will learn to identify and name the specific parts of the shadows they create—the form shadow, cast shadow, core shadow, and reflected light. This will give you a precise roadmap to follow when you start applying pencil to paper.