Introduction
Welcome back! In our last lesson, we focused on giving the eye three-dimensional form by understanding it as a sphere resting within the eye socket. This structural approach is fundamental, and we're going to continue using it as we move to the next feature of the face.
Today, your goal is to draw the nose using a simplified planar structure from front, side, and three-quarter views. The nose can be intimidating because of its subtle curves and complex form. However, just like with the eye, the key is to look past the surface details and see the simple geometry underneath.
This process of breaking down a complex form into simpler, manageable geometric components is a powerful problem-solving strategy in art, much like functional decomposition is in programming. By thinking of the nose as a series of flat planes (a planar structure), you can master its perspective and form before adding any details.
1. Seeing the Nose as a Simple Form
The first and most crucial step is to stop seeing a "nose" and start seeing a simple, boxy, wedge-like shape attached to the face. This simplified block has a front plane, two side planes, and a bottom plane. Understanding how this block turns in space is 90% of the battle.
Let's watch a video that introduces this core concept brilliantly.
How to Draw a Nose - Anatomy and Structure
Artist Stan Prokopenko excels at breaking down complex anatomy. In this first segment from his video, "How to Draw a Nose - Anatomy and Structure," he demonstrates how to simplify the nose into a basic box and shows how its planes change as the head turns.
Watch from 00:44 to 02:26. Your main focus should be on how the widths and angles of the front, side, and bottom planes change as the view shifts from front, to three-quarter, to side, and as it tilts up and down. This is the key to creating a nose that feels solid and correctly oriented.
This planar simplification is your primary tool. Before you draw a single curve, you should be able to visualize this simple boxy structure on the face, correctly oriented in perspective.
2. The "Why": Anatomy Behind the Planes
Now that you have the simplified model, let's briefly look at the "why." The planes of the nose aren't arbitrary; they are a direct simplification of the underlying bone and cartilage. Understanding this will help you place your planes more accurately and eventually add believable details.
The nose can be broken down into three main parts:
- The Bridge: The upper, bony part. This forms the top of our wedge.
- The Ball: The fleshy, cartilaginous tip of the nose.
- The Wings (Alae): The cartilaginous structures that form the nostrils.
Let's see how these parts relate to our planar model.
How to Draw a Nose - Anatomy and Structure
We'll continue with the Proko video. This next section connects the simplified planes to the actual anatomy of the nose.
Watch from 02:26 to 04:31. As you watch, try to map the three main parts (Bridge, Ball, Wings) to the planar block you learned about in the first clip. Notice how the combination of cartilage pieces creates the forms for the bottom half of the nose.
By knowing what's under the skin, your simplified model gains a new layer of logic. You're no longer just drawing a box; you're drawing a simplified representation of bone and cartilage.
3. The "How": A Step-by-Step Construction
With the theory in place, let's move to the practical application. How do you use this knowledge to construct a nose from scratch? We will follow a clear, step-by-step process that builds from a simple planar block to a more refined nose.
This next video demonstrates a complete construction process for the front, side, and three-quarter views.
How To Draw Noses - Anatomy For Artists (Study Session)
In his study session video, artist Dan Beardshaw provides a very clear, repeatable process for drawing the nose using planes. This is where we put theory into practice.
Watch from 04:59 to 08:12. Pay close attention to his method: He starts with the overall planar box to establish perspective. He lightly sketches the main parts inside this box (upper cartilage, ball, wings). He then refines the outlines. Notice how he applies this exact same process to the front, side, and three-quarter views. This is the method you will use in your practice drill.
This systematic approach—from the big, simple box to the smaller, refined parts—ensures your nose is structurally sound from the very beginning.

4. Practice Drill: Constructing the Nose from Three Views
Time to put your pencil to paper. Your goal is not to create a perfectly shaded, realistic nose, but to practice the construction process. This is about building confident, structurally sound underdrawings.
Your Task (20-25 minutes):
- Take a clean page in your sketchbook. Divide it into three sections: Front, Side, and Three-Quarter.
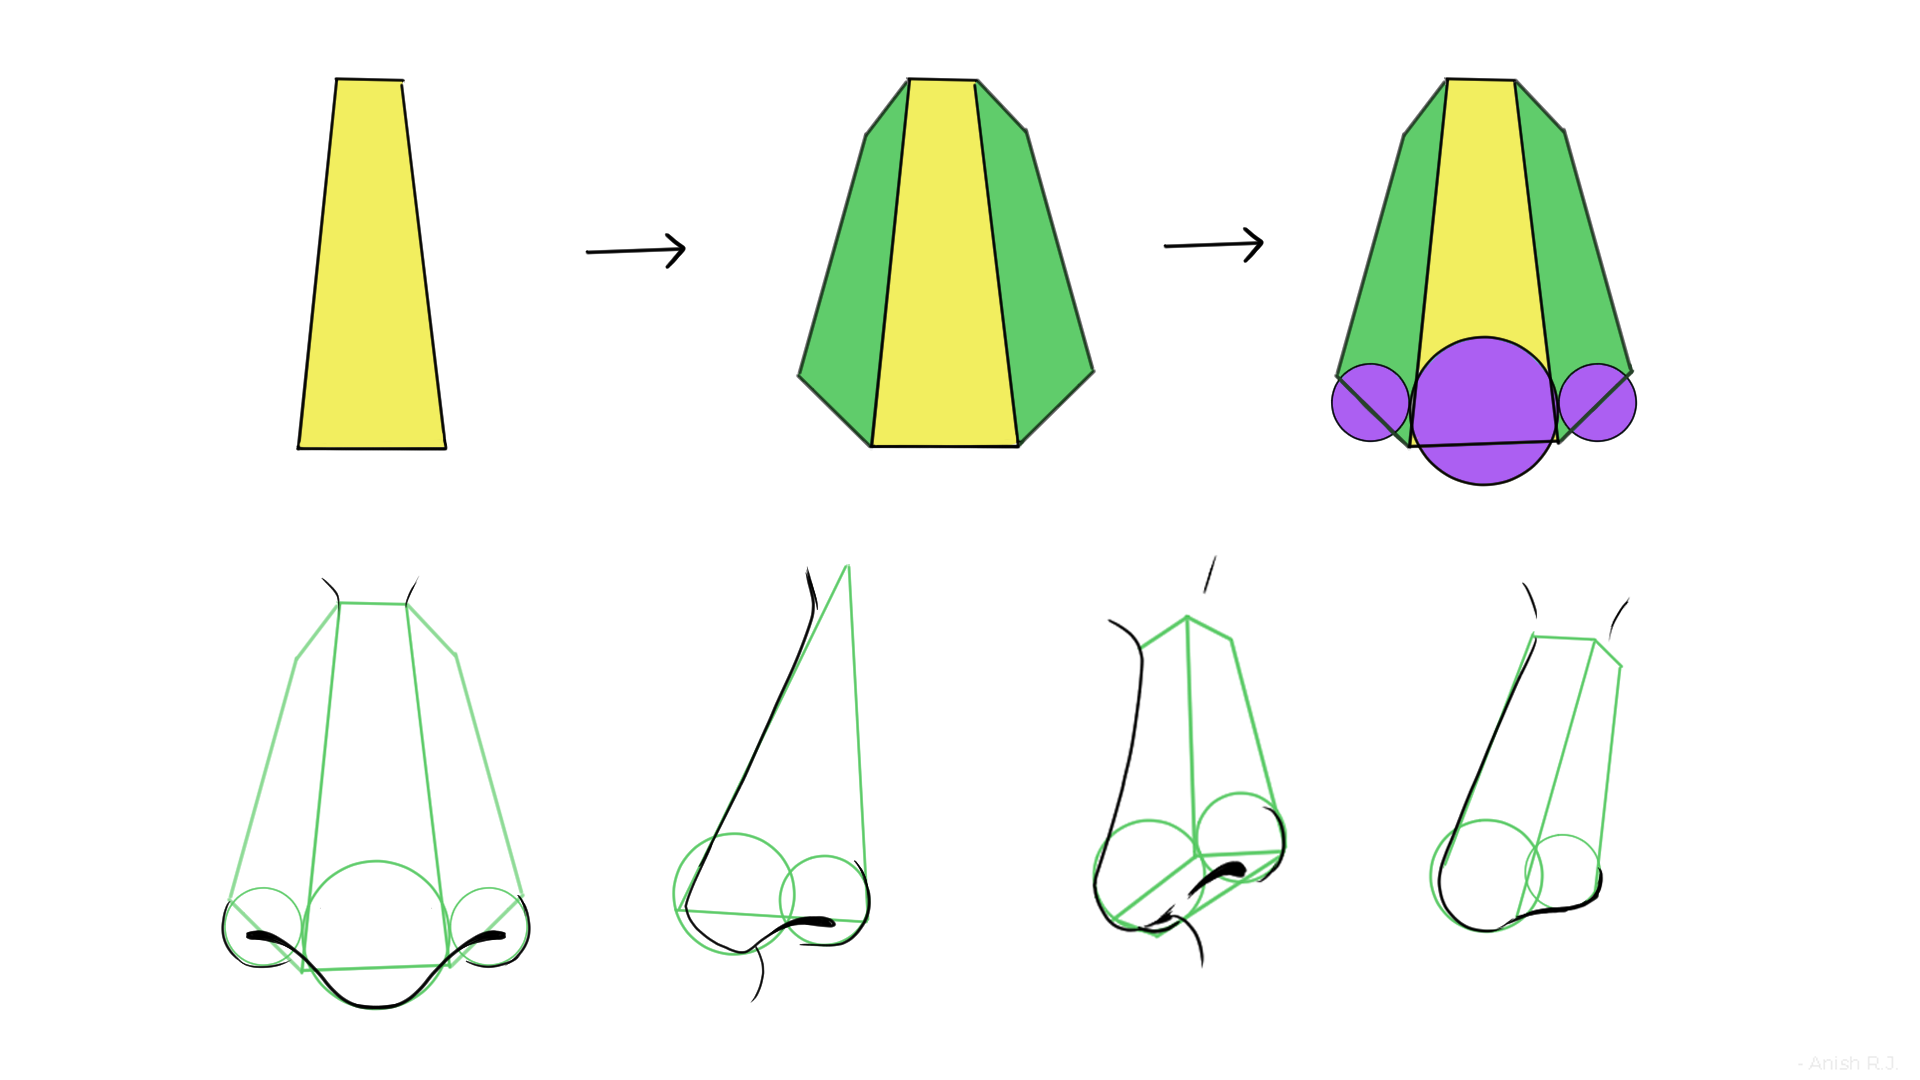
- In each section, use the method demonstrated by Dan Beardshaw and summarized in the image above to construct the nose for that view.
- For each view, follow these steps:
- Step 1: Block-in. Lightly draw the main wedge/box shape to define the nose's overall form and perspective.
- Step 2: Subdivide. Inside the block, sketch the main components: the ball and wings. For the front and 3/4 views, you can use the "three circles" method shown in many tutorials to help place the ball and wings.
- Step 3: Refine. Draw the final contour lines of the nose over your construction, defining the bridge, tip, and nostrils.
- Once you complete all three views, do it again. Aim to draw each view at least 2-3 times. Repetition is key to internalizing the process.
- Focus on the construction, not the details. Use confident lines for your final contour but keep the construction lines light.
Conclusion
Excellent work today. You've successfully deconstructed the nose into a manageable, logical structure. This planar approach is one of the most powerful tools in an artist's arsenal, allowing you to tackle any complex form with confidence.
Key Takeaways:
- To draw the nose, first simplify it into a wedge-like block with front, side, and bottom planes.
- This planar structure is a simplification of the underlying anatomy: the bony bridge and the cartilaginous ball and wings.
- The drawing process is systematic: establish the main planar form in perspective, block in the major components, and then refine the contours.
- This method is versatile and can be applied to draw the nose accurately from any angle, especially the front, side, and three-quarter views.
In our next lesson, we will move down the face to the mouth. You'll learn how to draw the mouth and lips, considering the curvature of the underlying teeth and jaw, once again using structural thinking to build believable forms.