Hello again! Welcome back to your second lesson.
In our first session, you learned the foundational ghosting technique to create single, confident strokes by separating the planning of a line from its execution. This was our first major step towards achieving the "confident line work" you're aiming for.
Today, we're going to build directly on that foundation. Our learning outcome is to draw smooth straight and curved lines of varying lengths and weights. You'll learn to modulate your strokes, moving beyond a single type of line to a whole vocabulary of marks. Think of last lesson as learning to play a single, clear note on an instrument. Today, you'll learn to play that note at different volumes (weight), for different durations (length), and as part of a melody (curves). This control is what will start to make your drawings feel dynamic and alive.
1. The Mechanics of Line Length and Speed
A common misconception is that all lines are drawn with the same motion. In reality, your arm uses different sets of muscles for lines of different lengths, much like a programmer might use a small, specialized function for a simple task and a more complex class for a larger one.
To understand this better, let's explore which parts of your arm do the work.
10 Drawing Exercises for More Confident Lines and Hatching
This article, '10 Drawing Exercises for More Confident Lines and Hatching' by The Virtual Instructor, begins by explaining exactly how your fingers, wrist, and elbow/shoulder are used for different line lengths. This is a key piece of theory behind line control.
Read the section 'Working Your “Linear” Muscles'. It's near the top of the page. Pay attention to the descriptions of 'elbow', 'wrist', and 'fingers' lines.
To recap the key insight from that reading:
- Fingers: For very short lines and fine details (e.g., hatching, rendering textures).
- Wrist: For short to medium lines and curves.
- Elbow/Shoulder: For long, smooth, straight lines and large, sweeping curves.
As you learned with ghosting, drawing from the shoulder is key for long, straight lines. The speed of that motion is also critical. Drawing too slowly invites wobbles, while drawing too fast sacrifices control.
Let's revisit the Proko video from our last lesson for a reminder on finding the right pace.
6 Habits for Good Line Quality
In '6 Habits for Good Line Quality,' Proko discusses the importance of finding a comfortable drawing speed. This is crucial for creating smooth, energetic lines.
Watch the segment from 02:14 to 03:29. Notice the analogy of throwing a ball – it perfectly captures the balance between energy and control.
The goal is to be conscious and purposeful. Your hand should move just fast enough to be fluid but slow enough for your brain to be in command.
2. The Geometry of Curves
Drawing a smooth curve is less about "steering" your pencil and more about using your arm's natural mechanics. The most effective way to draw consistent curves is by using a part of your arm as a compass, rotating around a fixed pivot point.
- Small arcs: Use your wrist as a pivot.
- Large arcs: Use your elbow as a pivot.
- Circles: Use your shoulder as a pivot, allowing your whole arm to swing freely.
The following video provides an excellent demonstration of these mechanical principles in action.
How to Draw Better Curves - It's Important
This video, 'How to Draw Better Curves,' by Art of Wei, breaks down the physical movements for creating clean circles and arcs. It's a very practical and easy-to-follow guide.
Watch from 00:30 to 04:36. Focus on how the artist uses his wrist, elbow, and whole arm for different types of curves. Also note the tip about rotating the paper to find a comfortable drawing angle.
For more complex curves, like an 'S' shape, you don't have to draw them in one go. You can break them down into a series of simpler, connected arcs (often called C-curves). This is a powerful idea we will return to throughout the course.
3. Controlling Line Weight
Line weight—the thickness or thinness of a line—is one of the most expressive tools in drawing. It's controlled primarily by a combination of pressure and speed.
- More pressure = Thicker, darker line.
- Less pressure = Thinner, lighter line.
- Varying pressure during a single stroke creates a tapered line, which looks dynamic and fluid.
Let's explore how to practice this control.
TIP 328 Master Line-Weight: 3 Steps to Stunning Industrial Design ...
This article, 'Master Line-Weight,' from The Design Sketchbook, has a couple of short, relevant sections on the mechanics of practicing pressure control.
Read the two short sections titled 'Part 1.2| Practice line-weight using your pen pressure' and 'Part 2.1| The 3 sizes of lines'. These will give you a clear framework for thinking about pressure.
The key takeaway is to think in terms of at least three weights: thin (light pressure), medium (normal pressure), and thick (heavy pressure).
By changing your speed and how you lift the pencil, you can also control the start and end of your lines.
10 Drawing Exercises for More Confident Lines and Hatching
Let's return to the '10 Drawing Exercises' article. It has a fantastic exercise that breaks down different line characteristics based on pressure and speed.
Read 'Exercise 1 – Drawing Straight Lines'. Focus on the descriptions of lines a, b, c, and d, and how they are created. This is a direct application of line weight control.
4. Practice Drills (25-30 minutes)
Time to put theory into practice. These drills are designed to build muscle memory for everything we've discussed. Use your sketchbook and a simple graphite pencil (a standard HB is fine). Remember to use the ghosting technique for all these strokes!
Drill 1: The Line Weight Spectrum (5 mins)
- Draw a series of about 10-15 parallel straight lines, about 10 cm long.
- Start with the first line, applying the absolute lightest pressure you can while still making a mark.
- With each subsequent line, gradually increase the pressure.
- Your final line should be the darkest, thickest mark you can make without breaking your pencil tip.
- The goal is to create a smooth gradient of values across your lines.
Drill 2: Straight Line Variations (10 mins)
- Length Practice: On a fresh page, draw straight lines of various lengths, consciously thinking about the muscles you're using.
- Draw several long lines (15-20 cm) using your shoulder.
- Draw several medium lines (5-8 cm) using your elbow and wrist.
- Draw several short lines (1-2 cm) using just your wrist and fingers.
- Tapering Practice: Now, try to replicate the four line types from the Virtual Instructor article.
- Draw lines with two thick ends ("full stop" lines).
- Draw lines with two sharp, tapered ends (swift movement).
- Draw lines that start thick and end thin.
- Draw lines that start thin and end thick.
Drill 3: Curved Line Drills (10 mins)
This set of exercises is about training the pivot motions. The image below provides a great template. Try to replicate these patterns on a page in your sketchbook.
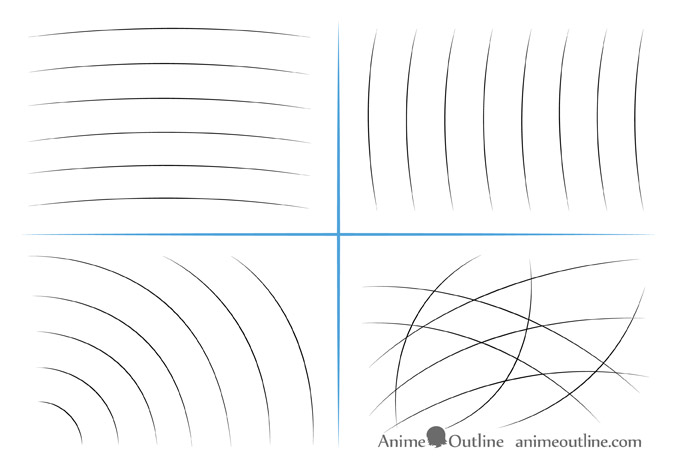
- Horizontal & Vertical Arcs: Use your wrist as a pivot to create rows of C-curves.
- Concentric Arcs: Place your wrist pivot in one spot (like the corner of your page) and draw a series of nested arcs of different sizes.
- Loose Circles: Loosen your grip, use your whole arm, and draw several large, overlapping circles, as shown in the Art of Wei video. Don't aim for one perfect circle; build it up with several light, ghosted strokes.
This is an example of what a well-filled practice sheet might look like. Don't worry about making it this neat; focus on the repetition and the feeling of the movements.

Conclusion
Excellent work today. You've moved from making a single type of mark to having a full toolkit for creating lines with intention and variety.
Here are your key takeaways:
- Line length determines the tool: Use your shoulder/elbow for long lines, your wrist for medium lines, and your fingers for short details.
- Curves come from pivots: Use your wrist, elbow, and shoulder as natural compasses to create smooth, consistent arcs and circles.
- Line weight comes from pressure: Consciously practice drawing with light, medium, and heavy pressure to control the thickness of your lines.
- Varying pressure during a stroke creates dynamic, tapered lines.
In our next lesson, we'll answer the question: "Now that I can vary my line weight, where should I make lines thick and where should I make them thin?" We will apply line weight variation to create emphasis and depth in a drawing, turning this mechanical skill into an artistic one.