Introduction
Hello and welcome back! In our last lesson, you learned to identify the key bony landmarks of the skeleton. You practiced finding points like the iliac crest (ASIS), the clavicles, and the curve of the spine, which serve as crucial anchor points on the human form.
Today, we're going to use that knowledge to build the core structure of the figure. Our goal is to draw simplified representations of the ribcage and pelvis to understand their structure and movement. Instead of getting lost in the complexity of every single rib and bone, we will simplify these two major masses into basic 3D forms. Mastering this is arguably one of the most important steps in figure drawing, as the relationship between these two forms dictates the entire gesture and structure of the torso.
Think of it as building the chassis of a car. Before you can add the sleek body panels (muscles) and details, you need a solid, well-proportioned frame. The ribcage and pelvis are that frame.
Part 1: Deconstructing and Simplifying the Ribcage
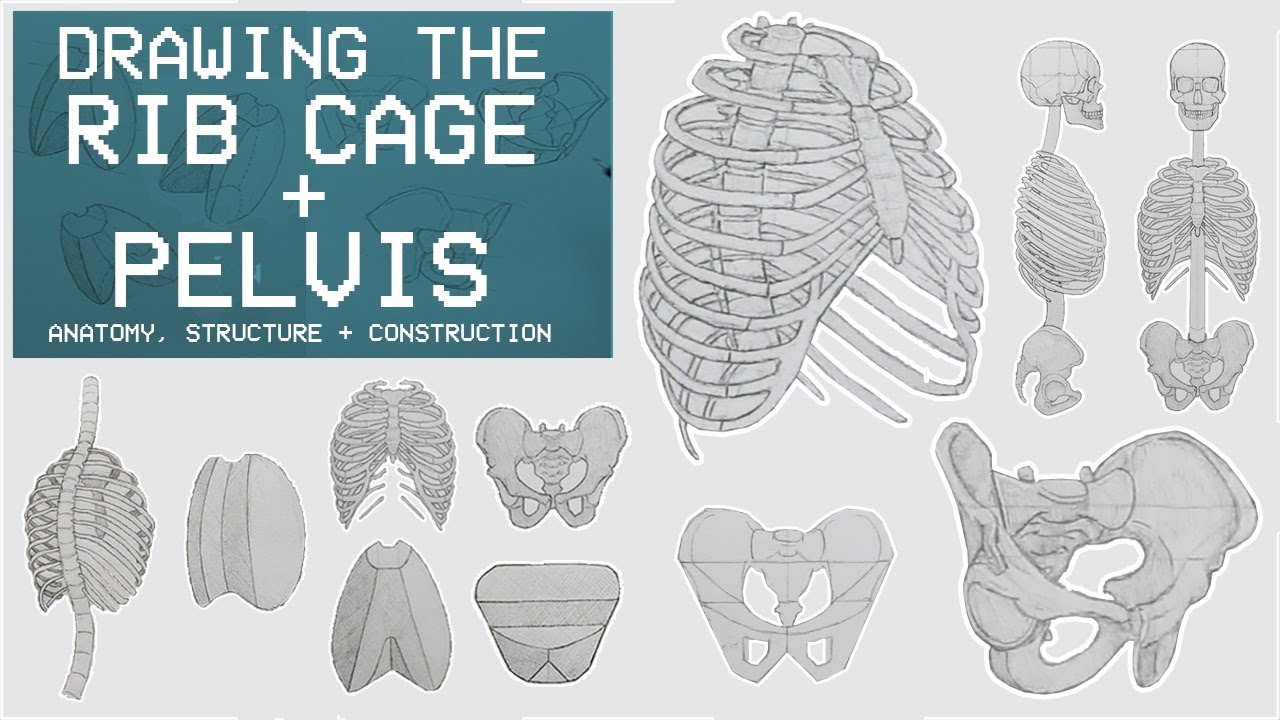
The ribcage is a large, semi-rigid structure that protects the vital organs. While its true shape is complex, for drawing purposes, we can simplify it into a form that's easier to handle in perspective. A common starting point is an egg shape, but we can refine that to better reflect its actual structure.

Let's watch a video that breaks down the ribcage's form and presents a very practical method for simplifying it.
Drawing The RIB CAGE & PELVIS - Anatomy, Structure & Construction - Anatomy 3
This video by artist Dan Beardshaw provides an excellent look at the ribcage. He starts with the actual anatomy and then cleverly simplifies it into a more manageable, blocky form that's perfect for construction.
Watch the following two segments: The introduction to the ribcage (00:00 - 02:18). Pay attention to how the simple egg shape is modified to include planes, making it feel more three-dimensional. The practice section (04:37 - 06:12). Observe how he draws this simplified form from various angles. Try to follow along with a few quick sketches of your own.
As you saw, the key is to think of the ribcage not just as a round shape, but as a form with a distinct front, side, and back plane. It has a slight downward tilt and an arch at the bottom (the thoracic arch). The landmarks you learned previously—like the pit of the neck and the sternum—help you locate the front plane of this simplified shape.
Part 2: Taming the Complex Pelvis
The pelvis is one of the most challenging bony structures to draw accurately from memory. Its shape is intricate and varies between individuals. Fortunately, just like with the ribcage, we can use a much simpler construction. The pelvis acts as a solid, rigid "bucket" or block that the legs and spine connect to.
Let's return to Dan Beardshaw's video to see how he approaches this challenge.
Drawing The RIB CAGE & PELVIS - Anatomy, Structure & Construction - Anatomy 3
Here, Dan Beardshaw breaks down the pelvis. He introduces a fantastic block-out method that makes drawing this complex form in perspective much more approachable.
Watch the segment on the pelvis from 06:12 to 11:45. Focus on two key ideas: The initial block form he uses as a starting point. The fact that the pelvis naturally tilts forward in a standing pose.
To reinforce this, let's look at another excellent resource that focuses less on construction from scratch and more on finding the pelvis on a figure, using the landmarks you already know.
Let's Make Pelvis Anatomy 10x Easier | Love life drawing
This article from Love Life Drawing, titled 'Let's Make Pelvis Anatomy 10x Easier', offers a brilliant, simplified approach. It emphasizes finding the pelvis's orientation in 3D space before drawing it.
Read the sections 'Find the angle of the pelvis', 'Check the tilt', and 'Remember the pelvis is a rigid mass'. Notice how heavily it relies on the ASIS points you learned about in the last lesson to determine the angle and tilt. The idea of the 'pelvis pants' is another very useful simplification.
The main takeaway here is that you can represent the pelvis as a simple box or a shape like "pelvis pants." The top corners of this shape are marked by the ASIS points, and in a neutral stance, the whole form tilts forward.
Part 3: Understanding Torso Movement
The magic of a dynamic pose comes from the interaction between the two rigid masses of the ribcage and pelvis. They are connected by the flexible column of the spine, which allows them to bend, tilt, and twist independently. This creates the "squash and stretch" that gives a figure life.
- Bending: When the torso bends forward, the space at the front between the ribcage and pelvis squashes (compresses), while the space at the back stretches.
- Tilting: The hips and shoulders can tilt in opposite directions (contrapposto), creating a graceful S-curve through the body.
- Twisting: The ribcage can rotate on the spine independently of the pelvis.
This video provides a very clear and simple demonstration of this principle.
How to Draw the Torso | Simplify Anatomy
The channel dr. Draw simplifies the torso down to its absolute basics: two boxes and a flexible tube. This is a powerful mental model for understanding movement.
Watch from 01:44 to 07:50. Pay close attention to the exercises where he draws the two boxes bending, rotating, and then combining both movements. Also, note his final point about the natural backward tilt of the ribcage and forward tilt of the pelvis.
Part 4: Practice Session (20-25 minutes)
Now it's time to put all these pieces together. Your task is to create structural underdrawings of the torso in different poses.
- Find References: Go to a figure drawing reference site like Line-of-Action.com or SketchDaily.net. Find 3-4 poses that show a clear bend, twist, or tilt in the torso.
- Analyze the Pose: For each reference, first identify the line of action of the spine.
- Construct the Torso:
- Lightly draw the simplified form of the ribcage (the Beardshaw block or an egg-box). Pay attention to its angle.
- Draw the simplified form of the pelvis (a tilted box or "pelvis pants"), making sure to correctly place it relative to the ribcage. Use the ASIS points to guide you.
- Connect the two forms, indicating the area of squash and stretch.
- Goal: This is not about creating a finished drawing. The goal is to produce a "wireframe" or structural sketch that accurately captures the relationship and orientation of the two main masses of the torso.
Conclusion
Great job! You've tackled one of the most fundamental challenges in figure drawing. By simplifying the ribcage and pelvis into manageable forms, you've unlocked the ability to construct the torso with volume and dynamism.
Key Takeaways:
- The complex forms of the ribcage and pelvis can be simplified into geometric, box-like shapes to make them easier to draw in perspective.
- The ribcage is an egg-like shape with defined planes, while the pelvis can be thought of as a forward-tilted block or bucket.
- The dynamism of the torso comes from the relationship between these two rigid masses, connected by the flexible spine, which allows for bending, tilting, and twisting.
- Understanding this relationship is key to creating "squash and stretch" and bringing a sense of life and movement to your figures.
In our next lesson, we will begin to flesh out this bony framework. We will learn how to map the major muscle groups of the torso that wrap around the ribcage and pelvis, creating the surface forms and contours that we actually see.