Hello! Welcome to the third lesson in our course on designing circular mandalas.
Introduction
In our previous lessons, we established the core mathematical rules for creating a flat circle. You learned the universal increase formula (increasing by your starting stitch count each round) and how to calculate the total stitch count for any given round.
So far, we've focused on the quantity of stitches. Today, we'll shift our focus to the placement of those stitches. Our learning outcome is to distribute increases evenly within a round to maintain a circular shape.
You'll discover why simply following the basic increase pattern can result in a hexagon rather than a circle, and you'll learn the crucial technique of staggering your increases to achieve a perfectly round, balanced shape—the ideal canvas for a beautiful mandala.
1. The Problem: Why Circles Become Hexagons
You now know that to grow a circle, you need to add a set number of stitches in each round. For example, in a single crochet circle, you add 6 stitches per round. A common way to write this pattern is:
- Round 3: (Increase, 1 sc) repeat 6 times.
- Round 4: (Increase, 2 sc) repeat 6 times.
- Round 5: (Increase, 3 sc) repeat 6 times.
While mathematically correct in terms of stitch count, this method has a visual side effect. By placing the increase at the beginning of each repeat, you end up stacking the increases directly on top of each other, round after round. This creates six distinct "points" or "corners," causing your circle to look more like a hexagon.
From your web design experience, you can think of this like stacking all your key visual elements along the left margin of a page. While functional, it creates an unbalanced layout. To achieve a visually pleasing design, you distribute elements across the page using a grid or other layout principles. The same concept applies here: we need to distribute our increases to create a balanced, circular shape.
This video demonstrates the problem perfectly.
The Secret to Making a Flat Circle with Single Crochet
In this clip from Change Path Crochet, you'll see a side-by-side comparison of a circle with stacked increases and one with distributed increases. Pay attention to how the stacked increases create visible corners.
Watch from 05:52 to 07:30. The presenter shows a piece where the increases are all aligned, explaining why it forms a hexagon, and then compares it to a true circle.
2. The Solution: Staggering Your Increases
To prevent the hexagonal shape, the solution is to avoid stacking your increases. We do this by intentionally shifting, or staggering, their positions from one round to the next.
There are many ways to do this, but one of the most common and systematic methods is to alter the pattern on even-numbered rounds.
- On odd-numbered rounds, you can follow the standard pattern (e.g.,
(inc, 3 sc)). - On even-numbered rounds, you split the group of single crochets that accompanies the increase. You work half of them before the increase and half after.
Let's see how this works with a single crochet circle (starting with 6 sc):
| Round | Standard Pattern (creates a hexagon) | Staggered Pattern (creates a circle) | Total Stitches |
|---|---|---|---|
| 3 (odd) | (inc, 1 sc) x 6 |
(inc, 1 sc) x 6 |
18 |
| 4 (even) | (inc, 2 sc) x 6 |
1 sc, inc, (2 sc, inc) x 5, 1 sc |
24 |
| 5 (odd) | (inc, 3 sc) x 6 |
(inc, 3 sc) x 6 |
30 |
| 6 (even) | (inc, 4 sc) x 6 |
2 sc, inc, (4 sc, inc) x 5, 2 sc |
36 |
Notice in the staggered pattern for Round 4, the 2 sc group is split into 1 sc at the beginning of the round and 1 sc at the end. For Round 6, the 4 sc group is split into 2 sc at the beginning and 2 sc at the end. This simple shift is enough to break up the "stack" of increases and smooth out the circle's edge.
This article provides a clear written explanation of this technique.
How to Crochet a Flat Circle - Magic Increase Formula
The article 'How to Crochet a Flat Circle' from Sarahmaker.com has an excellent section that explains and provides a pattern for this staggering method.
Please read the section titled 'How to Make Round Circles (Not Hexagons)'. It explains why the hexagon shape happens and gives a clear, round-by-round example of how to shift the increases on even-numbered rounds.
3. A Formulaic Approach to Staggering
Thinking about this as a formula can make it easier to remember: "On even rounds, split the stitches." Let's watch a video that breaks this down step-by-step.
Get Perfect Round Edges on Flat Circle Crochet | NO FLAT SIDES!
This video from Crochet and Tea is dedicated to this exact technique. The presenter explains it as a simple formula to apply on even-numbered rounds.
Please watch the following segments: The Concept (00:55 - 03:46): The presenter introduces the formula of shifting increases on even-numbered rounds. Demonstration (04:18 - 06:51): Watch how she splits the stitches on a round with an even number of singles (e.g., 'single, increase, single' instead of 'increase, two singles'). Further Rounds (09:02 - 11:20): See how the principle is applied to the next even round, further reinforcing the pattern.
4. Visualizing the Staggered Pattern
Crochet patterns are often represented visually in charts. Understanding these charts is a key skill for any designer. The image below shows a chart for a perfect circle using staggered increases.

In this chart:
- X = 1 single crochet
- V = 1 increase (2 single crochets in the same stitch)
Trace the 'V' symbols from the center outwards. You can see they don't form straight lines but are offset in each round. This is the visual representation of the staggering technique.
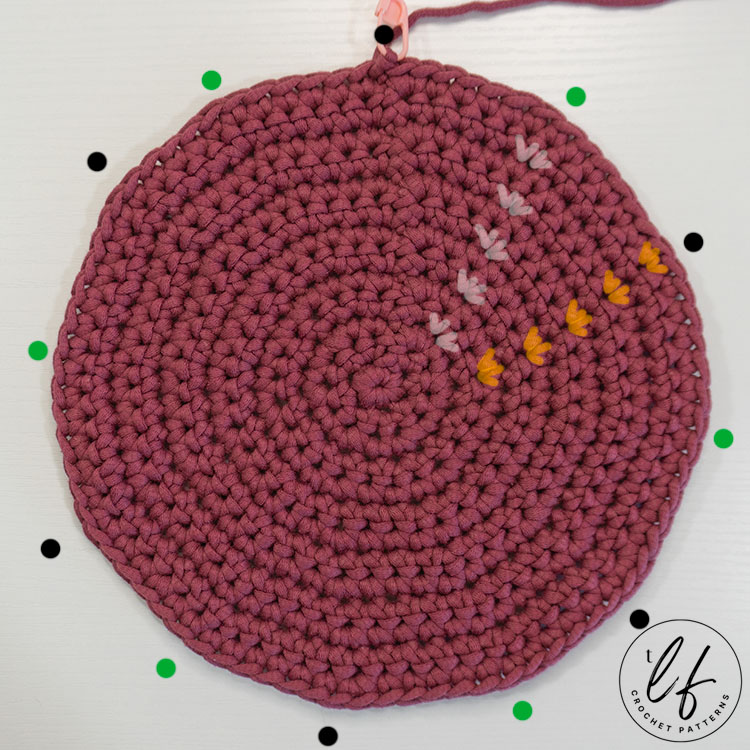
Here is another useful visual, this time on a physical crochet piece.
5. Practice
Now, let's put this into practice. Imagine you have just completed Round 7 of a single crochet circle, which has 42 stitches. You are about to start Round 8.
- What is the standard, non-staggered pattern for Round 8? (Hint: It involves 6 single crochets between increases).
- Using the staggering method, how would you write the pattern for Round 8 to ensure a perfectly circular shape?
Take a moment to write down your answer before checking the solution.
Click to see the solution
-
The standard, non-staggered pattern for Round 8 would be: (inc, 6 sc) repeat 6 times. (Total stitches: 48)
-
To stagger this, you split the "6 sc" group in half. The staggered pattern for Round 8 is: 3 sc, inc, (6 sc, inc) repeat 5 times, 3 sc. (Total stitches: 48)
Conclusion
Mastering the placement of increases is just as important as getting the count right. Today, you've learned the final piece of the foundational puzzle for creating a perfect flat circle.
Key Takeaways:
- Stacking increases by repeating the same pattern (e.g.,
inc, X sc) leads to a polygonal shape. - To achieve a true circle, you must stagger the placement of your increases.
- A reliable method is to split the single crochet stitches around the increase on even-numbered rounds.
Next Steps
You now have all the core geometric principles for creating a flat, round circle. However, sometimes things can still go wrong. In our next lesson, we will cover how to troubleshoot and correct common circular crochet issues like ruffling and cupping. This will equip you to diagnose problems in your work and get your designs back on track.