Hello! Welcome back to the second module of your course.
In our last lesson, we explored the designer's stitch toolkit, learning how to select different stitches like post stitches, popcorns, and shells to create a wide variety of textures and visual effects. We looked at how to create solid fabric, lacy openwork, and 3D bumps.
Today, we're going to build directly on that knowledge. Our focus is on how to combine different stitch types and heights to build dimensional and decorative patterns. If the last lesson was about choosing your tools, this one is about using them together to construct something complex and beautiful. We'll move beyond adding texture on a round to creating patterns that have true depth and layers.
This is where your web development background might provide a useful parallel. In CSS, you can place elements in the normal document flow, but you gain another level of control when you use properties like z-index and absolute/relative positioning to make elements overlap and interact. Similarly, in crochet, we can work in a simple, round-by-round sequence, but the real "magic" happens when we start layering stitches and rounds on top of one another.
The Principle of Stitch Height
Before we can combine stitches of different heights, we need a clear understanding of what "height" means in crochet and how to control it. The height of a basic stitch is determined by the number of times you yarn over before inserting your hook and the subsequent steps to complete the stitch.
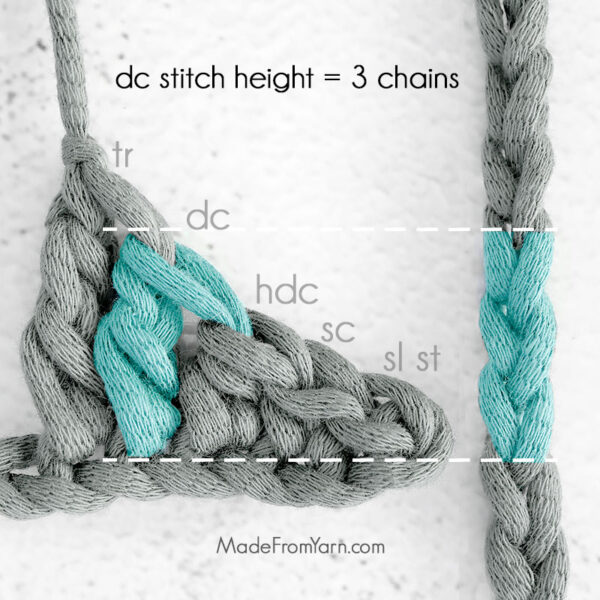
As you can see, each stitch has a distinct height.
- Slip Stitch (sl st) & Single Crochet (sc): Very short, create dense fabric.
- Half Double Crochet (hdc): A transitional height.
- Double Crochet (dc): A standard "tall" stitch that's very common.
- Treble Crochet (tr): Noticeably taller than a dc.
- Double Treble (dtr) and beyond: Even taller stitches used for specific effects.
To understand the mechanics behind creating these taller stitches, let's look at a tutorial.
Tall and Long Crochet Stitches Tutorial
The article 'Tall and Long Crochet Stitches Tutorial' from HanJan Crochet provides an excellent breakdown of how taller stitches are constructed. It clearly explains the relationship between yarn-overs and final stitch height.
Please read the sections titled 'The Different Types of Long Stitches', 'How to Make a Treble Crochet Stitch (tr)', and 'How to Make a Double Treble Crochet Stitch (dtr)'. Pay attention to the pattern: each time you add a yarn-over at the beginning, you add another 'pull through two loops' step, which increases the stitch's height.
The key takeaway is that you have precise control over stitch height. This control is fundamental for creating the dimensional patterns we'll explore next.
Combining Heights for Shaping and Layering
Now that we understand how to create stitches of varying heights, let's see how to combine them to create decorative patterns and, most excitingly, layers.
1. Shaping within a Round
The simplest way to use stitch height is to vary it within a single round to create shapes. By arranging stitches from shortest to tallest and back down, you can create curves, petals, and waves.
A great example of this is creating a shell or fan border. Let's watch how a combination of tall stitches (double crochet) and short stitches (slip stitch) creates a beautiful, undulating edge.
Crochet Spring Fling Garden (Rnds 1-7)
In this clip from the 'Crochet Spring Fling Garden' tutorial, watch how the designer creates a decorative petal edge in Round 7 by combining groups of taller stitches with a very short stitch.
Watch from timestamp 22:00 to 25:31. The pattern repeats two main components: a 'shell' of five double crochets worked in one spot, and a single slip stitch in another. Notice how the height of the double crochets forces the fabric to fan out, while the short slip stitch pulls it back in, creating a distinct petal shape.
2. Creating Layers with Overlay Crochet
This is where mandala design gets really interesting. Overlay crochet is a technique where you work stitches into rounds that are not the one immediately preceding your current round. You often work "in front of" or "behind" more recent rounds to connect to older ones. This is how designers create those incredible, multi-layered mandalas that look like blooming flowers.
To do this, you need tall stitches. A short stitch like a single crochet can't reach down two or three rounds without puckering and distorting the fabric. A tall stitch like a treble (tr) or double treble (dtr) has the necessary height to span that distance gracefully.
Let's look at a clear example of working into a previous round.
Crochet Spring Fling Garden (Rnds 1-7)
In this next clip from 'Crochet Spring Fling Garden', the designer is on Round 6. Instead of working into Round 5, she reaches down to work into stitches from Round 3, physically pushing Round 5 to the back.
Watch from timestamp 17:43 to 22:00. Pay close attention to how she works 'under round four pushing round five to the back.' This is a fantastic visual of how layers are created.
Case Study: Deconstructing the "Blooming Lotus"
The "Blooming Lotus Square" is a masterclass in combining stitch types and heights to build a complex, dimensional flower. While it's finished as a square, its center is a beautiful mandala. Let's analyze how the designer uses these techniques to build the layers.
How To Crochet The Blooming Lotus Square | An Overlay Crochet Granny Square Tutorial
We're going to watch several clips from the 'Blooming Lotus Square' tutorial. We won't be learning the whole pattern, but instead, we'll analyze the designer's choices to understand how she builds such an intricate, layered design.
Get ready to see how a flat circle transforms into a 3D flower!
Step 1: Adding a Background Layer
First, let's see a simple layering technique. In Round 4, the designer works behind the chains made in Round 3 to add a solid layer of stitches.
How To Crochet The Blooming Lotus Square | An Overlay Crochet Granny Square Tutorial
Watch Round 4 of the 'Blooming Lotus Square.'
Watch from 11:05 to 13:01. The instruction is to 'work behind your chain fours into each chain two space of round two.' This creates a new layer of fabric that sits behind the openwork of the previous round, adding depth and a foundation for future stitches.
Step 2: Combining Heights and Layers to Form Petals
Now for a more complex round. Round 6 simultaneously works into three different locations to form the first set of petals.
How To Crochet The Blooming Lotus Square | An Overlay Crochet Granny Square Tutorial
Round 6 is where the petals really start to form. Notice how the designer combines stitches of different heights and places them in different rounds to create a single, cohesive shape.
Watch from 17:23 to 21:18. The pattern combines: Double crochets (tall) in a chain space from Round 5. Front post half double crochets (medium height, textured) around a cluster from Round 5. A three double crochet cluster (tall, textured) into a skipped chain space from all the way back in Round 3!
This single round demonstrates the power of combining stitch types (dc, fphdc, cluster) and working into different layers (Round 5 and Round 3) to build a truly dimensional pattern.
Step 3: Using Very Tall Stitches for Dramatic Effect
Later in the pattern, the designer needs to pull three separate elements together across a wide gap. This requires a very tall, strong stitch.
How To Crochet The Blooming Lotus Square | An Overlay Crochet Granny Square Tutorial
In Round 13, the designer uses a 'front post treble three together' stitch. This is an advanced stitch, but the principle is exactly what we've been discussing.
Watch from 42:35, paying special attention to the segment from 46:30 to 48:20. The stitch is a treble (a tall stitch) because it needs the height to reach across the gap. It's a front post stitch to create texture. And it's worked three together to join three separate posts from previous rounds into one point. This is the perfect example of combining height and technique for a specific structural and decorative purpose.
Test your understanding!
You're designing a round and want to create a "sunbeam" effect, where raised spokes radiate from the center. The round you want to attach these spokes to is three rounds below your current working round. The stitches in between are mostly half double crochets.
- What type of stitch would be most appropriate to create the "spokes"?
- Why is this stitch a better choice than, for example, a front post double crochet?
Show answer
- A Front Post Double Treble (fpdtr) or possibly a Front Post Triple Treble (fptrtr) would be the best choice. It needs to be a front post stitch to create the raised, spoke-like texture.
- It needs to be a very tall stitch (like a dtr or even taller) because it has to span the height of three entire rounds of fabric. A shorter stitch like a front post double crochet (fpdc) would be too short; trying to stretch it that far would severely warp your project, causing it to cup or buckle. The extra height of the dtr allows it to reach down gracefully without distorting the overall shape.
Conclusion
Today, we've moved from selecting individual stitches to combining them like a composer arranging notes in a chord. By mastering stitch height, you've unlocked the ability to create patterns with true depth, dimension, and layers.
Key Takeaways:
- Stitch Height is a Design Tool: The height of a stitch, controlled by yarn-overs, is not just a side effect; it's a variable you can manipulate to create shapes and bridge gaps.
- Shaping with Height: Alternating between tall and short stitches within a round is a fundamental technique for creating curves, petals, and decorative edges.
- Layering with Height: Overlay crochet, which involves working into previous rounds, is the key to dimensional mandalas. This technique relies on using tall stitches (like trebles and double trebles) to reach down across multiple rounds without distorting the fabric.
- Complex Stitches are Combinations: Advanced stitches are usually just creative combinations of basic principles: stitch type (e.g., dc), placement (e.g., front post), height (e.g., treble), and grouping (e.g., worked together).
In our next lesson, we will address a critical question that arises from today's topic: How does the choice of these complex, dimensional stitches impact the standard increase formula we learned for keeping a circle flat? We'll learn how to calculate and adjust our stitch counts to accommodate for the extra bulk and different tensions these beautiful stitches introduce.