Welcome back! In our previous lesson, we rolled up our sleeves and configured a single-area OSPF network from scratch. You learned the essential commands to enable the OSPF process, set a router ID, and add interfaces. But as any network engineer knows, configuration is only half the job. A network isn't functional until you've verified it's operating exactly as intended.
This lesson focuses on that crucial second half: verification. We will dive into the suite of show commands that act as your diagnostic toolkit for OSPF. You'll learn how to systematically inspect neighbor relationships, interface status, the link-state database, and—most importantly—the IP routing table to confirm that your OSPF configuration is correct and that your network has achieved convergence. Mastering these commands is essential for both your upcoming project and for any real-world network troubleshooting.
By the end of this lesson, you will be able to use a variety of show commands to thoroughly verify OSPF neighbor adjacencies and the resulting routing table entries.
A Systematic Approach to OSPF Verification
When you're verifying or troubleshooting OSPF, it's best to have a logical workflow. You can think of it like debugging a program: you start with the most fundamental checks and move to more specific ones. A good OSPF verification process follows the protocol's own operational stages:
- Process & Interface Check: Is OSPF running correctly on the local router and enabled on the right interfaces?
- Neighbor Adjacency Check: Have the routers successfully formed neighbor relationships?
- Database Check: Have the routers synchronized their Link-State Databases (LSDBs)?
- Routing Table Check: Has the router calculated the best paths and installed them in the IP routing table?
The following flowchart provides a great visual map of the commands we'll be using and how they relate to each stage of the OSPF process.
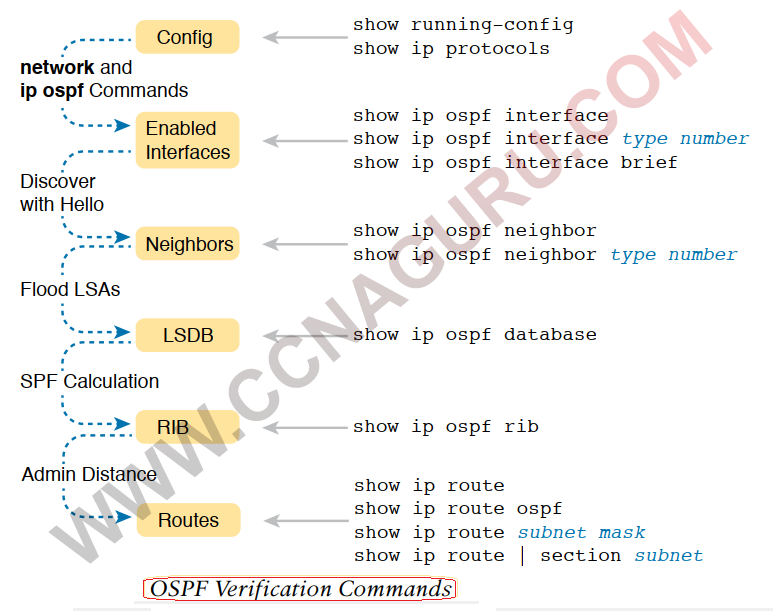
Let's walk through this process step-by-step.
1. Verifying the OSPF Process and Interfaces
Before checking for neighbors or routes, your first step is to confirm the local OSPF process is configured as you expect. Two commands are essential here.
show ip protocols: This command gives you a high-level summary of all routing protocols running on the router. For OSPF, it shows the process ID, the router ID, the networks being advertised vianetworkcommands, and a list of routing information sources (neighbors).show ip ospf interface brief: This command provides a concise table of all interfaces on which OSPF is enabled. It's the quickest way to see which interfaces are participating, their area, cost, state (e.g., DR, BDR), and a count of adjacent neighbors on that link.
The following video provides a practical demonstration of using these commands to get a baseline of your OSPF configuration.
OSPF Configuration & Show Commands - Practical OSPF
The video "OSPF Configuration & Show Commands" by Practical Networking walks through a configuration, showing how the output of verification commands evolves.
Watch the following clips: First, see the baseline before OSPF is fully active: show ip protocols (before). Next, see how the output changes after the process is started and interfaces are added: show ip protocols (after). Then, watch how to verify which interfaces are in OSPF: show ip ospf interface brief. Finally, see how show ip protocols reflects interfaces added via interface-specific commands: interface config reflection.
2. Verifying Neighbor Relationships
Once you've confirmed OSPF is running on the correct interfaces, the next logical step is to check if it has formed adjacencies with its neighbors. This is arguably the most common verification step.
The primary command here is show ip ospf neighbor.
The output of this command shows a list of all OSPF neighbors, their router ID (Neighbor ID), their state, the IP address used to reach them, and the local interface they are connected to.
- State: The most important column. For a fully converged and functional adjacency, you want to see the state as
FULL. If it's stuck in another state (like2-WAY,EXSTART, orINIT), it indicates a problem (e.g., mismatched MTU, area ID, or authentication settings). - On multi-access networks (like Ethernet), the state will also show the neighbor's role:
DR(Designated Router),BDR(Backup Designated Router), orDROTHER.
The following reading and video clips show you exactly what to look for.
Configure, Verify, and Troubleshoot Single Area OSPFv2 for IPv4
This section from a Cisco Press article, "Configure, Verify, and Troubleshoot Single Area OSPFv2," provides a detailed breakdown of the show ip ospf neighbor command output.
Read the section that begins "If you examine the show ip ospf neighbor command closely...". Focus on understanding the meaning of the Neighbor ID, the different OSPF states (especially FULL), and the DR/BDR roles.
OSPF Configuration & Show Commands - Practical OSPF
This clip from Practical Networking shows the show ip ospf neighbor command in action, right as an adjacency is formed.
Watch from verifying neighbors. Notice how the output is initially empty, but after the neighbor is configured, a console message appears, and the command then shows a FULL/DR adjacency.
For even more information, you can use show ip ospf neighbor detail, which provides verbose output about timers, options, and sequence numbers for each neighbor.

3. Inspecting the Link-State Database (LSDB)
After forming adjacencies, OSPF routers exchange Link-State Advertisements (LSAs) to build a complete map of the network topology. This map is stored in the Link-State Database (LSDB). A fundamental rule of OSPF is that all routers within the same area must have an identical LSDB.
The command to view this is show ip ospf database.
While a deep dive into LSA types is a more advanced topic, you can use this command for a powerful verification check: run it on two neighboring routers and confirm their databases are identical. If they are not, it points to a filtering or synchronization issue.
This video demonstrates this concept perfectly.
OSPF Configuration & Show Commands - Practical OSPF
The Practical Networking video shows how the LSDB grows as the network is built and demonstrates the identical nature of the database across routers.
Watch these three short clips to see the evolution: Initial LSDB: Only one LSA exists from the local router. LSDB after adjacency: The neighbor's LSA appears. Identical LSDBs: The presenter compares the LSDBs of two routers side-by-side to prove they match.
4. Verifying the IP Routing Table
The ultimate goal of any routing protocol is to populate the IP routing table with the best paths to all known destinations. Verifying this is the final and most important step.
The key commands are:
show ip route: Displays the entire IP routing table.show ip route ospf: A very useful filter that displays only the routes learned via OSPF.
When you look at the routing table, OSPF routes are marked with an O on the left. The entry will show:O 2.2.2.2 [110/2] via 10.10.10.2, 00:32:13, FastEthernet0/0
[110/2]: The first number, 110, is the Administrative Distance (OSPF's trustworthiness score). The second number, 2, is the metric or cost of the path.via 10.10.10.2: The next-hop IP address to which packets should be forwarded.FastEthernet0/0: The local exit interface.
Cisco OSPF Basic Configuration - FlackBox
This section from the Flackbox article "Cisco OSPF Basic Configuration" provides a clear, annotated example of the show ip route command.
Read the section titled "OSPF Verification – show ip route". The author follows a great practical workflow: check neighbors first, then check the routing table.
The following video shows show ip route ospf being used to confirm that routes from a neighbor's loopback interfaces have been learned.
OSPF Configuration & Show Commands - Practical OSPF
The Practical Networking video demonstrates how the OSPF routing table grows as new networks are advertised by neighbors.
Watch these clips: Empty OSPF route table: Initially, there are no OSPF routes because the only shared network is directly connected. Routes are learned: After the neighbor advertises its loopbacks, they appear in the local OSPF routing table. Final routing table: Shows the complete set of learned OSPF routes.
A Note on Packet Tracer
Since you'll be using simulation software for your project, it's important to be aware of some of its limitations. Cisco Packet Tracer is a fantastic tool, but it doesn't always replicate the output of real hardware perfectly.
OSPF Troubleshooting Starts Here with show Commands
In this clip from "OSPF Troubleshooting Starts Here," Wendell Odom points out two specific inaccuracies in Packet Tracer's OSPF verification commands.
Watch the short segment from Packet Tracer issues. He notes that show ip protocols may not show interfaces configured with the ip ospf command, and show ip ospf interface brief often shows an incorrect neighbor count of zero. Be aware of these cosmetic bugs so they don't send you on a troubleshooting wild goose chase.
Conclusion
In this lesson, you've learned a systematic process for verifying a single-area OSPF network. By moving from the general process down to the specific routes in the table, you can efficiently confirm that your network is behaving as expected or quickly pinpoint where a problem might lie.
Key Takeaways:
- Systematic Verification: Follow a logical flow:
show ip protocols->show ip ospf interface brief->show ip ospf neighbor->show ip route ospf. - Neighbor State is Key: In a healthy network, OSPF neighbors should be in the
FULLstate. Anything less indicates a problem. - The Routing Table is the Goal: The ultimate proof of a working configuration is seeing routes marked with an
Oin the output ofshow ip route. show ip route ospfis your friend: This command filters out all other routes, making it easy to focus only on what OSPF has learned.
We've now covered the full lifecycle of a basic single-area OSPF implementation, from planning and configuration to verification. In our next module, we will shift our focus from Layer 3 routing down to the technologies that govern our Local Area Networks at Layer 2, starting with the fundamentals of how switches operate and how they prevent network-crippling loops using Spanning Tree Protocol (STP).