In our last lesson, you learned how to design an efficient IP addressing scheme using Variable Length Subnet Masking (VLSM). Now that you can create a network plan on paper, the next crucial step is to test and verify that the actual, configured network operates as intended.
This lesson introduces the first two essential tools in any network engineer's troubleshooting toolkit: ping and traceroute. We will explore how to use these commands not just to see if a connection works, but more importantly, to systematically find the exact point of failure when it doesn't. This is a fundamental skill for your upcoming project and for any real-world network diagnostics.
1. ping: The Fundamental Connectivity Test
The ping command is your first line of defense. Its purpose is simple: to test whether a destination host is reachable across an IP network. It works by sending an ICMP (Internet Control Message Protocol) Echo Request packet to the target IP address and waiting for an ICMP Echo Reply.
A successful ping confirms two-way connectivity: the request reached the destination, and the reply made it back to the source.
Understand the Ping and Traceroute Commands
This official Cisco document provides a concise definition of the ping command and its purpose.
Read the section titled "The Ping Command". Pay close attention to the three things it determines: host activity, round-trip delay, and packet loss. Also, note the table of "Possible Output Characters From the Ping Facility," as the symbols differ between operating systems like Windows and Cisco's IOS.
When you run a ping, you'll get one of a few common responses:
- Success:
- On a Windows PC:
Reply from <IP address>: ... - On a Cisco router: An exclamation mark (
!) for each successful reply.
- On a Windows PC:
- Failure:
- On a Windows PC:
Request timed out.This means no reply was received within the default timeout period. - On a Cisco router: A period (
.) for each timed-out packet.
- On a Windows PC:
- Unreachable:
- On a Windows PC:
Destination host unreachable.This reply often comes from an intermediate router that doesn't have a route to the destination network. - On a Cisco router: The letter
U.
- On a Windows PC:
It's common for the first ping in a sequence to fail (showing a . followed by !!!!) if a router needs to perform an ARP lookup to find the MAC address of the next hop. This is normal and still indicates good connectivity. However, five consecutive dots (.....) indicate a definite problem.
2. traceroute: Finding the Path and the Problem
When a ping fails, it tells you there's a problem, but it doesn't tell you where the problem is. The failure could be on the next router, a router halfway across the internet, or the destination device itself. This is where traceroute (or tracert on Windows) becomes invaluable.
traceroute works by cleverly manipulating the Time-To-Live (TTL) field in the IP packet header. The TTL is a counter that is decremented by one at every router (hop) the packet crosses. If the TTL reaches zero, the router discards the packet and sends an ICMP "Time Exceeded" message back to the source.
traceroute exploits this mechanism:
- It sends a packet towards the destination with a TTL of 1. The first router decrements the TTL to 0, drops the packet, and sends a "Time Exceeded" message back. The source now knows the IP address of the first hop.
- It then sends a packet with a TTL of 2. This packet makes it past the first router, but is dropped by the second, which sends a "Time Exceeded" message back. The source now knows the IP of the second hop.
- This process repeats, incrementing the TTL by one each time, until the packet reaches the final destination.
To see this process explained visually, the following video is highly effective.
Traceroute Explained | Real World Examples
This video from CertBros provides a clear and detailed explanation of how traceroute works, including a demonstration with Wireshark.
Watch the first two segments: The introduction explains the core concept of using TTL to discover hops. The demonstration shows how to run the command and interpret its output, which includes the hop number, round-trip times, and the IP address of each router along the path.
The output of a traceroute shows you the path, hop by hop. If the trace stops at a certain hop and you see lines of asterisks (* * *) or "Request timed out," you've likely found your problem area. The issue is likely with that router or the link immediately following it.
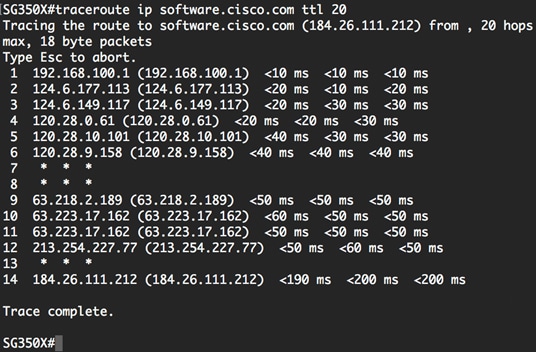
3. A Systematic Troubleshooting Walkthrough
Now let's put these tools together in a practical scenario that mirrors what you'll do for your project. Imagine two PCs on different networks can't communicate. A ping from PC1 to PC3 fails. What's next?
The following video demonstrates a complete troubleshooting process in Packet Tracer. It follows a logical methodology: test, trace, identify, fix, and verify.
13.2.7 Packet Tracer - Use Ping and Traceroute to Test Network Connectivity
This video from Tech Acad walks through a full troubleshooting lab exercise. It's an excellent example of applying the concepts from this lesson to a practical problem. We'll focus on the IPv4 part of the exercise.
Follow the steps the presenter takes to solve the IPv4 connectivity issue: Test and Gather Info: Watch from the initial test. The presenter first uses ipconfig /all to verify the IP settings of the PCs and then uses ping to confirm that connectivity fails. Trace the Path: From this point, traceroute is used from PC1. Notice that the trace stops at a specific router's IP address. This is the last successfully reached device and our primary suspect. Investigate the Suspects: Watch how the presenter logs into the routers along the path and uses the show ip interface brief and show ip route commands from this section to compare the actual configuration against the network documentation. This is how the incorrect IP address is found. Implement and Verify: Finally, watch from the fix. The incorrect IP address is corrected, and ping is used again to verify that connectivity has been restored.
This step-by-step process—ping, traceroute, show commands, fix, ping again—is a fundamental troubleshooting workflow you should adopt for your project and beyond.
4. An Important Nuance: Extended Ping
When you ping from a Cisco router's command line, it uses the IP address of the outgoing interface as the source IP of the ping packet by default. This can sometimes lead to a misleading result.
Imagine a user on LAN A can't reach a server. You log into the router connected to LAN A and ping the server. The ping works! But the user's traffic is still failing. Why? Because the router used its WAN interface IP as the source, and the return route for that IP is working. However, the remote network might be missing a route back to the user's subnet (LAN A).
To accurately test from the perspective of the user's subnet, you use an extended ping.
Cisco Basic Connectivity Troubleshooting - FlackBox
This article from FlackBox has an excellent section explaining the purpose and usage of extended pings.
Read the section titled "Extended Ping". Focus on the scenario it describes: why a normal ping from a router can succeed while user traffic fails. Then, review the command walkthrough that shows how to invoke the extended ping wizard to specify a different source address for the test.
By using an extended ping and setting the source address to an IP from the user's subnet (e.g., the router's LAN interface), you can accurately replicate the user's traffic flow and correctly diagnose routing issues.
Conclusion
In this lesson, you've been introduced to the foundational tools for network troubleshooting. You are now equipped not only to design an IP plan but also to begin testing and debugging it.
Key Takeaways:
pingis used to test for basic end-to-end L3 reachability.traceroute(tracert) is used to map the hop-by-hop path to a destination and identify the specific location of a failure.- A systematic workflow is key: Test (
ping), Isolate (traceroute), Investigate (showcommands), Correct, and Verify (ping). - An extended ping is a powerful tool for troubleshooting from a router when the source IP address of the test packet matters.
In the troubleshooting video, you saw a preview of commands like show ip interface brief. Our next lesson will dive deeper into these verification commands, showing you how to thoroughly inspect the IP configuration on Cisco devices to quickly spot and resolve common errors.