Hello! Welcome to the grand finale of your sound engineering course.
Over the past several weeks, you've journeyed through the entire music production workflow. You started with the fundamentals of gain staging, moved on to recording and editing vocals, sculpted sounds with EQ and compression, created space with reverb and delay, and added character with saturation. In our last lesson, you put the final polish on your mix, using a limiter to achieve competitive loudness for commercial release.
Now, we've arrived at the final step: delivering your music to the world. Today's lesson focuses on a critical, technical skill: how to export final master files and instrumental stems in the correct formats and bit depths. This ensures that all your hard work translates perfectly, whether you're uploading to Spotify, collaborating with another artist, or sending your track to be remixed.
1. Exporting Your Final Master File
The final master file is the single stereo audio file (e.g., a WAV or MP3) that you will distribute. This is the finished product, containing all your processing from the master bus, including the limiting we applied in the last lesson.
The goal is to export a high-quality, uncompressed file that meets industry standards for distribution.
To see all the options available in the export window, the official FL Studio channel provides an excellent overview.
The best way to export your music | Learn FL Studio
This video from the FL Studio channel walks through the export window and its most important settings. We'll use it to understand the core options for file format, quality, and bit depth.
Watch from 00:42 to 02:28. Focus on these key sections: Tail Settings (0:42): Understand why 'Leave remainder' is almost always the correct choice. File Format (1:02): Note the difference between WAV (high quality, large size) and MP3 (compressed, smaller size). Bit Depth (1:45): Pay close attention to the explanation of 16-bit, 24-bit, and 32-bit float. This is crucial for choosing the right format.
Key Settings for Your Master Export
Based on the video and industry best practices, here are the settings to use for your final master file.
Mastering in FL Studio: A Comprehensive Guide
This article from Lucid Samples provides a concise table of recommended export settings for a final master. It also introduces the concept of 'Dither,' which is important when changing bit depths.
Read the section 'Finalizing Your Mastered Track in FL Studio'. Pay special attention to the table with recommended export settings.
Here is a summary of the recommended settings for a master file destined for streaming services or professional use:
- File Type: WAV
- This is an uncompressed format, meaning it preserves 100% of the audio quality from your project. MP3 is a "lossy" format that discards audio data to save space and should only be used for informal sharing, not for professional distribution.
- Bit Depth: 24-bit
- FL Studio's internal audio engine works at 32-bit float, which has a massive dynamic range. Exporting at 24-bit is the modern standard for streaming services. It provides excellent quality and dynamic range. 16-bit is the older standard for CDs.
- Sample Rate: 44.1 kHz
- This is the standard for most consumer audio and streaming. Unless you recorded at a higher rate and have a specific reason to maintain it, 44.1 kHz is the correct choice.
- Resampling Quality: Set this as high as you can (e.g., 512-point sinc). This ensures the best possible quality when converting the sample rate, at the cost of a slightly longer export time.
- Dither: ON
- Dithering is a special type of low-level noise that is added when you reduce the bit depth (e.g., from your project's 32-bit float to a 24-bit or 16-bit file). It prevents audible artifacts called "quantization distortion." You should enable dither only on the final export when you are reducing the bit depth. Never dither a file that will be processed further.
2. Exporting Instrumental Stems
"Stems" are individual audio files for each track or group of tracks in your song (e.g., a file for vocals, one for drums, one for bass, etc.). They are essential for collaboration, remixing, and sending your project to a professional mixing or mastering engineer.
The key difference when exporting stems is that you want multiple files, not just one.
Preparing Your Project for Stem Export
Before you export, you need to ensure your project is properly organized.
How To Export Song Track Stems In FL Studio Properly! (Or Any DAW)
This practical tutorial by Marvillous Beats shows the essential preparation step for exporting stems: making sure every instrument has its own dedicated mixer track.
Watch from 01:20 to 02:41. The presenter demonstrates how to link an instrument from the Channel Rack to a specific mixer track and why this is so important for organization and the final export.
Rule #1 of Stems: Each sound you want as a separate file must be routed to its own mixer track, and those tracks should be clearly named (e.g., "Kick," "Bass," "Lead Vocal").
The Stem Export Process
The process starts the same way, but with a few crucial differences in the settings.
How To Export Song Track Stems In FL Studio Properly! (Or Any DAW)
Let's return to the Marvillous Beats tutorial to see the full stem export workflow, which emphasizes quality and compatibility.
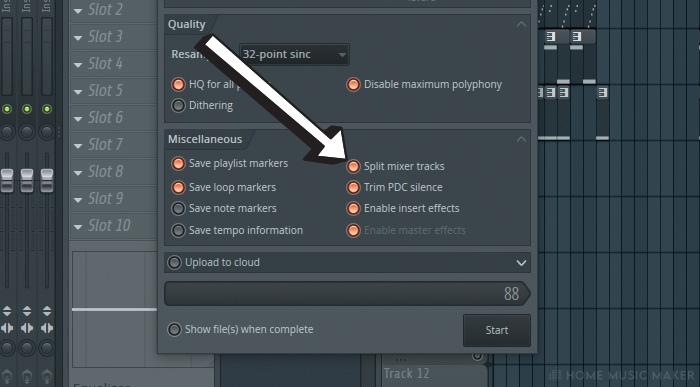
Watch from 02:41 to 07:10. Pay close attention to these points: Creating a Folder: He creates a new, dedicated folder for the stems to keep them organized. Format and Bit Depth (04:40): He explains why WAV at 24-bit or 32-bit float is essential for stems. 32-bit float is ideal because it preserves the full quality and headroom, making it perfect for someone else to mix. Split Mixer Tracks (05:20): He enables the key setting. Song vs. Pattern Mode (05:30): This is critical. He makes sure to set it to 'Song' mode so every stem has the exact same length, ensuring they line up perfectly when imported into another project.
Test your understanding!
You are collaborating with a producer who uses a different DAW. You need to send them stems for your track. You export using "Split mixer tracks," but they message you saying all the stems have effects like reverb and delay on them, and they wanted "dry" stems to apply their own effects.
Which setting in the FL Studio export window did you likely forget to change?
Show answer
You likely left "Enable insert effects" and/or "Enable master effects" turned on. To provide truly dry stems (without your processing), you would disable these options during export. Disabling "Enable master effects" is almost always necessary when sending stems for mixing, as the other engineer will do their own master bus processing.
Your Final Export Checklist
Here is a quick reference guide for your two main export scenarios.
Checklist for Exporting a Final Master:
- Select: Ensure "Song" mode is active and no time selection is highlighted in the playlist to export the entire track.
- Navigate: Go to
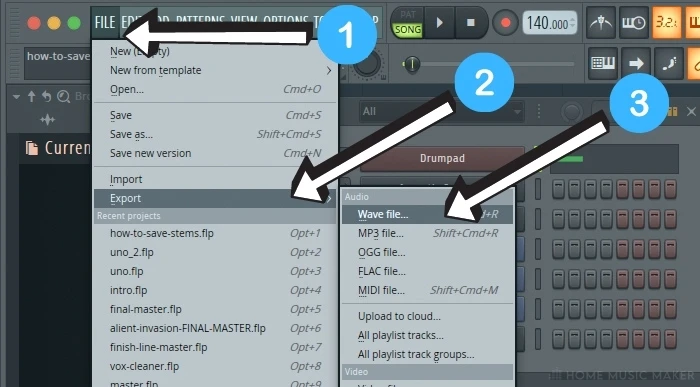
File > Export > WAV file.... - Set Format:
- Type: WAV
- Bit Depth: 24-bit (for streaming) or 16-bit (for CD)
- Set Quality:
- Sample Rate: 44.1 kHz
- Resampling: 512-point sinc (or highest available)
- Dither: ON
- Set Miscellaneous:
- Tail: Leave remainder
- Split mixer tracks: OFF
- Enable insert effects: ON
- Enable master effects: ON
- Start.
Checklist for Exporting Stems for Collaboration/Mixing:
- Prepare: Route every instrument/vocal to a unique, named mixer track.
- Select: Ensure "Song" mode is active.
- Navigate: Go to
File > Export > WAV file...and create a new folder for the stems. - Set Format:
- Type: WAV
- Bit Depth: 32-bit float (ideal for further processing) or 24-bit.
- Set Quality:
- Sample Rate: 44.1 kHz
- Resampling: 512-point sinc
- Dither: OFF (very important! Never dither stems.)
- Set Miscellaneous:
- Tail: Leave remainder
- Split mixer tracks: ON
- Enable master effects: OFF
- Enable insert effects: Your choice. Discuss with your collaborator. "Dry" (OFF) is often safer.
- Start. After exporting, it's good practice to compress the folder into a .zip file for easy sharing.
Course Conclusion
And with that, you have reached the end of this course. You have built a complete, practical skill set covering the entire sound engineering workflow within FL Studio.
Key Takeaways from Today's Lesson:
- The final master file should be a high-quality, uncompressed WAV file, typically at 24-bit depth and 44.1 kHz sample rate, with dithering enabled.
- Stems are individual track exports used for collaboration and remixing. They should also be high-quality WAV files (32-bit float is best), but without dithering and usually without master effects.
- The "Split mixer tracks" option is the key to exporting stems in FL Studio.
- Always ensure your project is in "Song" mode when exporting stems so they are all the same length and align perfectly.
You now have the knowledge to not only create, mix, and master a track but also to prepare it for professional distribution and collaboration. The journey of a sound engineer is one of continuous learning and practice. Take these techniques, apply them to your own music, listen critically, and never stop experimenting.
Congratulations on your hard work and dedication. Now go make some great music and share it with the world.