Hello! Welcome back to our module on creating space and depth in your mixes.
In our last lesson, you trained your ear to identify the fundamental "flavors" of reverb: the grandness of a hall, the realism of a room, and the shimmering texture of a plate. You now have the foundational knowledge to choose the type of space a sound should live in.
Today, we move from choosing the space to becoming its architect. You will learn how to adjust the core reverb parameters—pre-delay, decay time, and size—to precisely shape that space and make it fit perfectly within your mix. Instead of just using presets, you'll gain the control to build a custom environment, whether it's a tight, intimate room for a vocal or a vast, epic landscape for a synth pad.
1. The Anatomy of a Reverb
Before we start turning knobs, it's crucial to understand what a reverb effect is actually modeling. When a sound occurs in a room, you hear three distinct things in rapid succession:
- Direct Sound: The original sound that travels straight from the source to your ears.
- Early Reflections: The first few reflections that bounce off the nearest surfaces (walls, floor, ceiling) and arrive just after the direct sound. Your brain uses these to determine the size and shape of the room.
- Reverb Tail (Late Reflections): A dense wash of thousands of later reflections that have bounced around the room many times. This is the smooth "tail" of the reverb, and its length tells us how reflective the room's surfaces are.
This image perfectly illustrates the concept.

Understanding these three parts is key because the main reverb parameters we'll discuss are designed to control them.
- Size primarily shapes the Early Reflections.
- Decay Time primarily shapes the Reverb Tail.
- Pre-delay controls the gap between the Direct Sound and everything that follows.
2. Shaping the Space: The Core Parameters
Let's dive into the three key parameters you'll use to build your virtual space. Since you're comfortable with FL Studio, we'll often refer to how these work in Fruity Reeverb 2.
FL STUDIO | Mixing Basics - Reverbs
The official FL Studio channel has a great video covering the basics of Fruity Reverb 2. This first section will walk you through the most important parameters, including the ones we're focusing on today.
Watch from 02:25 to 06:46. Pay close attention to the explanations of 'Size', 'Decay', and 'Pre-delay'. Notice how the narrator connects these controls to the perception of room size and materials.
Now, let's break down each parameter with a more hands-on approach.
A. Size: Defining the Room's Dimensions
The Size (or "Room Size") parameter sets the dimensions of your virtual space. A small size gives the impression of a closet or small room, while a large size suggests a warehouse or cathedral.
Technically, this parameter adjusts the timing of the early reflections. A practical way to set this is to listen only to the early reflections to find a space that feels right, before you even think about the reverb tail.
Mixing With Mike Mixing Tip: Understanding and Setting Reverb Parameters
This video from 'Mixing With Mike' demonstrates a fantastic professional technique for setting your reverb size. He explains how to isolate the early reflections to first define the space before adding the reverb tail.
Watch from 00:31 to 05:39. Focus on his workflow: he turns the reverb tail off and adjusts the early reflections to find a 'size' that fits the vocal. This is a powerful ear-training exercise.
B. Decay: Controlling the Reverb Tail
Decay (or "Decay Time") controls how long it takes for the reverb tail to fade into silence. This parameter is your main tool for controlling the character of the space—is it a heavily-damped studio with soft surfaces (short decay) or a church made of stone (long decay)?
For a natural-sounding reverb, the Size and Decay parameters should be linked. A small room size with a very long decay time will often sound unnatural and dissonant, like a metallic ringing.
Reverb: The Ultimate Guide For Music Producers
This article from EDMProd clearly explains the main reverb parameters. We'll focus on the sections that describe Decay, Size, and their relationship.
Read the section 'The Most Important Parameters of a Reverb'. Focus on the 'Decay' and 'Size' descriptions, and listen to the audio examples that demonstrate what happens when you use a long decay with a small size.
A key part of making reverb work in a mix, especially for vocals, is making it fit the song. A great pro tip is to match the decay time to the tempo and feel of the accompaniment.
For example, in a ballad, you might set the reverb tail to fade out just as the next musical phrase begins, or to end along with a sustained piano chord. In an up-tempo track, a shorter decay time is essential to avoid muddying the mix.
C. Pre-Delay: Creating Clarity and Depth
Pre-delay is perhaps the single most important parameter for ensuring your reverb adds space without sacrificing clarity. It sets a small amount of time (in milliseconds) between the dry, direct sound and the start of the reverb (both the early reflections and the tail).
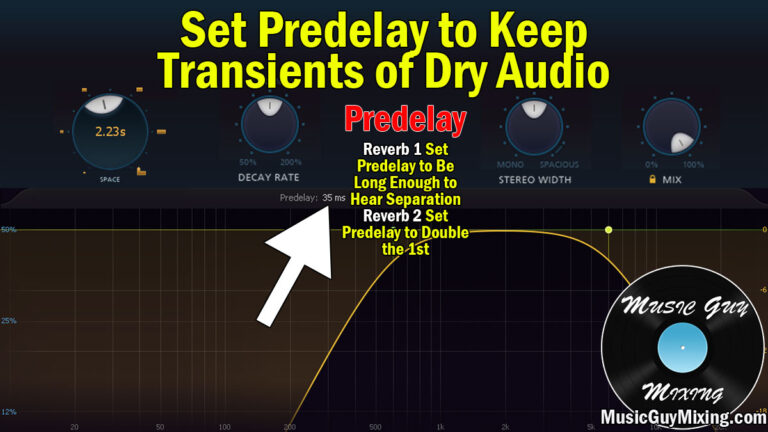
This small delay has two powerful effects:
- Clarity: It allows the listener's brain to process the dry sound's transients and consonants first, making vocals more intelligible and drums more punchy.
- Depth Perception: A longer pre-delay makes the sound source feel closer to the listener, as if you're standing right in front of the singer in a large hall. A zero pre-delay makes the source sound more distant, as if it's at the back of the room, enveloped by the reverb.
Mixing With Mike Mixing Tip: Understanding and Setting Reverb Parameters
Let's return to 'Mixing With Mike'. This next section offers one of the best explanations of pre-delay you'll find, including how to set it to create intimacy and how to calculate times that are in sync with your track's tempo.
Watch from 05:39 to 09:06. Absorb his explanation of how pre-delay separates the direct signal from the reverb. The tip about using musical subdivisions of your tempo for pre-delay is a game-changer.
For vocals, a small amount of pre-delay (e.g., 15-30ms) is almost always a good idea to maintain clarity. The article below gives some excellent, practical starting points.
A complete tutorial on mixing vocals and finished ...
This tutorial on mixing vocals provides concrete settings for creating a space that blends well with an instrumental track. It's a great practical guide.
Read 'Step 1: Select a reverb type...' and focus on the 'Basic parameter settings' under point 2. Note the starting values for Pre-delay and Decay Time. Then read 'Step 2: Enhance spatial realism using “Early Reflections”' to see how early reflections and pre-delay work together.
Test your understanding!
You are mixing a lead vocal for a fast-paced pop-punk song. You want to add some space, but the vocal needs to remain very upfront, clear, and energetic. Describe how you would set the Size, Decay Time, and Pre-delay. Justify your choices.
Show answer
- Size: A small to medium size (like a room or plate) would be best. A large hall would sound out of place and wash out the vocal.
- Decay Time: A short decay time (likely under 1.5 seconds) is crucial. A long decay would clash with the fast tempo, creating mud and reducing the song's energy. The reverb should not bleed over into the next vocal line.
- Pre-delay: A moderate pre-delay (e.g., 20-40ms) would be very effective. This separates the dry vocal from the reverb, ensuring every word is clear and punchy, which is essential for this genre. It keeps the vocal feeling upfront while the reverb creates a sense of space behind it.
Conclusion
You now have the fundamental tools to go beyond presets and start sculpting your own acoustic environments. By understanding and manipulating these three core parameters, you can make deliberate choices about the space in your mixes.
Key Takeaways:
- Size controls the virtual room's dimensions, defined primarily by the early reflections. Set this first to establish the basic space.
- Decay Time controls the length of the reverb tail. It should complement the size and, more importantly, the tempo and energy of your song.
- Pre-delay is your secret weapon for clarity. It creates a small gap that lets the dry sound punch through before the reverb begins, creating both separation and a sense of depth.
- The relationship between these parameters is everything. A change in one will affect how you perceive the others. Always adjust them while listening in the context of the full mix.
In our next lesson, we will explore another crucial tool for creating depth: delay. We'll also cover the essential professional workflow of using sends and return tracks to apply reverb and delay efficiently, a topic briefly mentioned in today's videos. This will give you even more control and save your computer's processing power.