Hello! Welcome back to your sound engineering course.
In our last lesson, we focused on timing our delays, learning to sync them to our project's tempo or calculate the time in milliseconds. We briefly touched on the idea of putting these effects on separate tracks, and today, we're going to master that essential professional workflow.
This lesson is all about setting up and using send and return tracks for your time-based effects (like reverb and delay). This is one of the most fundamental routing techniques in mixing. Understanding this will make your mixes more efficient, flexible, and sonically cohesive. For someone like you who's already comfortable navigating FL Studio, this lesson will add a powerful structural approach to your existing skills.
1. The "Why": Inserts vs. Sends
So far, you might have been adding effects directly onto a track's insert slots in the mixer. This is called insert processing. It's perfect for tools that treat the entire signal, like an EQ or a compressor.
However, for time-based effects like reverb and delay, putting them directly on a track can be problematic. If you put a reverb plugin on your lead vocal track, the entire vocal signal gets processed. It can become a "washed out," distant sound, and you lose the clarity of the original performance.
The professional solution is to use send and return routing, also known as parallel processing.
The core idea is simple:
- You keep your original "dry" track (e.g., the vocal).
- You "send" a copy of that dry signal to a separate mixer track.
- This separate track, called a return track (or sometimes an aux track or effects bus), contains your effect (e.g., a reverb).
- The original dry track and the new "wet" return track are then blended together at the master output.
This gives you two separate faders: one for the clean vocal and one for its reverb, offering far more control.
To solidify these concepts, let's start with a clear article that defines the terminology.
Your guide to busing and routing audio tracks like a pro
The article 'Your guide to busing and routing audio tracks like a pro' from Splice provides excellent, straightforward definitions for the concepts we're discussing today.
Please read the section 'The basics of audio busing.' Focus on the definitions of source track, bus, and bus track. Pay close attention to the part explaining how adding a bus on a 'send' duplicates the signal for effects, and the definitions of 'wet' vs. 'dry' signal.
As the article explains, the main advantages of this workflow are:
- CPU Efficiency: You can send multiple tracks (e.g., lead vocal, backing vocals, a synth) to the same reverb return track. This means you only run one instance of the reverb plugin, saving significant processing power.
- Cohesion: Sending multiple instruments to the same reverb makes them sound like they exist in the same acoustic space, helping to "glue" your mix together.
- Flexibility: You can process the "wet" signal independently. For example, you can put an EQ on the reverb itself to remove muddy low frequencies from the reverb tail, without affecting the dry vocal at all. This is a game-changer for clean mixes.
2. The "How": Setting Up Sends and Returns in FL Studio
Now for the practical part. Since you're proficient with FL Studio, this process will be intuitive. Here is the step-by-step workflow.
Step 1: Create and Name Your Return Track
Select a free mixer insert. Right-click it, select "Rename, color and icon...", and give it a clear name like "Vocal Reverb" or "Main Delay".
Step 2: Load the Effect and Set it to 100% Wet
On this new return track, load your chosen effect (e.g., Fruity Reverb 2). This next step is critical: you must set the effect's mix to be 100% wet and 0% dry. This ensures the return track is only outputting the effect's sound, not a copy of the original signal.
This article provides a clear visual for how to do this with FL Studio's native plugins.
FL Studio – Creating and Using Send FX Channels [VIDEO]
The article 'FL Studio – Creating and Using Send FX Channels' from DIY Music gets straight to the point on this crucial setting.
Read the sections 'Setting up Send FX Channels.' Notice how for Fruity Reverb 2, you turn the 'DRY' knob all the way down and the 'WET' knob all the way up. This is the golden rule for setting up effects on a return track.
Step 3: Route the Source Track to the Return Track
- Select your source track (e.g., your lead vocal).
- Look at the bottom of your return track ("Vocal Reverb"). You'll see an upward-pointing arrow.
- Click that arrow. A wire will appear, showing the new connection, and a knob will appear next to it. You have now created the "send."
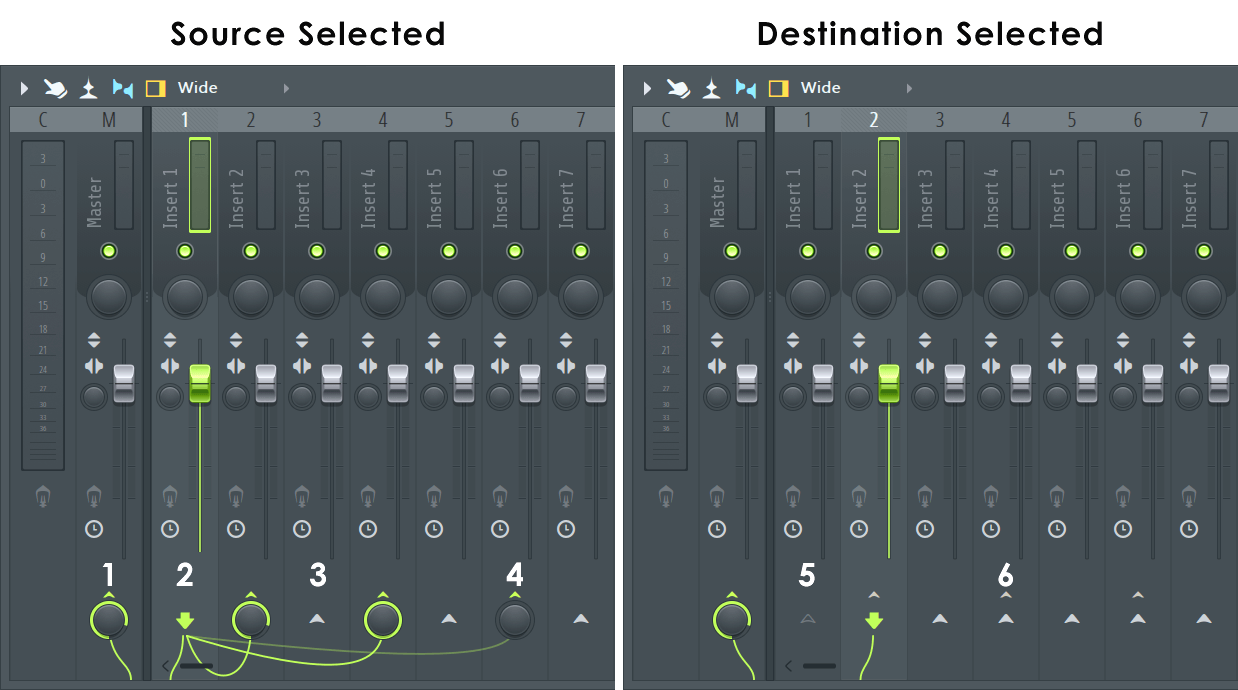
Step 4: Blend the Signals
You now have independent control:
- Source Track Fader: Controls the volume of your dry vocal.
- Return Track Fader: Controls the overall volume of the reverb for all tracks sent to it.
- Send Knob (on the source track): Controls how much of the dry vocal is being sent to the reverb. Turning this up makes the vocal sound more "wet" and distant.
This video provides a complete demonstration of this setup. The presenter clearly explains the problem with insert effects and walks through the send/return solution.
Routing in FL Studio - Busses, Auxes, Sends
The video 'Routing in FL Studio' by Mix With Jerry offers a fantastic explanation and demonstration of this entire process.
Watch the section on 'send tracks' from 07:23 to 11:59. He perfectly demonstrates why you'd use a send for reverb, how to set it up, the importance of the 100% wet signal, and how you gain independent control over the effect.
Test your understanding!
You have a lead vocal and two backing vocal tracks. You want them all to sound like they are in the same medium-sized room to help them blend together. Describe the steps you would take in FL Studio to achieve this efficiently using a single reverb plugin.
Show answer
- Choose an empty mixer track and name it "Vocal Room Reverb".
- Load
Fruity Reverb 2onto this track and set its Dry level to 0% and its Wet level to 100%. I would also adjust the reverb's 'Size' and 'Decay' parameters to simulate a medium-sized room. - Select the lead vocal track. Click the routing arrow at the bottom of the "Vocal Room Reverb" track to create a send. Adjust the send knob to taste.
- Select the first backing vocal track and repeat the process: click the routing arrow on the reverb track and adjust its send knob.
- Select the second backing vocal track and do the same.
Now all three vocal tracks are being sent to a single reverb plugin, ensuring they sound cohesive and saving CPU. I can control the overall reverb level with the "Vocal Room Reverb" fader.
3. Creative Routing: Sidechaining Effects
Once you master this routing, you can unlock powerful creative techniques. One of the most popular, especially for vocals, is sidechaining your delay.
The goal is to have long, interesting delay throws without them clashing with the main vocal. You achieve this by making the delay "duck" (get quieter) whenever the vocalist is singing and then rise back up in the silent gaps. This requires a send/return setup.
This next video shows you exactly how to do it.
FL Studio Tutorial - Sidechain Delay on Vocals (buses & Sends)
In this tutorial, J Canan demonstrates how to set up a sidechained delay for vocals, a perfect practical application of what we've just learned.
First, watch from 03:01 to 05:21. He sets up separate return tracks (he calls them 'buses') for his reverb and delay and routes his vocal to them, just as we've discussed. Then, watch from 05:21 to 08:45, where he performs the key action: he adds a Fruity Limiter to the delay return track, sets it to compression mode, and sidechains it to the dry vocal. Listen to the result—the delay fills the gaps beautifully without muddying the vocal phrases.
This technique is a perfect example of why send/return routing is so powerful. It allows you to process and control the effect in a way that would be impossible with a simple insert.
Conclusion
Mastering send and return routing is a huge step towards mixing like a professional. It's a workflow that encourages efficiency, creativity, and sonic clarity.
Key Takeaways:
- Use Inserts for processing a whole track (EQ, Compression). Use Sends/Returns for parallel effects where you want to blend the wet and dry signals (Reverb, Delay).
- The three main benefits of using sends are CPU efficiency, mix cohesion, and the flexibility to process the effect independently.
- The golden rule for return tracks is to set your effect plugin to 100% wet.
- This workflow gives you three main points of control: the dry track's fader, the send level, and the return track's fader.
Now that we have our dry source and our wet effect on separate tracks, our next step is to use this separation to create a sense of depth in our mix. In the next lesson, we will focus on balancing the wet/dry signal of effects to place elements convincingly in the mix, moving them from front-to-back in the soundstage.