Hello! Welcome back to your course on sound engineering.
In our last lesson, you learned to use high-pass and low-pass filters to sweep away unnecessary low-end rumble and high-end hiss. This is a crucial first step in cleaning up a mix. Today, we're moving from the edges of the frequency spectrum into its very core to address some of the most common problems in mixing.
This lesson focuses on recognizing and correcting common frequency issues like muddiness, boxiness, and harshness. Mastering this skill will be one of the biggest leaps forward you'll make in moving from a rough recording to a clear, professional-sounding mix. We'll identify where these problems live and learn the precise surgical technique to remove them without harming the original sound.
1. What are Muddiness, Boxiness, and Harshness?
Before we can fix these problems, we need to train our ears to recognize them and know where to look for them. These terms are used by engineers to describe specific, unpleasant characteristics caused by a buildup of energy in certain frequency ranges.
To start, let's get a clear definition of these problem areas.
Your Guide to the Audio Frequency Chart
The article 'Your Guide to the Audio Frequency Chart' provides an excellent breakdown of the frequency spectrum and the common terms associated with each band. It directly explains what 'mud', 'boxiness', and 'harshness' are and where they come from.
Read the sections 'The Audio Spectrum at a Glance' and 'Exploring the Six Essential Frequency Bands'. Pay close attention to the descriptions for the 'Low-Mids' and 'Upper-Mids'. The table in the first section is a great summary.
Based on that reading, here's a quick summary of the usual suspects:
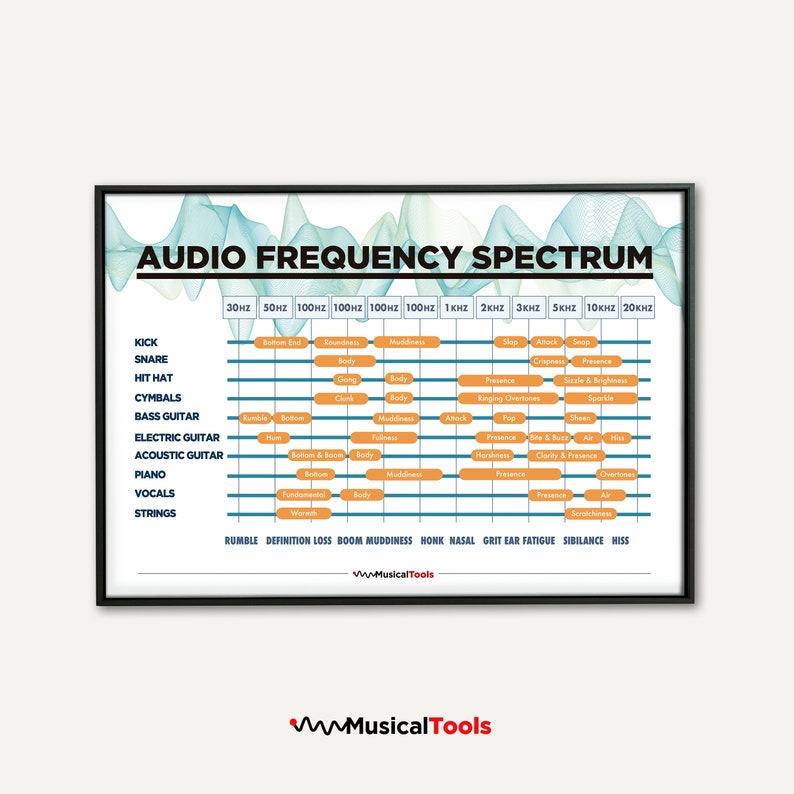
- Muddiness (~200 - 500 Hz): This is the most common issue in home recordings. It's a build-up in the low-mids that makes a mix sound cluttered, congested, and indistinct, as if a blanket has been thrown over the speakers. It robs your mix of clarity.
- Boxiness (~300 - 600 Hz): Living in a similar area to mud, boxiness gives a cheap, "cardboard" or hollow sound, particularly noticeable on drums, vocals, and acoustic guitars.
- Harshness / Shrillness (~2 - 5 kHz): This is an aggressive, piercing quality in the upper-mids that causes listener fatigue. It can sound brittle, tinny, or like "ice picks in the ears." This is often a problem with vocals, cymbals, and distorted guitars.
The following video offers a fantastic tour of these "ugly" frequency areas. Listening to the examples will help you connect these descriptive words to actual sounds.
5 Ugly Frequency Areas YOU SHOULD KNOW
The video '5 Ugly Frequency Areas YOU SHOULD KNOW' by Learn Audio Engineering gives you a quick, practical tour of common problem frequencies.
Watch the sections that cover 'the mud' (01:43 - 02:39), 'the piercing shrill' (02:39 - 03:01), and 'nails on a chalkboard' (03:01 - 03:37). Listen carefully as the presenter isolates and describes each problematic sound.
This chart provides a helpful visual reference for where these issues often appear on various instruments.
Test your understanding!
You are listening to an acoustic guitar recording that sounds full, but it also sounds a bit like it was recorded inside a cardboard box. Based on what you've just learned, which frequency range would you investigate first to fix this?
Show answer
You would investigate the low-mids, roughly between 300 Hz and 600 Hz. This is the range most commonly associated with a "boxy" sound.
2. The Technique: Surgical Subtractive EQ
Now that you know what to listen for and where to find it, how do you fix it? The answer is with surgical subtractive EQ. Unlike the broad slopes of the high-pass and low-pass filters you used in the last lesson, this requires a very narrow filter to cut out the offending frequency without affecting the surrounding sound.
The most effective method is often called the "boost and sweep" or "frequency hunting" technique.
Here is the process:
- In Fruity Parametric EQ 2, select a band and make sure its type is set to "Peaking".
- Narrow the bandwidth by turning the BW knob to the right (or right-clicking the band and scrolling) to create a sharp, narrow peak.
- Boost the gain of this band significantly (e.g., +10 dB).
- Slowly sweep the frequency of this band across the suspected problem area (e.g., 200-600 Hz for muddiness).
- Listen for a frequency that suddenly "jumps out," sounds particularly ugly, or resonates in an unpleasant way. You've found the problem.
- Once you've pinpointed the frequency, switch the boost to a cut by pulling the gain down.
- Finally, adjust the amount of cut and slightly widen the bandwidth until the problem is reduced, but the instrument still sounds natural. Always bypass the EQ to compare the "before" and "after" to ensure you've made an improvement.
This next video provides a perfect, practical demonstration of this exact technique.
In 'How to do Subtractive EQ', the presenter clearly demonstrates the 'frequency hunting' technique to solve the exact problems we're discussing.
Watch from 07:49 to 09:04 to see how he hunts for and removes a 'boxy' resonant frequency. Then, watch from 09:04 to 11:38 to see him apply the same technique to find and tame harsh sibilant frequencies in the upper-mids. Notice how narrow his EQ band is when searching.
3. Practical Exercise: Clean Up a Track
It's time to put this into practice in FL Studio. Ear training is the most important part of this process, and you only build it by doing.
- Open an existing project or load a single audio file (a vocal track is ideal, but acoustic guitar, piano, or even a full drum loop will work).
- Insert an instance of Fruity Parametric EQ 2 on the track.
- Hunt for Muddiness/Boxiness:
- Use the "boost and sweep" technique described above.
- Focus your search between 250 Hz and 600 Hz.
- Listen for that hollow, cardboard, or congested sound.
- When you find it, apply a gentle cut of around -3 dB to -6 dB.
- Hunt for Harshness:
- Use the same technique.
- Focus your search between 2 kHz and 5 kHz.
- Listen for piercing, brittle, or overly aggressive frequencies.
- Apply a similar cut when you find the offending spot.
Important: The goal is not to eliminate these frequencies entirely, but to reduce them just enough to clean up the sound. A little goes a long way. Constantly use the bypass button on your EQ to make sure you're improving the sound, not just changing it.
Conclusion
Today you've moved beyond simple filtering and into the art of surgical EQ. By learning to identify and correct muddiness, boxiness, and harshness, you've gained one of the most powerful skills for achieving clarity and professionalism in your mixes.
Key Takeaways:
- Muddiness and Boxiness are found in the low-mids (approx. 250 - 600 Hz) and make a mix sound cluttered and cheap.
- Harshness is found in the upper-mids (approx. 2 - 5 kHz) and makes a mix sound piercing and fatiguing.
- The "boost, sweep, and cut" method is the standard technique for finding and removing these problematic frequencies with surgical precision.
- Subtlety is key. Make small cuts and always A/B your changes to ensure you are truly improving the sound.
In the last few lessons, we've focused on using EQ to clean up individual sounds. Now that your tracks are cleaner, the next challenge is making them work together. In our next lesson, we will focus on using EQ to create frequency separation between two competing elements in a mix, ensuring that every instrument has its own space to shine.