Hello! Welcome to the final lesson in our module on adding character and movement to your tracks.
In our previous lessons, we explored how to use effects like saturation, chorus, and distortion to shape the static tone of a sound. We saw, for example, how adding distortion can give a vocal more aggression. But what if you only want that aggression in the chorus? Or what if you want a synth to slowly morph and evolve over eight bars?
This is where automation comes in. Today, we'll learn how to automate effect parameters to create dynamic changes and interest throughout a song. This is the key to transforming a static, looping mix into a dynamic arrangement that breathes, evolves, and holds the listener's attention from beginning to end.
1. The "How-To": Creating Automation in FL Studio
Automation allows you to "record" the movement of any knob, fader, or button in your project over time. Since you're already comfortable navigating FL Studio, we'll dive right into the mechanics of how to create and edit automation clips.
The following video from In The Mix is an excellent, concise guide that covers everything you need to know to get started.
How To Use Automation Clips - FL Studio 20 Essentials
This video, 'How To Use Automation Clips - FL Studio 20 Essentials', provides a complete walkthrough of the core automation features in FL Studio. It will show you how to automate both native FL Studio plugins and third-party VSTs.
Please watch the following sections: Introduction (00:00 - 01:06): Get a clear definition of what automation is and what it's used for. Automating Native Parameters (01:06 - 03:41): Pay close attention to the process: right-click a parameter -> 'Create automation clip'. Notice how to add, delete, and move points, and how to change the curve shape. Automating Third-Party Plugins (03:41 - 04:45): This is a crucial skill. The process is slightly different: you first 'tweak' the knob in the plugin, then use the 'Last tweaked' parameter control in FL Studio to create the clip. Adjusting Min/Max Range (05:18 - 06:42): This is a powerful feature for fine-tuning. It allows you to limit the range of the automation, which is perfect for making subtle changes.
To summarize the key workflow in FL Studio:
- For native FL Studio parameters: Right-click the knob or fader and select "Create automation clip."
- For third-party plugins: First, move the knob you want to automate inside the plugin. Then, go to FL Studio's top menu:
Tools > Last tweaked > Create automation clip.
Once the clip is in your Playlist, you can Right-click to add points, Right-click on existing points to delete them or change their mode (like 'Hold' or 'Single curve'), and Left-click and drag to move them.
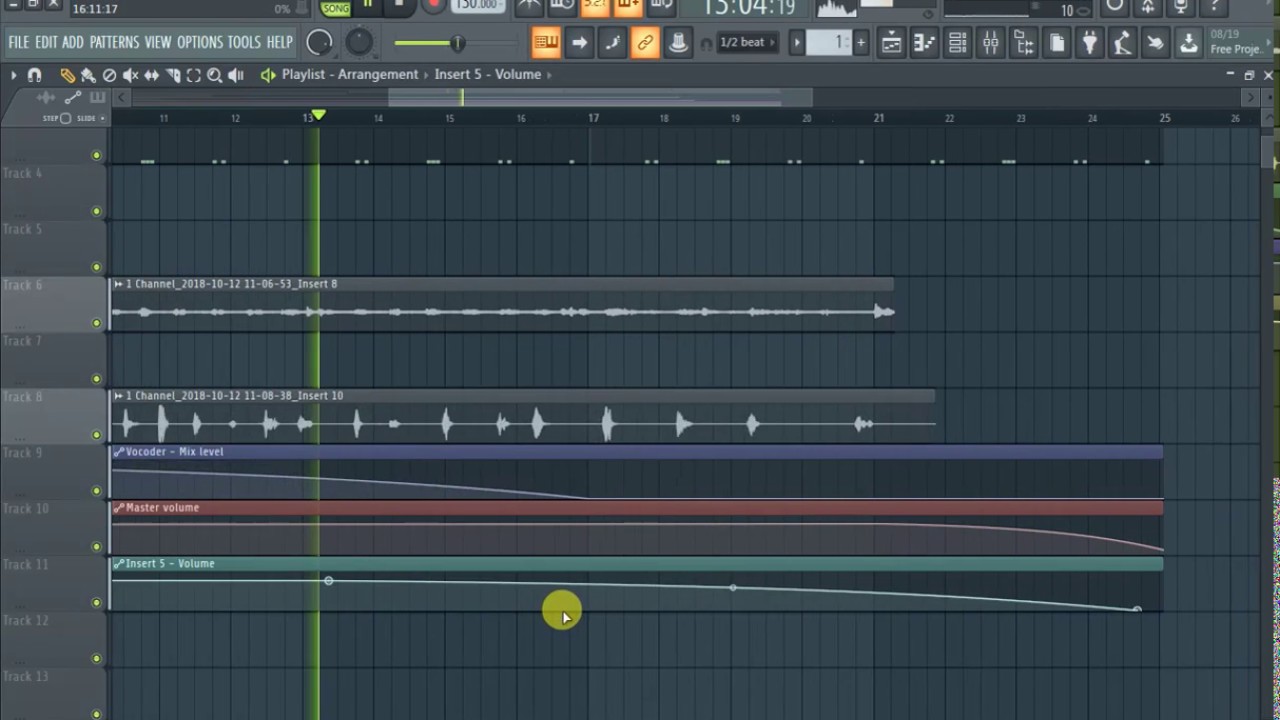
2. Practical Application: Detailed Vocal Automation
One of the most common and important uses of automation is controlling a vocal's volume. While you could automate the main mixer fader, a more flexible professional workflow involves using a separate gain plugin at the start of your effects chain. This allows you to even out the vocal's dynamics before it hits your compressor, making the compressor's job easier and its sound more transparent.
This next video demonstrates this exact workflow for vocal automation. It's a fantastic practical example of how automation is used in a real-world mixing scenario.
Vocal Automation Tutorial | FL Studio 20
In this 'Vocal Automation Tutorial' by Jon Audio, you'll see a detailed, hands-on workflow for controlling vocal volume. The focus is on using a separate plugin for automation, which is a powerful technique.
Watch the first two sections of this video: Setup and Concept (00:00 - 02:50): Focus on why the presenter adds Fruity Balance as the first plugin in the chain. This is the core concept: automating volume before compression. Editing and Workflow (02:50 - 07:32): Observe the workflow. The presenter overlays the automation clip on the audio clip for a clear visual reference. Notice the heavy use of 'Hold' points to create precise, block-like volume adjustments to turn down loud words and turn up quiet ones.
The key idea here is "micro-managing" the vocal's level phrase by phrase, or even word by word. This ensures the vocal sits perfectly in the mix at all times, a task that a compressor alone can't always achieve without sounding unnatural.
3. Creative Automation: Making Your Mix Move
Beyond corrective tasks like vocal riding, automation is your primary tool for adding creative movement and building excitement. Instead of just automating volume and panning, you can automate any parameter on any effect plugin. This opens up a universe of possibilities.
Let's explore a few classic and highly effective techniques.
Technique 1: Filter Sweeps for Transitions
A filter sweep is one of the most effective ways to build tension and signal a change in your song (like leading into a chorus or drop).
- What it is: Automating the cutoff frequency of a high-pass or low-pass filter.
- How to do it: Place an EQ (like
Fruity Parametric EQ 2) on your master track or a bus of instruments. Create an automation clip for the frequency knob of a high-pass filter. Over 4 or 8 bars, automate the frequency to rise from ~100 Hz up to ~10 kHz. This thins out the sound, building tension. When the drop hits, the automation ends, and the full frequency range slams back in.
Technique 2: Reverb & Delay "Throws"
This is a great way to add emphasis and create a sense of space at the end of vocal phrases or on specific drum hits.
- What it is: A "throw" is a burst of an effect on a single word or sound.
- How to do it: Set up your reverb or delay on a send/return track as we discussed in a previous module. Create an automation clip for the send level on your vocal or snare track. Keep the send level at zero, but automate it to quickly jump up for the last word of a phrase, then immediately go back down. This "throws" that single word into a big space without muddying up the rest of the track.
Technique 3: Evolving Character with Saturation
In our last lesson, we used distortion to add static aggression. Now, let's make it dynamic.
- What it is: Automating the 'drive' or 'mix' knob of a saturation or distortion plugin.
- How to do it: Put a saturation plugin (like
Fruity Fast Dist) on a synth bass. During the verse, keep the drive low for a clean sound. Automate the drive to increase significantly during the chorus to give the bass more grit and energy, helping it stand out.
These are just a few examples. The article "10+ Creative Automation Techniques That Will Blow Your Mind" provides many more fantastic ideas.
10+ Creative Automation Techniques That Will Blow Your Mind
For more inspiration, skim through this article from Unison Audio. You don't need to read it in depth, but look at the headings to see the sheer variety of creative automation techniques available.
Quickly read through the list starting from '#1. Reverb Throw Automation...'. Notice the different parameters being automated: reverb sends, filter cutoffs, delay feedback, distortion drive, and even synth parameters like wavetable position. This will give you a great overview of what's possible.
Test your understanding!
Imagine you have a synth pad that plays a simple chord progression throughout your song. It sounds nice, but it's very static and a bit boring. Using the concepts we've just discussed, describe two distinct automation ideas you could apply to this synth pad to make it more dynamic and interesting as the song progresses from the verse to the chorus.
Show answer
Here are two possible ideas:
-
Filter and Reverb Swell:
- Automation 1 (Filter): Automate a low-pass filter's cutoff frequency. During the verse, keep the cutoff low (e.g., around 800 Hz) so the pad sounds dark and sits in the background. As the song builds into the chorus, automate the cutoff to slowly rise, making the pad brighter and more present.
- Automation 2 (Reverb): Simultaneously, you could automate the 'Wet' or 'Mix' level of a large hall reverb on the pad. Keep it relatively dry in the verse, and automate the wet level to increase along with the filter sweep, making the pad feel like it's expanding and filling more space as it gets brighter.
-
Chorus and Panning for Width:
- Automation 1 (Chorus): Use a chorus effect and automate the 'Mix' or 'Depth' parameter. In the verse, keep the mix level low for a subtle effect. In the chorus, automate the mix level to increase, making the pad sound much wider and thicker.
- Automation 2 (Auto-Pan): Use an auto-panner plugin (like
Fruity PanOMatic) and automate its 'Amount' or 'Speed'. During the verse, keep it off or very low. For the chorus, automate the amount to increase, creating a gentle panning motion from left to right that adds movement and interest to the now-wider sound.
Conclusion
This lesson concludes our module on adding character and modulation. You've learned how to use a wide array of tools to shape your sounds, and with automation, you now have the ability to make those effects dynamic and an integral part of your song's arrangement.
Key Takeaways:
- Automation is the key to creating movement, dynamics, and interest in a mix.
- In FL Studio, you can create an automation clip for almost any parameter by right-clicking or using the
Tools > Last tweakedmenu. - Automating a gain plugin before your compressor is a powerful technique for transparently controlling vocal dynamics.
- Creative automation goes beyond volume/pan. Automating filters, effect sends (reverb/delay), and saturation are fundamental techniques for building energy and creating transitions.
You now have a solid understanding of the essential audio processing tools. In our next module, "The Mixing Framework," we will zoom out and learn how to bring all these skills together. We'll start by looking at the big picture: how to analyze a song and develop a mixing strategy before you even touch a single EQ or compressor.