Hello! Welcome back.
In our last two lessons, we've laid the essential groundwork for a great vocal recording. First, you learned how to choose the right microphone and polar pattern. Then, you learned how to tame your recording environment by setting up a temporary space to minimize unwanted room reflections.
Now, it's time to bring those two elements together. This lesson will focus on the crucial final step before you hit record, addressing the learning outcome: Position a microphone correctly to capture a clean and balanced vocal performance.
Mic placement is not just about pointing the mic at the singer; it's an art that allows you to shape the vocal tone dramatically before it even enters your DAW. By adjusting the microphone's position by just a few centimetres, you can control the amount of bass, reduce harshness, and capture a performance that is much easier to mix. Your goal today is to learn how the three key variables—distance, height, and angle—work together to produce a professional vocal sound.
The Three Pillars of Microphone Placement
Think of microphone placement as having three main controls at your disposal:
- Distance: How far the singer is from the microphone.
- Height: The vertical position of the mic relative to the singer's mouth.
- Angle (Axis): The direction the microphone is pointing.
Mastering how these three interact is fundamental to vocal production. Let's break each one down.
1. Distance: Controlling Proximity and Consistency
The distance from the singer's mouth to the microphone capsule is arguably the most significant factor in the tone you capture. It controls two critical things: the amount of low-end and the consistency of the volume.
The Proximity Effect
Most cardioid microphones (which you learned about in the first lesson) exhibit something called the proximity effect. In simple, practical terms: the closer you get to the mic, the more bass frequencies are exaggerated.
- Too close: The vocal can sound boomy, muffled, and unnatural.
- Too far: The vocal can sound thin, distant, and you'll capture more of the room sound (which we worked to eliminate in the last lesson).

Finding the Sweet Spot
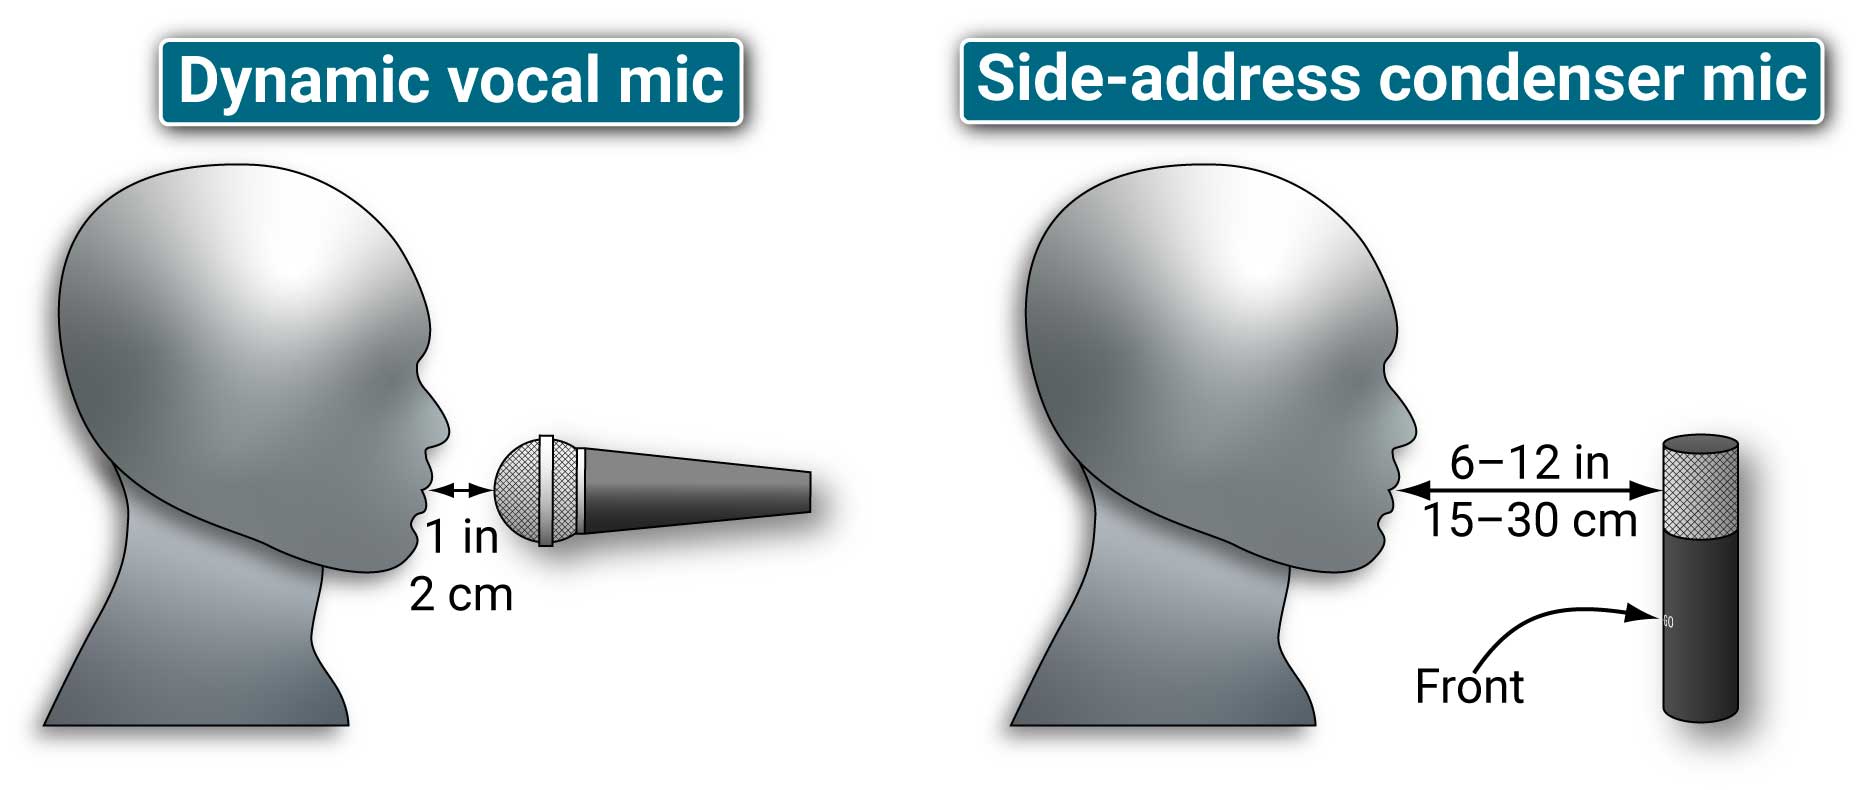
So, what's the right distance? A great starting point for most modern pop or rock vocals is 4-6 inches (or 10-15 cm) away from the capsule. This is close enough to get an intimate, present sound with a touch of warmth from the proximity effect, but far enough to avoid excessive boominess and plosives.
A fantastic practical tip is to use your hand to measure this distance consistently.
Microphone Placement -- Where and How to Setup your Mic like a Pro
Watch this clip from the video 'Microphone Placement -- Where and How to Setup your Mic like a Pro' by Jay Myers Voiceover. He gives a straightforward demonstration of how to find and maintain a consistent distance.
Watch from 01:28 to 02:58. Pay attention to the 'hand trick' he uses to ensure he's the same distance from the mic every time. This consistency is vital when recording multiple takes.
The article "The 3 Key Phases for Recording Vocals Like a Pro" also has excellent advice on this. It reinforces the 6-inch starting point for cardioid condenser mics and explains how this can vary for different mic types.
The 3 Key Phases for Recording Vocals Like a Pro
To go a little deeper, please read the section 'Cardioid Condenser Microphones' from the Mastering.com article.
In the article, find the subheading 'Find the Best Microphone Placement' and read the section under 'Cardioid Condenser Microphones'. Note the simple rule: Far away (12 inches) = open and airy. Close (4 inches) = warm and intimate.
2. Height: Shaping the Tonal Balance
The vertical position of the microphone has a surprising impact on the vocal's character. By changing the mic's height, you can emphasize different resonant qualities of the singer's voice.
- At Lip Level: This is a common starting point. It's a neutral position that captures a balanced sound but can sometimes be prone to plosives (puffs of air from 'p' and 'b' sounds).
- Aimed Down from Above (Nose/Forehead Height): This position tends to de-emphasize the chest resonance and can capture more nasal and head tones. This can help a vocal cut through a dense mix or, conversely, make a singer sound thinner.
- Aimed Up from Below (Chin/Chest Height): This position tends to capture more of the chest's resonance, resulting in a fuller, warmer, and sometimes "thicker" sound. This can be great for adding body to a thin voice.
The best way to understand this is to hear it.
Vocal Recording - Where to Point the Mic at the Vocalist
The video 'Vocal Recording - Where to Point the Mic at the Vocalist' by Creative Sound Lab provides a perfect A/B/C comparison of these positions. This is a great ear training exercise.
Watch from 00:40 to 03:57. First, he'll play you the three examples back-to-back. Then, he'll explain what's happening and play them again. Listen carefully for the change in character: the 'nasal' quality when aimed up, and the 'chest' sound when aimed down.
3. Angle (Axis): Solving Problems and Adding Finesse
Finally, let's talk about the angle of the microphone relative to the singer's mouth. We refer to this as recording on-axis (pointing directly at the sound source) or off-axis (pointing slightly away).
While pointing the mic directly at the singer's mouth (on-axis) might seem logical, it's often not the best choice. The strongest blasts of air happen straight ahead, leading to two main problems:
- Plosives: Loud, bassy thumps caused by 'p' and 'b' sounds hitting the microphone diaphragm directly. A pop filter helps, but placement is the first line of defense.
- Sibilance: Harsh 's', 'sh', and 't' sounds. These high-frequency sounds are very directional.
By simply moving the microphone slightly to the side and having the vocalist sing across the front of the mic instead of into it, you can dramatically reduce these issues.
Microphone Placement -- Where and How to Setup your Mic like a Pro
Let's return to the 'Microphone Placement' video. The presenter explains this off-axis technique very clearly.
Watch from 02:58 to 04:12. Focus on his explanation of why you don't want the mic directly in front of you and his technique of placing it 45 degrees to the side.
This off-axis technique is a cornerstone of professional vocal recording. Angling the mic also has a subtle tonal effect, often making the sound slightly less bright, which can be desirable for singers with a harsh or overly sibilant voice.
Putting It All Together: A Go-To Starting Position
Now that you understand the three pillars, here is a fantastic, reliable starting point for recording vocals with a side-address condenser microphone:
- Distance: Place the mic about 6 inches (15 cm) from the singer. Use your hand to measure.
- Height: Position the microphone so the capsule is level with the singer's upper lip or nose.
- Angle: Angle the mic downwards about 15-20 degrees towards the mouth. You can also position the mic stand slightly off to the side (about 30-45 degrees) and have the singer face forward, singing across the capsule.
This combination is effective because it:
- Provides a good balance of presence and warmth (distance).
- Keeps the capsule out of the direct path of plosives (height and angle).
- Often reduces sibilance naturally (angle).
Test your understanding!
You are about to record two different singers for a song.
- Singer A has a very quiet, breathy, and slightly thin voice.
- Singer B has a powerful, boomy voice with very sharp 's' sounds (sibilance).
Based on what you've learned, what would be your initial mic placement strategy for each singer? Explain your reasoning for distance, height, and angle.
Show answer
There's no single 'correct' answer, as experimentation is key, but here's a logical starting strategy:
For Singer A (quiet, thin voice):
- Distance: I'd start a bit closer, maybe around 4-5 inches. This will leverage the proximity effect to add some warmth and body to their thin tone, and will capture their quiet performance with a better signal-to-noise ratio.
- Height: I'd experiment with placing the mic slightly lower, maybe at chin level and aimed up. This would help to capture more chest resonance and add fullness.
- Angle: I'd likely start on-axis or very slightly off-axis to capture all the high-frequency detail of their breathy performance.
For Singer B (boomy, sibilant voice):
- Distance: I would start further away, around 8-10 inches. This will reduce the boomy proximity effect from their powerful voice.
- Height: I'd place the mic at forehead level, angled down. This moves the capsule away from the direct line of their harsh 's' sounds.
- Angle: I would definitely use an off-axis position, perhaps 30-45 degrees to the side. This is the most effective way to tame sibilance at the source, ensuring the 's' sounds hit the mic at an angle where it's less sensitive to them.
Conclusion
Today you've moved beyond simply setting up the gear and have started to use the microphone as a true tone-shaping tool. Getting the sound right at the source by carefully positioning your microphone is one of the hallmarks of a skilled engineer. It saves you countless hours of corrective work during the mixing stage.
Key Takeaways:
- Mic placement is a balance of three factors: distance, height, and angle.
- Distance controls the proximity effect (bass boost) and intimacy. A 4-6 inch starting point is standard.
- Height influences the tonal character, allowing you to emphasize either chest resonance (lower placement) or head/nasal tones (higher placement).
- Angle (off-axis placement) is your primary tool for reducing plosives and sibilance at the source.
In the previous lessons, you've selected your mic, treated your space, and now correctly positioned your mic. You are fully prepared to capture a high-quality performance. In our next lesson, we'll cover the process of recording multiple vocal takes and ensuring you get a clean, consistent performance ready for the editing stage.