In our last lesson, you brought your title page to life by applying a cohesive color palette. With that, you have now learned all the fundamental skills for creating a single, well-designed page in Canva. This lesson is the final piece of our "Canva Kickstart" module, and it shifts our focus from designing on the page to managing the designs themselves.
Your Canva account will soon fill up with drafts, experiments, and final versions of your ebook pages and covers. To work efficiently, you need to know how to keep everything in order. Today, you will learn how to save, duplicate, and organize your projects. These housekeeping skills are just as important as your design skills for maintaining a smooth and frustration-free workflow.
Saving Your Work in Canva
One of the most reassuring features of Canva for any new user is its auto-save function. As you work, Canva automatically saves your changes every few seconds, provided you have a stable internet connection. You can see the status at the top of the editor—it will usually say "All changes saved."
This means you generally don't have to worry about manually saving your progress. However, it's still good practice to know how to do it. You can manually save a design by navigating to File > Save. You can also save your design directly to a specific folder using File > Save to folder, which is a great way to stay organized as you work.
Duplicating Your Projects
Duplicating a design is a task you'll perform constantly. It's essential for:
- Creating a quick backup before making major changes.
- Experimenting with different layouts or color schemes without altering your original.
- Using an existing design as a template for a new one (for example, using your Chapter 1 title page layout for Chapter 2).
There are two primary ways to duplicate a project in Canva.
Method 1: Duplicating from the Editor
When you have a design open, you can easily make a copy of the entire project. This is useful when you immediately want to start working on a variation.

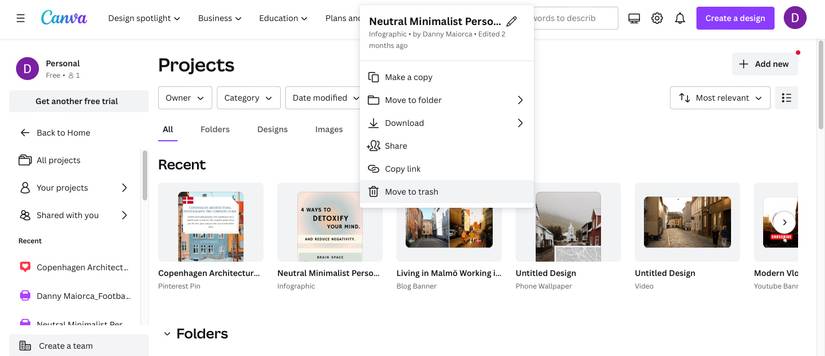
Method 2: Duplicating from the Projects Page
You can also duplicate any design without opening it first. This is often faster if you're just organizing your files or want to create a copy to work on later. You do this from your main project dashboard.
The following video provides a very clear, quick demonstration of both of these methods. It also introduces how to duplicate a single page within a project, a skill that will be very important later when you build your full ebook.
How to Duplicate a Project in Canva
This short tutorial from Pixel & Bracket clearly demonstrates the different ways to duplicate your work in Canva.
Watch the entire video. It's brief and covers three key techniques: Duplicating from within the editor using the 'File' menu. Duplicating from the homepage using the project thumbnail menu. Duplicating a single page within a project.
Organizing Your Designs with Folders
As you create more designs, your Canva homepage can become cluttered. The key to long-term organization is using the Projects area and creating a clear folder structure. Think of it as creating folders on your computer to organize documents—the same principle applies here.
For your goal of creating ebooks, you might create folders for:
Ebook CoversInformational Ebook - Interior PagesFiction Ebook - Story ChaptersMarketing Graphics
This video from Kristin With an Eye explains the philosophy of using the 'Projects' tab as your main organizational hub, which is a far more structured approach than relying on the "Recent designs" view on the homepage.
📁 How to Organize your Canva account like a PRO [SAVE TIME DESIGNING!]
This video provides a professional organizer's approach to tidying up a Canva account, focusing on the power of the 'Projects' tab and a logical folder system.
Watch these key segments to understand the strategy: The Projects Folder: Understand why the 'Projects' tab is a better starting point than the homepage. Tidying Up Designs: Learn how to rename and delete designs to reduce clutter. Creating a Folder System: See how to create new folders and sub-folders. Moving Designs into Folders: Watch the process of moving your designs into your new folder structure.
Now that you understand the strategy, let's walk through the exact steps to get your own account organized.
How to Organize Canva with Folders (Expert Tips)
This article by Canva Verified Expert LaShonda Brown provides a practical, step-by-step guide to cleaning up your account and implementing a folder system.
Focus on these sections to learn the mechanics of organization: First, read the section on deleting. It's important to know that deleted items go to the 'Trash' and can be recovered, so you don't have to be afraid of making a mistake. Next, carefully study the instructions on using Canva folders. This shows you how to select one or more designs and move them into a folder.
Your Turn: Create Your First Folder
Let's apply what you've learned.
- Go to your Canva dashboard.
- Click on Projects in the left-hand menu.
- In the top-right corner, click the Add new button and select Folder.
- Name your new folder
My Ebook Projectsand click Create folder. - Now, navigate back to your designs (either in
Projects > Designsor on the homepage). - Find your "The Silent Forest" title page design.
- Click the three dots (
...) on the design thumbnail, select Move to folder, chooseMy Ebook Projects, and click Move here.
Your design is now neatly filed away. As you continue this course, you will add all your project work to this folder.
Conclusion
You've now reached the end of our first module, "Canva Kickstart." You've gone from an empty account to creating, styling, and now organizing your first design. In this lesson, you learned about Canva's auto-save feature and how to duplicate projects and pages. Most importantly, you learned how to create a folder system within the Projects tab to keep your work tidy and accessible. This organizational foundation will save you countless hours as your projects become more complex.
Congratulations on mastering the absolute essentials of Canva! In our next lesson, we will begin Module 2, "Core Ebook Design Skills." We'll move beyond just using the tools and start exploring why certain designs are more effective than others. Our first topic will be visual hierarchy, where you'll learn to use size, weight, and color to control what your reader sees first, guiding their attention and making your pages clear and impactful.