Welcome back! In the last lesson, you accomplished the monumental task of creating a complete first draft. You now have the "clay" — the raw material of your story. Today, we begin the sculptor's work: revision. This is where professional writing is truly forged.
Your goal for this lesson is to learn and apply a multi-pass professional revision process to the draft you just wrote. Instead of trying to fix everything at once, we'll break revision into distinct, manageable stages. This methodical approach is the key to transforming a good draft into a polished, compelling piece of entertainment journalism.
1. Understanding the Professional Workflow
In a professional newsroom or magazine, editing isn't a single action but a series of stages, each with a different focus. Trying to fix a story's structure, sentence flow, and comma placement all at once is inefficient and often leads to missing crucial errors.
First, let's get a clear overview of these stages. The following article from Journalism University provides an excellent breakdown of the different "levels" of editing.
Exploring the Different Levels of Editing in Journalism
This article clearly lays out the distinct stages of the editing process, from the big-picture structural review to the fine-toothed-comb copy edit.
Read the sections titled Level 1: Structural editing, Level 2: Rewriting, and Level 3: Copy editing. As you read, focus on the different questions an editor asks at each stage. Notice how the focus narrows from the overall story down to the individual words.
To further clarify the distinction between improving the style and fixing errors, watch this short video. It focuses on the difference between line editing (our main focus today) and copy editing.
Copywriting Tips: What’s The Difference Between Line Editing & Copy Editing?
This video by Alex Cattoni provides a concise explanation of line editing versus copy editing.
Watch the sections defining what line editing is and what copy editing is. Pay attention to how line editing is about the feel, flow, and storytelling, while copy editing is the technical check for correctness.
For our purposes today, we will combine these concepts into two main passes:
- Substantive Edit: Looking at the big picture—structure, argument, and flow. This is similar to the "Structural Editing" described in the article.
- Line Edit: Focusing on the sentence level—clarity, rhythm, word choice, and tone. This is the "craft" of writing.
We will leave the final, technical "Copy Edit" (checking AP Style, grammar, etc.) for later, as it should always come last.
2. The First Pass: Substantive Editing (The Architect's View)
Before you start tweaking sentences, you must ensure the building's foundation is solid. In this pass, you are the architect, not the interior designer. Read your draft from beginning to end, focusing only on these big-picture questions.
Your Substantive Editing Checklist:
- Argument & Focus: Does my lede effectively hook the reader? Does my nut graf clearly state the article's core idea and why it matters?
- Structure & Flow: Does the rest of the article deliver on the promise of the nut graf? Is the information presented in a logical order? Are there any sections that feel out of place?
- Content: Is anything crucial missing? Do I need another quote or a better example to support a point? Conversely, is there anything here that, while interesting, doesn't serve the main argument?
- Pacing & Ending: Does the story move at a good pace? Does the ending (your kicker) feel earned and provide a satisfying sense of closure?
A great article from Rolling Stone offers some excellent techniques for this stage, one of which uses an analogy you might appreciate given your interest in music.
Self-Editing Tips for Writers: Polishing Your Manuscript Like a Pro
This article frames self-editing as the process of "mixing a track"—taking raw material and making it sing. It offers several practical strategies for revision.
Read the following sections: "Kill Your Darlings": This addresses the crucial task of cutting material that doesn't serve the story. "The Cold Storage Method": This explains why taking a break from your draft is essential for seeing it clearly. "The Three-Pass System": This reinforces the value of editing in distinct stages.
3. The Second Pass: Line Editing (The Craftsman's View)
Once you are happy with the structure of your article, it's time to zoom in and work on the sentences. This is the line edit, where you polish your prose until it is clear, concise, and dynamic.
In the last lesson, you watched a video on common prose mistakes. Now is the time to actively hunt for and fix those issues in your own draft. The key techniques discussed in "Editor Fixes Common Prose Mistakes" (resource LINK) were:
- Cutting filter words (
I saw,she realized) to create more immediacy. - Varying sentence length to control rhythm and pace.
- Varying sentence content by layering action with sensory detail, thoughts, and description.
To help you with this pass, here are two powerful tools.
Tool 1: Read It Aloud
This is one of the most effective line-editing techniques. As the Rolling Stone article mentioned, "Your ears will catch what your eyes miss." When you read your work aloud, you'll immediately notice awkward phrasing, clunky sentences, and unnatural dialogue that your brain smooths over when reading silently.
Tool 2: The Line Editor's Checklist
Use the following checklist to guide your line-editing pass. It covers many of the most common sentence-level issues that separate amateur prose from professional writing.
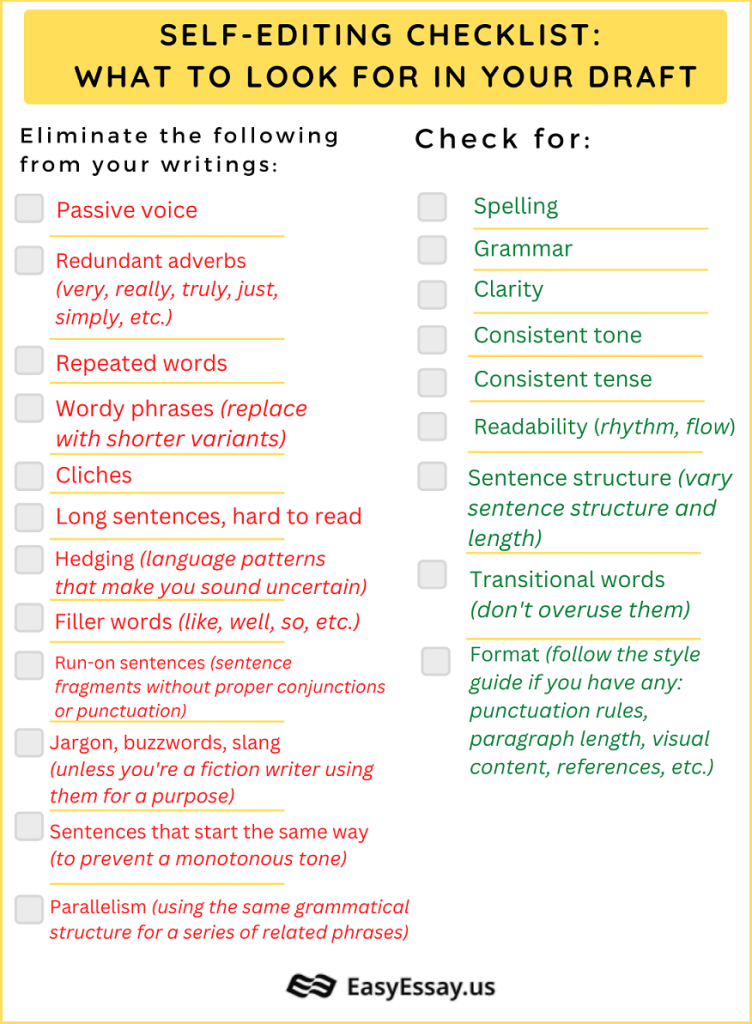
4. Your Task: Revise Your Draft
Now it's time to apply this process to your capstone article.
Step 1: Perform the Substantive Edit (approx. 15-20 minutes)
- If possible, take a short break before starting (the "Cold Storage Method").
- Read your draft through once without stopping to fix typos or rephrase sentences.
- As you read, use your word processor's comment feature to make notes based on the "Substantive Editing Checklist" above. Ask yourself: "Does this paragraph belong here?" "Is this transition working?" "Is my argument clear?"
- After reading, review your comments and make the big changes: move paragraphs, delete irrelevant sections ("kill your darlings"), or write a new sentence to clarify a transition.
Step 2: Perform the Line Edit (approx. 25-30 minutes)
- Now that the structure is solid, begin a new pass. Read your draft aloud.
- As you read, use the "Self-Editing Checklist" image as your guide. Hunt for passive voice, wordiness, weak verbs, and repetition.
- Focus on rhythm and flow. Are your sentences all the same length? Can you combine some short, choppy sentences or break up a long, rambling one?
- Sharpen your word choices. Replace vague descriptions with concrete, sensory details.
Don't aim for perfection. Aim for progress. The goal is to make your draft significantly stronger, clearer, and more engaging.
Conclusion
Well done. You've now experienced the disciplined, layered process of professional revision. By separating the architectural work from the sentence-level craft, you can edit more effectively and with greater intention.
Key Takeaways:
- Professional revision is a multi-pass process, not a single event.
- The substantive edit focuses on big-picture elements like structure, argument, and flow.
- The line edit focuses on sentence-level craft: clarity, concision, rhythm, and word choice.
- Techniques like reading aloud and using checklists are invaluable tools for identifying and fixing weaknesses in your prose.
In our next lesson, we will continue to hone your line-editing skills by focusing on a specific, powerful technique for adding clarity and rhythm to your writing: parallel structure.