Hello! Welcome to the next lesson in our journey through backend development with Spring Boot.
In our previous lesson, we dove deep into mocking dependencies for service-layer unit tests using @Mock and @InjectMocks. You learned how to isolate a service from its dependencies to test its business logic in a focused and predictable way.
Today, we move one layer up the application stack to the web layer. Our learning outcome is to write integration tests for the web layer using @WebMvcTest and MockMvc. We'll learn how to test our REST controllers to ensure they correctly handle incoming HTTP requests, interact with the service layer, and return appropriate HTTP responses. This is a critical skill for building reliable APIs.
You'll see that the mocking skills you just mastered are essential here, but we'll apply them in a slightly different context to test the "slice" of our application that handles web requests.
1. The "Right" Way to Test a Controller
When testing a controller, you might consider two extremes:
- A plain unit test: Call the controller's Java method directly and assert the return value.
- A full integration test (
@SpringBootTest): Start the entire application, including the database, and send a real HTTP request.
However, neither is ideal for focused controller testing. A plain unit test completely bypasses the Spring MVC framework, so you aren't testing request mappings, HTTP status codes, or JSON serialization. A full integration test is very slow and tests more than just the controller.
The solution is a "slice" test using @WebMvcTest. This annotation loads only the web layer of your application (your controllers, filters, exception handlers, etc.) while keeping the rest of the application context unloaded. It provides the perfect balance of realism and speed.
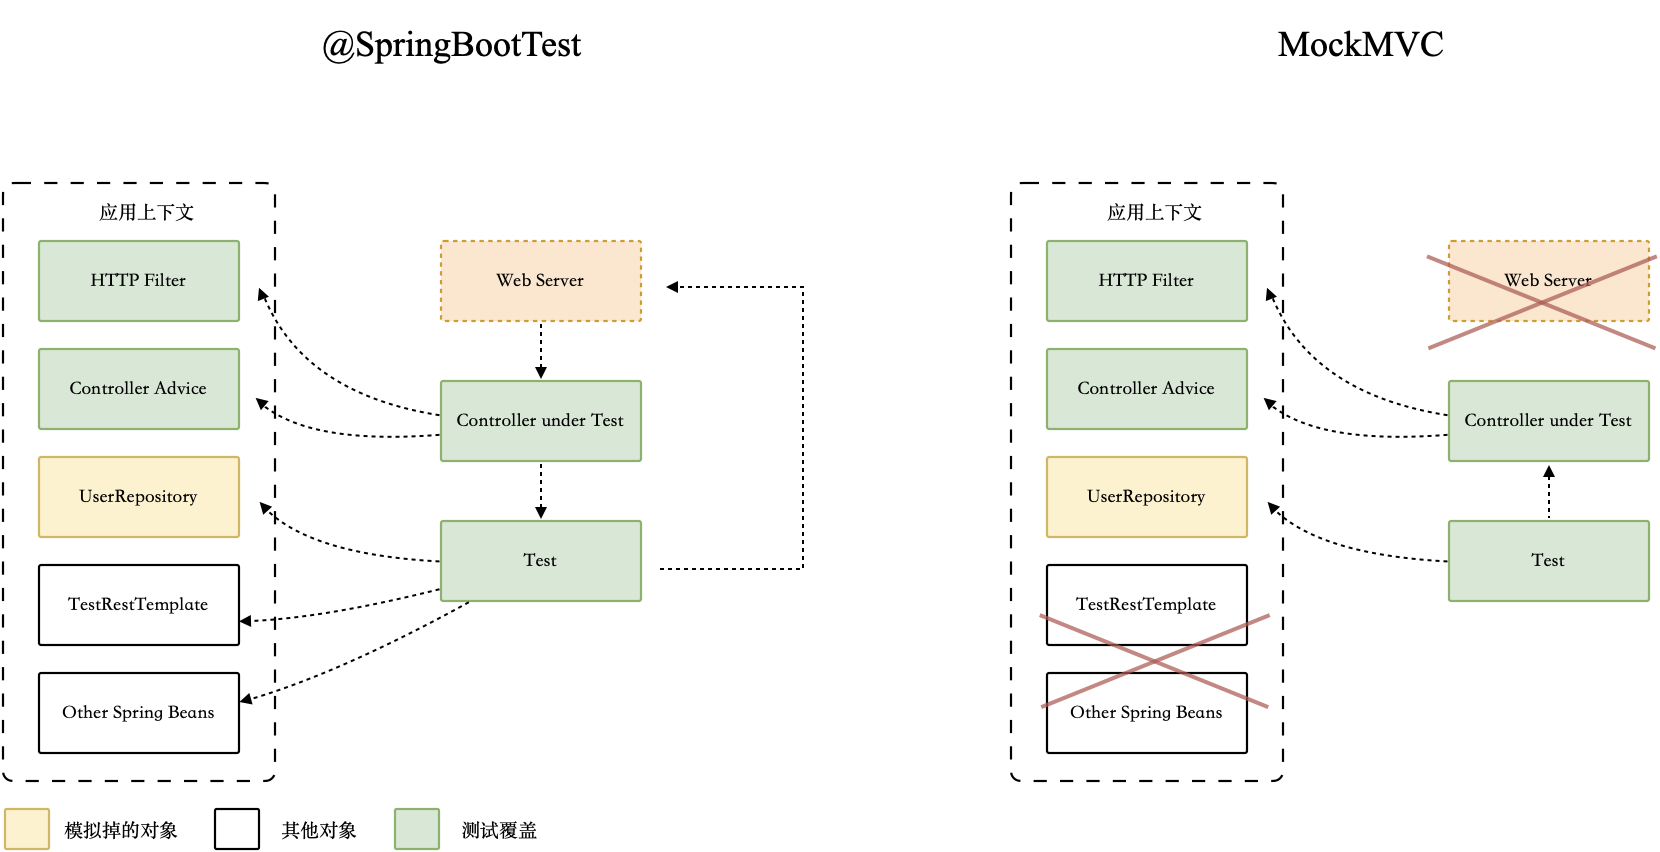
To get a deeper understanding of why @WebMvcTest is the preferred approach, the following article provides an excellent explanation.
How to Test Spring Boot Web Controller the Right Way
This article by Philip Riecks, 'How to Test Spring Boot Web Controller the Right Way', clearly explains the pitfalls of plain unit tests and full integration tests for controllers, positioning @WebMvcTest as the ideal solution.
Please read the introduction and the sections 'The Pitfalls of Plain Unit Tests', 'Why @SpringBootTest Is Overkill', 'The Sweet Spot: @WebMvcTest', and the 'Wrap-Up'. Focus on understanding why @WebMvcTest provides the best trade-off for testing the web layer.
2. Setting Up a Web MVC Test
Let's look at the key components for setting up a web layer test. A typical test class will have this structure:
// 1. Specify the controller you want to test to keep the context small
@WebMvcTest(UserController.class)
class UserControllerTest {

    // 2. Inject the MockMvc instance to perform requests
    @Autowired
    private MockMvc mockMvc;

    // 3. Mock any dependencies the controller has
    @MockBean
    private UserService userService;

    // 4. Inject an ObjectMapper for converting objects to JSON
    @Autowired
    private ObjectMapper objectMapper;

    // ... Your tests will go here
}
Let's break down the important annotations:
@WebMvcTest(UserController.class): This is the main annotation that enables this test slice. It configures the Spring test context with only beans relevant to the web layer. By specifyingUserController.class, we tell Spring to only instantiate that specific controller, making our test even faster and more focused.@Autowired private MockMvc mockMvc;:MockMvcis the star of the show. It's a powerful class that lets us "perform" mock HTTP requests against our controller without needing a running web server. Spring Boot auto-configures this bean for us when we use@WebMvcTest.@MockBean private UserService userService;: This is a crucial concept. Since@WebMvcTestonly loads the web layer, theUserServicebean that theUserControllerdepends on is not created.@MockBeantells Spring to create a Mockito mock ofUserServiceand add it to the application context. TheUserControllerwill then be injected with this mock. This is different from the@Mockannotation we used before, as@MockBeanis integrated with the Spring context.
The following video segment demonstrates this exact setup process.
Master Unit Testing Java Spring Boot REST API Application in One Shot | Full Course
The 'Think Constructive' channel provides a detailed walkthrough of testing a Spring Boot application. We'll watch the segment where the presenter sets up the controller test class.
Please watch from 01:15:34 to 01:19:46. Pay close attention to how the presenter uses @WebMvcTest, autowires MockMvc, and uses @MockBean to provide a mock for the service layer dependency. This will solidify the structure we just discussed.
3. Testing GET and POST Endpoints
Now that we have the setup, let's write some tests. The general flow for a MockMvc test is: Arrange, Act, Assert.
- Arrange: Stub the behavior of your mocked dependencies (e.g., the
UserService). - Act: Use
mockMvc.perform()to execute a request against your endpoint. - Assert: Use
andExpect()to verify the HTTP response (status, headers, body).
This video provides a concise and practical demonstration of testing both GET and POST endpoints.
Perform HTTP GET and POST Requests MockMvc to Test a @RestController
Philip Riecks has a fantastic, focused tutorial on using MockMvc for GET and POST requests. This will be our primary guide for the hands-on part.
Please watch the entire video (about 10 minutes). For the GET request (00:00 - 06:03): Notice how when(...).thenReturn(...) is used to stub the service. Then, see how mockMvc.perform(get(...)) is chained with andExpect() calls to check the status code and the JSON response using jsonPath(). For the POST request (06:03 - end): Observe how the request is built using .contentType() and .content(). Then, see how the assertions check for a 201 Created status and the Location header. Finally, note the use of Mockito.verify() to confirm the service method was called.
Dissecting the Code
Let's review the patterns from the video.
Testing a GET Endpoint:
@Test
void shouldReturnListOfUsers() throws Exception {
    // Arrange: Create a list of users to be returned by the mock service
    List<User> users = List.of(new User(1L, "duke", "duke@java.com"));
    when(userService.getAllUsers()).thenReturn(users);

    // Act & Assert
    mockMvc.perform(get("/api/users"))
            .andExpect(status().isOk()) // Assert HTTP 200 OK
            .andExpect(content().contentType(MediaType.APPLICATION_JSON)) // Assert content type
            .andExpect(jsonPath("$.size()").value(1)) // Assert array size using JSONPath
            .andExpect(jsonPath("$[0].username").value("duke")); // Assert field of the first element
}
JSONPath is a query language for JSON, similar to XPath for XML. It allows you to navigate the structure of a JSON document to assert specific values. $ represents the root of the document.
Testing a POST Endpoint:
@Test
void shouldCreateUser() throws Exception {
    // Arrange: Create the user object to be sent
    User userToCreate = new User(null, "mike", "mike@java.com");
    // Convert the object to a JSON string
    String userJson = objectMapper.writeValueAsString(userToCreate);

    // We don't need a `when()` here if the service method returns void.
    // We'll use `verify()` instead after the action.

    // Act & Assert
    mockMvc.perform(post("/api/users")
                    .contentType(MediaType.APPLICATION_JSON) // Set the content type of the request
                    .content(userJson)) // Set the request body
            .andExpect(status().isCreated()); // Assert HTTP 201 Created

    // Assert: Verify that the service's storeNewUser method was called exactly once
    verify(userService, times(1)).storeNewUser(any(User.class));
}
Test your understanding!
Based on the examples for GET and POST, outline the steps to write a test for a PUT endpoint that updates a user. The endpoint is PUT /api/users/{id}. What would you do in the Arrange, Act, and Assert phases?
Show answer
Here is a possible outline:
-
Arrange:
- Define the
idof the user to update. - Create a
Userobject (updatedUser) with the new data. - Convert the
updatedUserobject to a JSON string using anObjectMapper. - Stub the service method. For an update method that returns the updated user, you might use:
when(userService.updateUser(eq(id), any(User.class))).thenReturn(updatedUser);
- Define the
-
Act:
- Use
mockMvc.perform()withput("/api/users/" + id). - Set the
.contentType(MediaType.APPLICATION_JSON). - Set the
.content()with the JSON string of theupdatedUser.
- Use
-
Assert:
- Expect the status to be
isOk()(200 OK). - Optionally, use
jsonPath()to verify that the response body contains the updated information (e.g.,jsonPath("$.name").value("newName")). - You could also use
verify()to ensure theupdateUsermethod on the service was called with the correctidand user data.
- Expect the status to be
Conclusion
In this lesson, we made a significant step forward in our testing strategy. We learned how to write focused integration tests for the web layer, ensuring our controllers behave exactly as expected when handling HTTP requests.
Key Takeaways:
@WebMvcTestis the ideal annotation for creating "slice tests" that focus only on the web layer of your Spring application.MockMvcis the primary tool for simulating HTTP requests (GET, POST, etc.) and performing assertions on the results within a test environment.- Dependencies of the controller, such as services, must be mocked using
@MockBeanto isolate the web layer for testing. - You can make powerful assertions on the HTTP response, including the status code, headers, and the body content using JSONPath.
What's Next?
We've now tested our service layer in isolation and our web layer in a focused slice. The final piece of the puzzle is the persistence layer. In our next lesson, "Write integration tests for the repository layer using @DataJpaTest," you will learn how to test that your JPA repositories are correctly interacting with a database, using a dedicated test slice and an in-memory database to keep tests fast and reliable.