Hello! Welcome to your next lesson in the "Microservices with Spring Cloud" module.
In our previous lesson, we established the "why" of microservices, exploring the principles and patterns for decomposing a monolith. We concluded that managing a distributed system introduces new challenges. Today, we'll tackle one of the first and most fundamental of these challenges: configuration management.
This lesson directly addresses the learning outcome: Implement a centralized configuration server using Spring Cloud Config. You will learn how to:
- Understand the problems of configuration management in a microservices environment.
- Set up a Spring Cloud Config Server to centralize your application properties.
- Connect a client microservice to the Config Server to fetch its configuration.
- Dynamically update configuration in a running application without a restart.
Let's dive in and build our first piece of microservice infrastructure.
The Problem: Configuration Chaos
In a monolithic application, managing configuration is relatively simple. You have a single application.properties or application.yml file. But imagine a system with 10, 50, or 100 microservices. If each service has its own configuration file, you'll quickly face significant problems:
- Duplication: Common properties, like database credentials or message broker URLs, are scattered across many services.
- Inconsistency: Updating a shared property becomes a tedious and error-prone task of finding and changing it in every single service.
- Costly Changes: Even a minor configuration change requires rebuilding, re-testing, and redeploying the affected service, which slows down development cycles.
This video provides an excellent summary of these challenges.
🚀 Spring Cloud Config Explained | Centralized Config for Microservices (with Git + Refresh Demo)
To start, let's watch this short segment from the video 'Spring Cloud Config Explained' by CodeSnippet. It clearly illustrates the issues that arise when managing configuration in a distributed system.
Watch from 00:58 to 03:54. The video explains how duplicated properties and the need for redeployment create significant friction in a microservices architecture.
The Solution: Spring Cloud Config
Spring Cloud Config provides a straightforward client-server approach to solve these problems. The architecture consists of three main components:
- Configuration Repository: A backend storage for your configuration files. This is typically a Git repository, which gives you versioning, history, and access control over your configuration changes.
- Config Server: A Spring Boot application that connects to the Configuration Repository. It reads the property files and exposes them to other services through a REST API.
- Config Client: Your microservice (e.g., an order service, user service) which is configured to fetch its properties from the Config Server on startup.
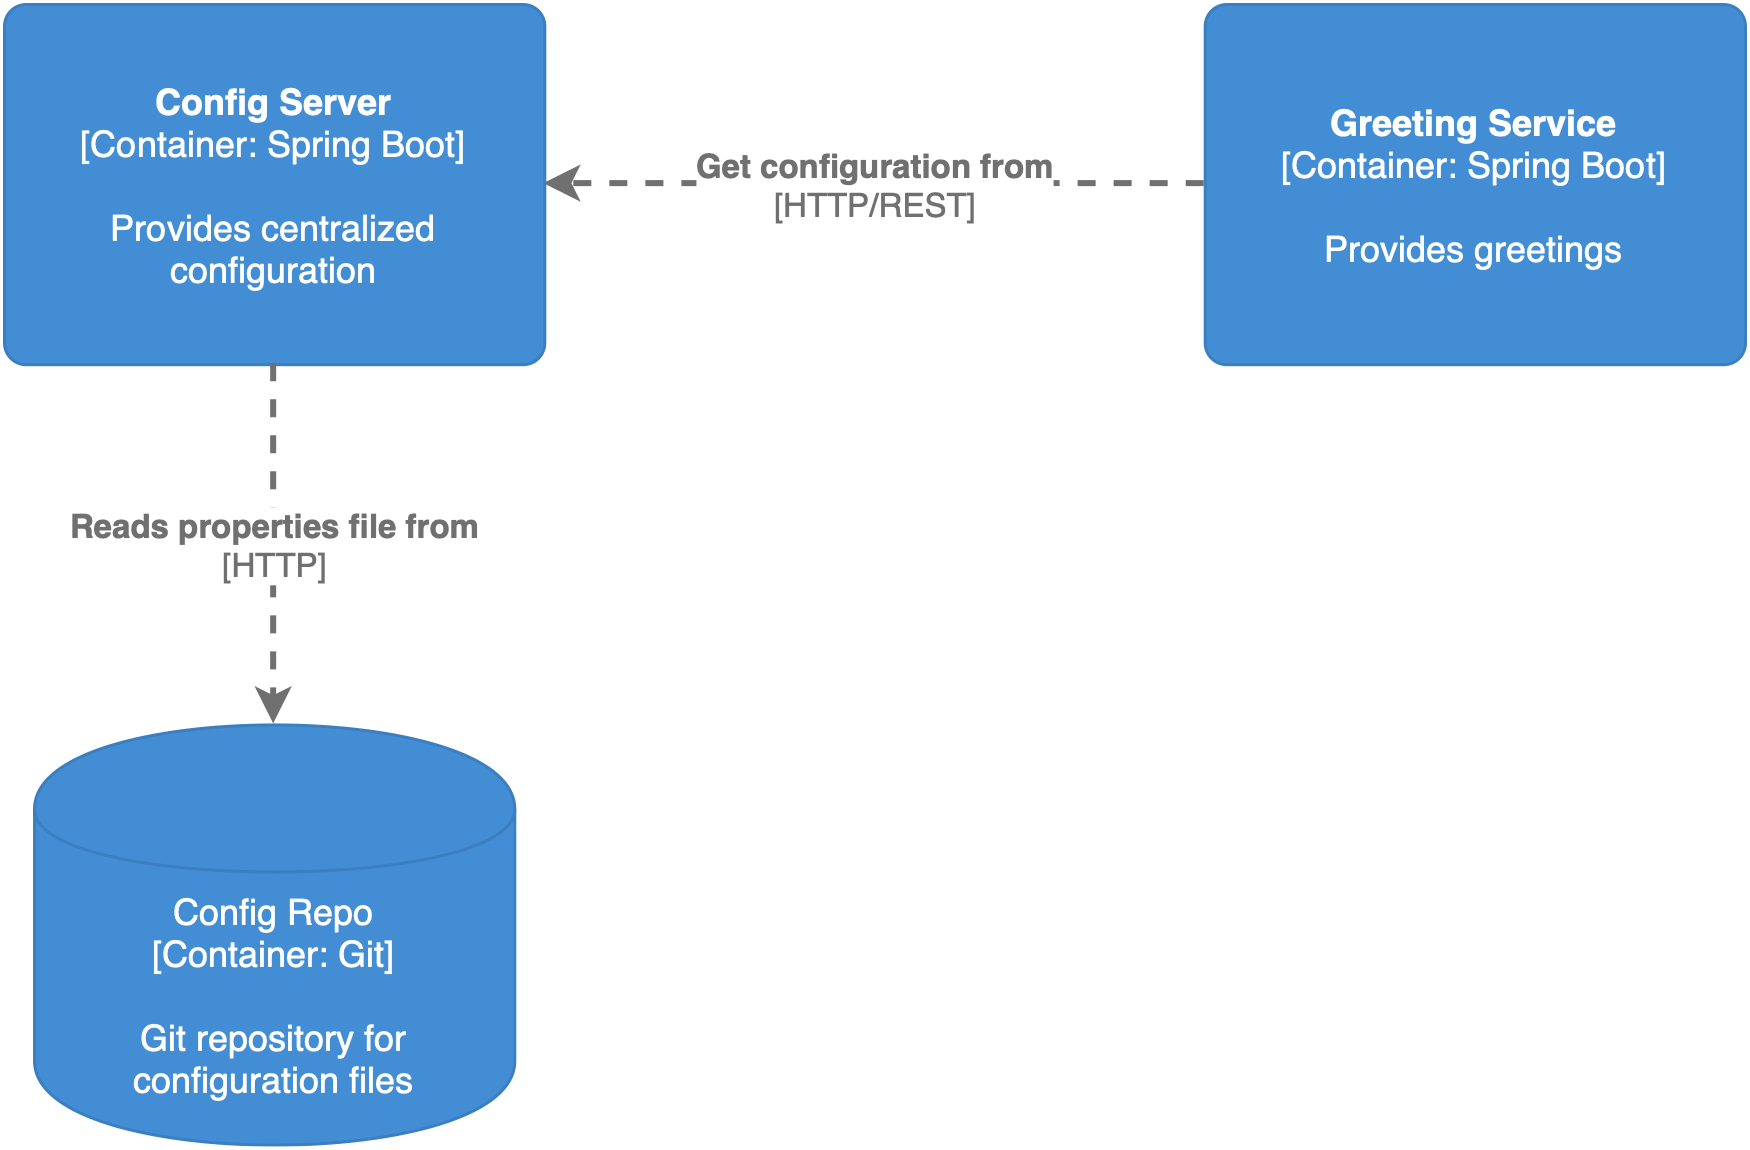
Let's see a more detailed architectural overview.
🚀 Spring Cloud Config Explained | Centralized Config for Microservices (with Git + Refresh Demo)
This next segment provides a clear overview of the Spring Cloud Config architecture and its components.
Watch from 05:50 to 09:05. Pay attention to how the Config Server exposes endpoints that map to the application name and profile, allowing clients to fetch their specific configuration.
Now that we understand the architecture, let's build it.
Step 1: Create the Configuration Repository
The first step is to create a central place to store our configuration files. A public GitHub repository is perfect for this.
- Navigate to GitHub and create a new public repository. Name it something like
spring-cloud-config-repo. - Inside this new repository, create a file named
greeting-service.yml. This file will contain properties for a service namedgreeting-servicerunning in the default profile. Add the following content:message: greeting: "Hello from the default profile!" - Create another file named
greeting-service-dev.yml. The-devsuffix ties this file to a Spring profile nameddev. Add this content:message: greeting: "Hello from the development profile!" - Commit these two files to the
mainbranch of your repository.
Your configuration is now version-controlled and ready to be served.
Step 2: Build the Spring Cloud Config Server
Next, we'll create a Spring Boot application that acts as our Config Server.
-
Go to start.spring.io.
-
Set up a new project with the following:
- Project: Maven
- Language: Java
- Group:
com.example - Artifact:
config-server - Dependencies: Add
Config Server.
-
Generate the project, download the ZIP, and open it in your IDE.
-
Open the main application class (e.g.,
ConfigServerApplication.java) and add the@EnableConfigServerannotation. This single annotation transforms your application into a Config Server.import org.springframework.boot.SpringApplication; import org.springframework.boot.autoconfigure.SpringBootApplication; import org.springframework.cloud.config.server.EnableConfigServer; @SpringBootApplication @EnableConfigServer // This enables the Config Server public class ConfigServerApplication { public static void main(String[] args) { SpringApplication.run(ConfigServerApplication.class, args); } } -
Now, configure the server in
src/main/resources/application.properties. We need to tell it which port to run on and where to find the Git repository.# The port for the config server. 8888 is a common convention. server.port=8888 # The URI of your Git repository spring.cloud.config.server.git.uri=https://github.com/YOUR_USERNAME/spring-cloud-config-repo.gitReplace
YOUR_USERNAMEwith your actual GitHub username.
Test the Config Server
You're ready to test! Run the ConfigServerApplication. Once it starts, open a browser and navigate to:
http://localhost:8888/greeting-service/dev
The server should respond with a JSON object containing the properties from your greeting-service-dev.yml file. This confirms your Config Server is successfully reading from the Git repository.
Example output from the Config Server endpoint, showing properties fetched from the Git repository for the 'greeting-service' application and 'dev' profile.
Step 3: Build a Config Client
Now let's create a microservice that consumes configuration from our new server.
-
Go back to start.spring.io.
-
Set up a new client project:
- Project: Maven
- Language: Java
- Group:
com.example - Artifact:
greeting-service - Dependencies:
Spring Web,Config Client,Spring Boot Actuator.
-
Generate and open this new project in your IDE.
-
Configure the client to connect to the Config Server. In Spring Boot 2.4 and later, this is done using
spring.config.import. Create a file namedsrc/main/resources/application.propertiesand add:# The name of this application. It MUST match the name of the config file in Git (greeting-service.yml). spring.application.name=greeting-service # The active profile. This determines which profile-specific file to load (greeting-service-dev.yml). spring.profiles.active=dev # Tell Spring Boot to import configuration from a Config Server. # The 'optional:' prefix prevents the app from failing to start if the config server is down. spring.config.import=optional:configserver:http://localhost:8888 -
Create a simple REST controller to display the configured greeting.
import org.springframework.beans.factory.annotation.Value;
import org.springframework.web.bind.annotation.GetMapping;
import org.springframework.web.bind.annotation.RestController;

@RestController
public class GreetingController {

    // Inject the property from the centralized configuration
    @Value("${message.greeting}")
    private String greetingMessage;

    @GetMapping("/greeting")
    public String getGreeting() {
        return greetingMessage;
    }
}
Test the Config Client
- Make sure your Config Server is still running.
- Run the
GreetingServiceApplication. Watch the console logs during startup; you should see a line indicating it's fetching configuration fromhttp://localhost:8888. - Once started, open a browser and navigate to
http://localhost:8080/greeting.
You should see the message: "Hello from the development profile!". Your client application has successfully loaded its configuration from the central Config Server.
Test your understanding!
What would happen if you stopped the Config Server and then tried to restart the greeting-service? Why?
Show answer
Because we used optional:configserver:... in spring.config.import, the greeting-service would still start. However, since it cannot connect to the Config Server, the @Value("${message.greeting}") injection would fail, and any attempt to access the /greeting endpoint would result in an error. If we had omitted the optional: prefix, the application would have failed to start altogether.
Step 4: Dynamic Configuration Refresh
We've centralized our configuration, but we still have one problem: if we update a property in Git, the client application won't see the change until it's restarted. Let's fix this by enabling dynamic refresh.
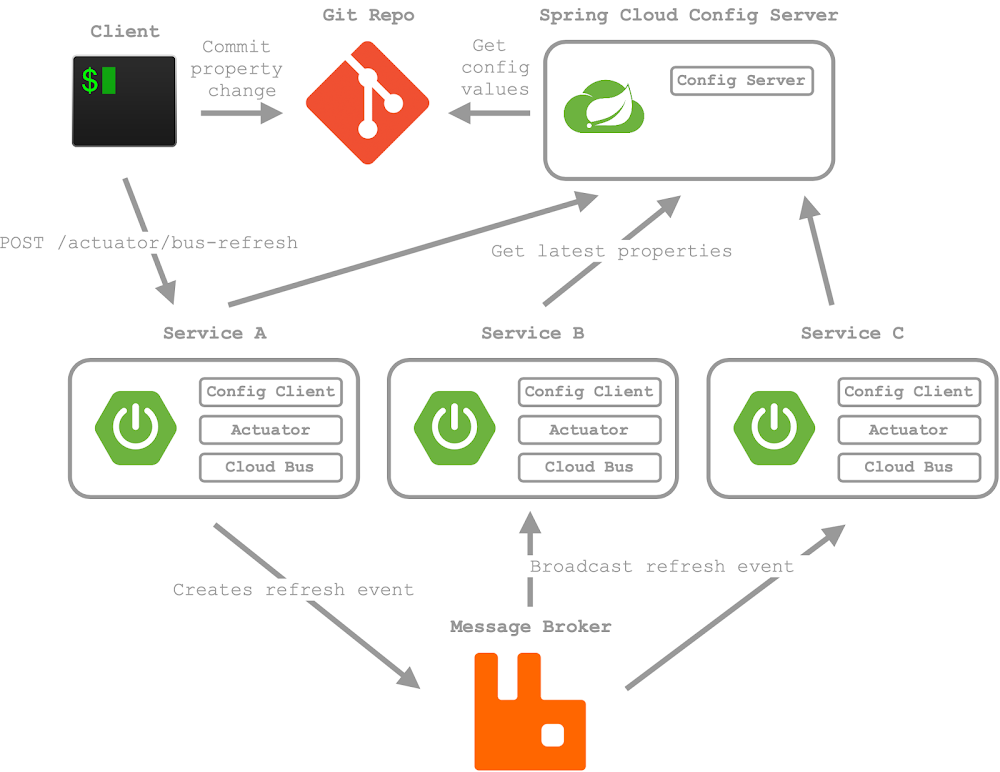
Here’s how to enable it in your greeting-service client:
-
Expose the Actuator
refreshendpoint. We already added thespring-boot-starter-actuatordependency. Now, add the following line togreeting-service'sapplication.properties:# Expose the 'refresh' endpoint over HTTP management.endpoints.web.exposure.include=refresh -
Enable refresh on the controller. Add the
@RefreshScopeannotation to yourGreetingController. This tells Spring to create a special proxy for this bean that can be re-initialized when a refresh is triggered.import org.springframework.beans.factory.annotation.Value; import org.springframework.cloud.context.config.annotation.RefreshScope; // Import this import org.springframework.web.bind.annotation.GetMapping; import org.springframework.web.bind.annotation.RestController; @RestController @RefreshScope // Add this annotation public class GreetingController { // ... rest of the class is the same }
Test the Refresh Mechanism
The following video walks through exactly what we're about to do.
🚀 Spring Cloud Config Explained | Centralized Config for Microservices (with Git + Refresh Demo)
Let's watch a full demonstration of the refresh feature. This will show how to update a property in Git and trigger the change in a running application without a restart.
Watch from 19:56 to 26:24. The video demonstrates adding the Actuator dependency, annotating a bean with @RefreshScope, and using a POST request to the /actuator/refresh endpoint to update the configuration.
Now, try it yourself:
- Restart your
greeting-serviceto apply the new annotations and properties. - Go to your
spring-cloud-config-repoon GitHub and edit thegreeting-service-dev.ymlfile. Change the message to something new:
Commit the change.message: greeting: "Hello, the config has been refreshed!" - Go back to your browser and refresh
http://localhost:8080/greeting. The message will not have changed. The client is still using the old value. - Now, trigger the refresh. Open a terminal or a tool like Postman and send an empty POST request to the
/actuator/refreshendpoint:
You should get a JSON response listing the properties that were changed (e.g.,curl -X POST http://localhost:8080/actuator/refresh["message.greeting"]). - Finally, refresh
http://localhost:8080/greetingin your browser one more time.
Voila! You should now see the new message: "Hello, the config has been refreshed!". You have successfully updated the configuration of a running microservice without restarting it.
Conclusion
Congratulations! You've just implemented a core component of a robust microservices architecture. Centralizing configuration removes a major source of errors and friction, allowing services to be managed more effectively.
Key Takeaways:
- Centralized Configuration is essential for managing properties across multiple microservices.
- Spring Cloud Config uses a Config Server to serve properties from a backend, typically a Git repository.
- Client applications use the
spring.config.importproperty to connect to the Config Server. - The
@RefreshScopeannotation, combined with the/actuator/refreshendpoint, enables dynamic updates to configuration without requiring an application restart.
What's Next?
Our services can now be configured from a central location. But how do they find each other in a dynamic cloud environment where IP addresses can change? In the next lesson, you will implement service discovery using a registry like Eureka. This will be the next step in building our interconnected microservices landscape.