Hello! Welcome to the next lesson in our journey into backend development.
In our last session, we took control of the Spring IoC container by explicitly telling it which beans to create using @Configuration and @Bean. This method is powerful and essential, especially when dealing with code from third-party libraries that you can't modify. However, for the code we write ourselves, defining a @Bean method for every single class can become tedious.
Today, we'll explore a more automated and elegant approach: component scanning. You'll learn how to use special "stereotype" annotations that allow Spring to automatically discover your classes and register them as beans. This lesson is designed to meet the learning outcome: Use @Component, @Service, and @Repository stereotypes for component scanning.
By the end of this lesson, you'll understand how to structure your application so Spring can do most of the wiring work for you, making your code cleaner and your development process faster.
1. From Explicit Beans to Automatic Discovery
So far, we've been the ones creating objects (new MyService()) inside @Bean methods. Component scanning flips this around. We simply add an annotation to our class, and Spring finds it, creates an instance, and manages it in the ApplicationContext for us.
The primary annotations that enable this are called stereotype annotations. They act as labels that classify your classes by their role or "stereotype" within the application.

Let's break down what these mean:
@Component: This is the most generic Spring annotation. It marks a Java class as a "component" or a bean to be managed by the Spring container.@Service: A specialization of@Componentintended to be used on classes in the business logic layer.@Repository: A specialization of@Componentintended for classes in the persistence or data access layer (e.g., classes that interact with a database).@Controller: A specialization of@Componentfor classes in the presentation layer (e.g., handling web requests in a Spring MVC application). We'll explore this one deeply in the next module.
The key thing to understand is that @Service, @Repository, and @Controller are all, at their core, just @Component annotations with a more specific name.
To see this in action, let's look at the source code for the @Service annotation.
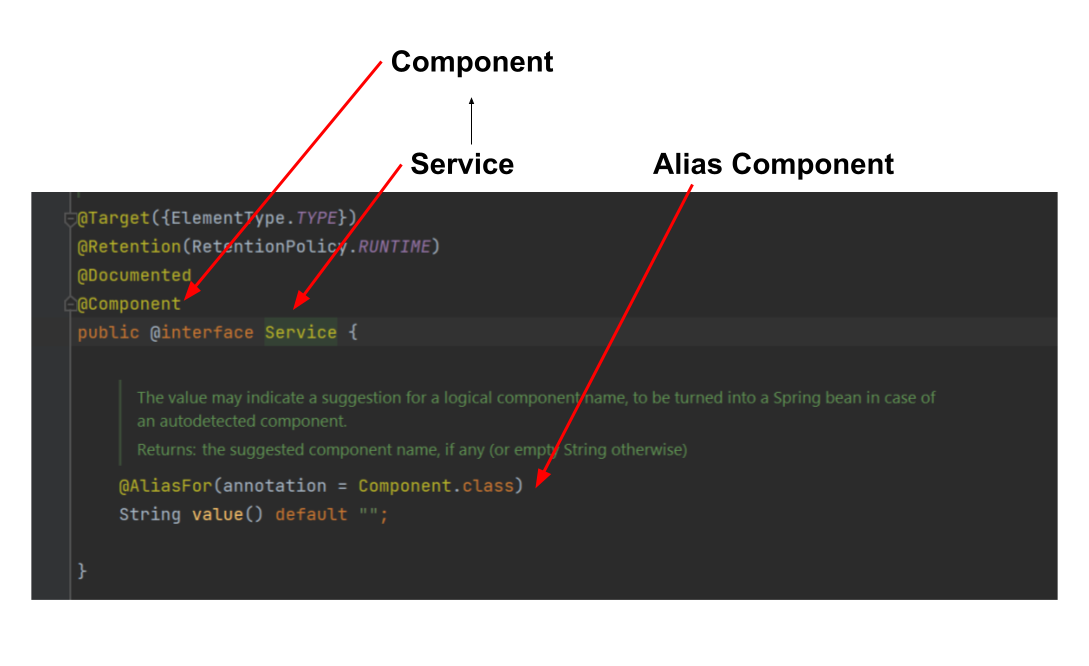
This hierarchical relationship is fundamental to how Spring works. Let's watch a video that explains this concept clearly.
Difference between Component Service Repository Controller & RestController annotation | Code Decode
This video from Code Decode explains what stereotype annotations are and demonstrates that @Service and @Repository are just specializations of the parent @Component annotation.
Watch from 02:32 to 06:53. Pay close attention to how the presenter proves that the specialized annotations are children of @Component by looking at their source code.
2. The Magic of Component Scanning
Now that we know what Spring is looking for (classes with stereotype annotations), let's understand how it finds them. This process is called component scanning.
When a Spring application starts, it scans a configured set of packages on the classpath, looking for any class marked with a stereotype annotation. For every one it finds, it automatically registers a bean definition in the ApplicationContext.
You might be wondering, "Where did I configure this scanning?" If you've created a Spring Boot project, this is handled for you automatically by the @SpringBootApplication annotation on your main application class.
@SpringBootApplication is a convenience annotation that bundles three other important annotations, one of which is @ComponentScan.
Let's dive into a video that explains how this works.
Mastering Spring @ComponentScan Annotation: Deep Dive with Examples
The 'Mastering Spring @ComponentScan' video from CodeSnippet does an excellent job of showing where @ComponentScan comes from and how its default behavior works.
Watch from 05:12 to 13:45. The video will first show you that @ComponentScan is part of @SpringBootApplication. Then, it demonstrates a critical concept: by default, Spring only scans the package where the main application class resides, and all of its sub-packages. This has important implications for how you should structure your project.
The key takeaway is project structure. A standard convention is to place your main application class (the one with @SpringBootApplication) in a root package (e.g., com.mycompany.myapp). Then, all your other packages for controllers, services, repositories, etc., should be sub-packages of that root (e.g., com.mycompany.myapp.service, com.mycompany.myapp.repository). This ensures all your components are automatically discovered without any extra configuration.
Test your understanding!
Your main application class, MyApplication, is located in the package com.example.app.
You then create a new service class, UserService, and place it in the package com.example.services. You annotate it with @Service.
Will Spring automatically create a bean for UserService when the application starts? Why or why not?
Show answer
No, Spring will not create a bean for UserService by default.
The reason is that the com.example.services package is not a sub-package of com.example.app. Default component scanning only looks within the package of the main application class and its children. To fix this, you could move UserService to com.example.app.services or move the main application class to com.example.
3. Choosing the Right Annotation: More Than Just a Label
If @Service and @Repository are just specialized forms of @Component, why not just use @Component for everything?
You could, but you would be missing out on two major benefits:
- Semantic Clarity: Using the right annotation makes your code self-documenting. When another developer sees
@Service, they immediately know it contains business logic. When they see@Repository, they know it handles data access. - Additional Functionality: Some specialized annotations enable extra processing by the Spring framework. This is most prominent with
@Repository.
Let's explore the differences.
@Service vs. @Component
Currently, in the Spring Framework, @Service offers no additional functionality over @Component. Its purpose is purely semantic. It's a convention that helps developers distinguish the business logic layer from other general-purpose components. Following this convention is highly recommended for building maintainable applications.
@Repository vs. @Component
This is where there's a significant technical difference. The @Repository annotation enables a feature called exception translation.
When your code interacts with a database, many things can go wrong, and the database driver will throw technology-specific, checked exceptions (like Java's SQLException). If you don't use @Repository, you would have to wrap every database call in a try-catch block to handle these exceptions.
When you annotate a class with @Repository, Spring applies a special processor that intercepts these platform-specific exceptions and re-throws them as one of Spring's unified, unchecked DataAccessException subtypes.
Why is this so valuable?
- Decoupling: Your service layer no longer needs to know about
SQLExceptionor any other persistence-specific exceptions. It only needs to be prepared to handle the genericDataAccessException. - Cleaner Code: It eliminates the need for boilerplate
try-catchblocks throughout your data access objects (DAOs).
The following video provides an excellent summary and demo of these differences.
Difference between Component Service Repository Controller & RestController annotation | Code Decode
Let's return to the Code Decode video. This final segment explains the specific use cases for each annotation and highlights the unique benefits of @Repository and @Controller.
Watch from 14:48 to 28:12. This is a comprehensive look at the practical differences. Focus on why you can't just replace @Controller with @Component and, most importantly, the detailed explanation of exception translation provided by @Repository.
Conclusion
Today, you've unlocked a core feature of the Spring Framework that greatly simplifies application development. By moving from explicit @Bean configuration to automatic component scanning, you can write cleaner, more conventional, and more maintainable code.
Key Takeaways:
- Stereotype annotations like
@Component,@Service, and@Repositorymark your classes for automatic detection by Spring. - Component Scanning is the process Spring uses to find these classes. It's enabled by default in Spring Boot via the
@SpringBootApplicationannotation. - By default, scanning occurs in the package of your main application class and all its sub-packages.
- Always use the most specific annotation for the job:
@Servicefor the business logic layer to improve code clarity.@Repositoryfor the data access layer to enable automatic exception translation, which converts checked persistence exceptions into Spring's uncheckedDataAccessExceptionhierarchy.
What's Next?
We now have two powerful ways to get our objects into the Spring container: explicitly with @Bean and automatically with component scanning. But creating the beans is only half the story.
In the next lesson, we will complete the Dependency Injection picture by learning how to inject these beans into the classes that need them. We will dive into constructor-based and setter-based dependency injection and see how the @Autowired annotation makes wiring your application together almost effortless.