Hello! Welcome to the final lesson in our module on Asynchronous and Event-Driven Patterns.
In our last session, you successfully implemented a message producer. Your Spring Boot application can now send a message to a RabbitMQ topic exchange, which then routes it to a queue named my-queue. That message is currently sitting in the queue, waiting to be processed.
Today, we will complete the circuit. Our goal is to implement a message consumer in Spring Boot to receive and process messages from that RabbitMQ queue. By the end of this lesson, you will have a complete, self-contained messaging application where one part produces a message and another part consumes it automatically.
The Consumer's Role in Messaging
Before we write the code, let's revisit the core architecture of RabbitMQ to understand the consumer's place in it.

As you can see, the Consumer is the final destination for a message. It's a program that connects to a queue, retrieves messages, and performs some work based on their content. This decouples the work from the initial request, allowing for robust, scalable, and resilient systems. In our case, the "work" will simply be printing the message to the console.
Implementing a Message Listener in Spring AMQP
In Spring's AMQP (Advanced Message Queuing Protocol) support, the easiest way to create a consumer is by creating a message listener. This is a component that Spring automatically connects to a queue, invoking a method in your code whenever a message arrives.
The framework provides a simple and powerful annotation for this: @RabbitListener. Let's build our consumer.
We will use the same project from the previous lesson. The official RabbitMQ "Hello World" tutorial provides a very clean and simple example of a receiver, which we will adapt.
RabbitMQ tutorial - "Hello World!"
The official RabbitMQ tutorial demonstrates a straightforward receiver implementation. We'll use this as a model for our own consumer.
Please review the section titled 'Receiving'. Focus on the Tut1Receiver.java class. Pay close attention to the @RabbitListener and @RabbitHandler annotations, as these are the key components we will be using.
Now, let's apply this to our project.
-
Create a new Java class named
Receiverin the same package as yourMessagingRabbitmqApplication.javaandRunner.javafiles. -
Add the following code to your new
Receiver.javafile.
package com.example.messagingrabbitmq; // Use your own package name

import org.springframework.amqp.rabbit.annotation.RabbitListener;
import org.springframework.stereotype.Component;

@Component
public class Receiver {

    @RabbitListener(queues = "my-queue")
    public void receiveMessage(String message) {
        System.out.println("Received <" + message + ">");
    }
}
Let's break down this simple yet powerful class:
@Component: This annotation tells Spring to create a bean of this class, making it a managed component in the application context. This is crucial for Spring to detect the listener.@RabbitListener(queues = "my-queue"): This is the core of our consumer. It instructs Spring to:- Create a message listener container under the hood.
- Have this container listen to the queue named
my-queue, which is the same queue our producer is sending messages to. - When a message arrives, invoke the annotated method (
receiveMessage).
public void receiveMessage(String message): This is our handler method. Spring AMQP intelligently converts the body of the RabbitMQ message into the type of the method parameter. Since our producer sent aString, we can declare aStringparameter here to receive the payload directly.
That's it! With just these few lines of code, you have a fully functional message consumer.
Test your understanding!
Imagine you are building a notification service. You need to create a consumer that processes email notifications from a queue named email-notifications. What is the single most important change you would make to the Receiver class above to make it listen to that queue instead?
Show answer
You would change the @RabbitListener annotation to target the new queue name:@RabbitListener(queues = "email-notifications")
Running the Full Producer-Consumer Cycle
Your project now contains both the Runner.java class (the producer) from the last lesson and the new Receiver.java class (the consumer). When you run the application, the following will happen in sequence:
- The Spring application starts.
- Spring detects the
@RabbitListeneron yourReceiverbean and starts a listener container in the background, which connects to RabbitMQ and waits for messages onmy-queue. - Spring executes the
runmethod of yourCommandLineRunner(Runner.java). - The
Runnersends the message "Hello from our Spring Boot producer!" to themy-topic-exchange. - The exchange routes the message to
my-queue. - The listener, which has been waiting patiently, immediately picks up the message and invokes your
receiveMessagemethod. - The "Received <...>" message is printed to the console.
Let's see it in action:
- Make sure your RabbitMQ Docker container is running (
docker-compose up -d). - Run your Spring Boot application from your IDE.
- Observe the console output. You should see something like this:
Sending message...
Message sent!
Received <Hello from our Spring Boot producer!>
You might notice the "Received" message appears almost instantaneously after the "Sent" message. This demonstrates the power of asynchronous, event-driven communication.
Now, check the RabbitMQ Management UI:
- Open
http://localhost:15672in your browser. - Go to the Queues tab.
- Find
my-queuein the list.
Unlike last time, you will likely see 0 in the "Messages" column. Why? Because the Receiver consumed the message as soon as it arrived. You might see the message rate graphs spike for a second, indicating that a message was enqueued and then immediately dequeued.
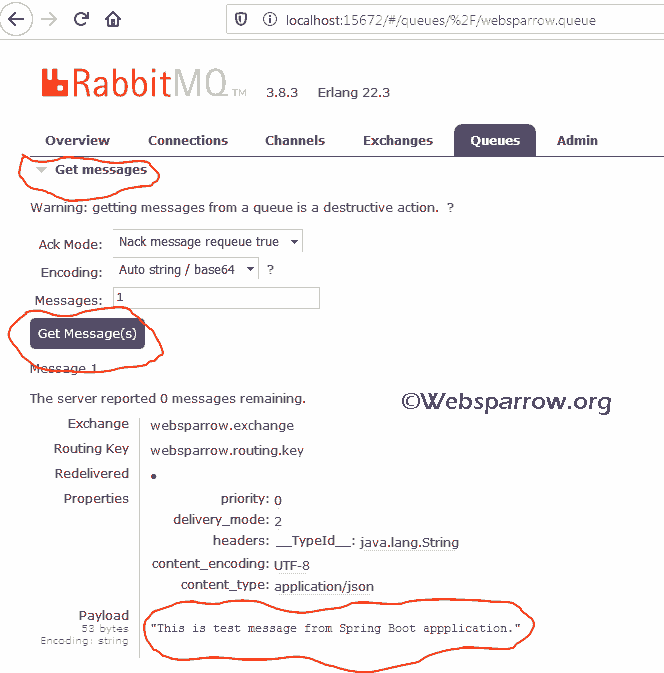
This is what a healthy consumer looks like in action—it processes messages as they come in, keeping the queue empty. For comparison, the image below shows what a message looks like when it's waiting in the queue before being consumed.
Conclusion
Congratulations! You have successfully built a complete messaging loop. You now have a Spring Boot application that can both produce and consume messages via RabbitMQ. This forms the foundation for building complex, event-driven architectures and microservices.
Key Takeaways:
- A message consumer (or receiver/listener) is a component that subscribes to a queue and processes incoming messages.
- The
@RabbitListener(queues = "...")annotation is the primary way to create a message consumer in Spring Boot. - Spring Boot's auto-configuration handles the complex work of setting up listener containers, allowing you to focus on the business logic of your handler method.
- The producer and consumer are decoupled; the producer sends a message without knowing who, if anyone, is listening. The consumer processes messages without knowing who sent them.
What's Next?
You have now mastered the fundamental patterns of asynchronous communication within a single application. This is a critical skill, but in modern systems, this pattern is most powerful when used to enable communication between different applications or services.
This brings us to the end of the "Asynchronous & Event-Driven Patterns" module and sets the stage perfectly for our next major topic: Microservices with Spring Cloud. In the first lesson of the next module, we will explore the core principles of microservices and discuss strategies for breaking down a large, monolithic application into smaller, independent services that can communicate using the very patterns you've just learned.