Hello! Welcome to the final lesson in our module on Containerization and CI/CD.
In our last session, we took a major step by extending our CI pipeline to not only build and test our Spring Boot application but also to package it as a Docker image and publish it to Docker Hub. This created a versioned, distributable artifact—a cornerstone of modern software delivery.
Today, we will complete our automation journey by implementing the "CD" in CI/CD: Continuous Deployment. We will configure our pipeline to automatically deploy our containerized application to a live environment on a cloud platform. This will close the loop, creating a fully automated path from a git push to a running application in the cloud.
Specifically, this lesson will guide you through how to: Implement a CD pipeline to automatically deploy the containerized application to a cloud platform (e.g., AWS Elastic Beanstalk).
We will use AWS Elastic Beanstalk, a Platform-as-a-Service (PaaS) that handles the underlying infrastructure, allowing us to focus on deploying our application.
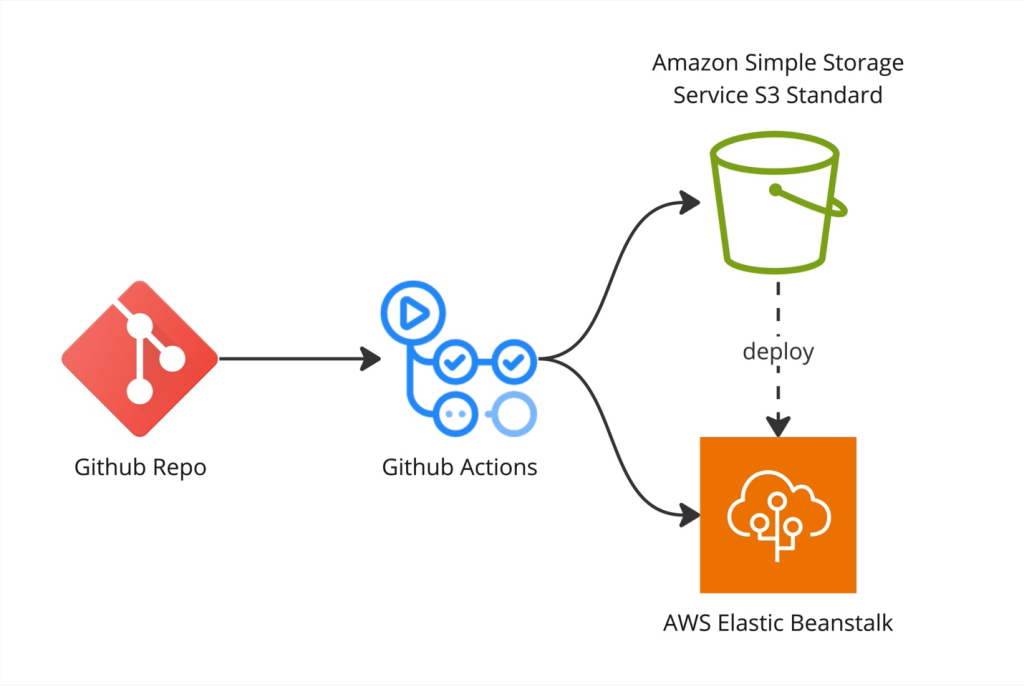
1. Preparing the Cloud Environment: AWS Elastic Beanstalk
AWS Elastic Beanstalk (EB) is a service that makes it easy to deploy and scale web applications. It manages the servers, load balancers, and scaling for you. We will create an EB environment that is configured to run Docker containers.
Deployments with Docker and Elastic Beanstalk
The following video from Ryan Schachte provides a clear demonstration of how to create a new application and environment in Elastic Beanstalk. We'll use this as a guide for our initial setup.
Watch the video from 26:51 to 29:51. Follow the steps to create an application in your own AWS account. Crucially, when you get to the 'Platform' selection, choose 'Docker' instead of Node.js as shown in the video. For the platform branch, 'Amazon Linux 2' is a good choice. After the environment is created, you should have a public URL showing a sample application page. This confirms your environment is ready.
Once this process is complete, you will have a running environment in AWS waiting for our application code.
2. Granting Secure Access to AWS
For GitHub Actions to deploy code to your AWS account, it needs permissions. Hardcoding credentials is a major security risk. The standard practice is to create a dedicated service account (an IAM User in AWS) with restricted permissions and provide its credentials to GitHub securely.
- Create an IAM User: This user will represent our GitHub Actions workflow. It will be granted programmatic access only.
- Assign Permissions: We will grant this user the necessary permissions to interact with Elastic Beanstalk.
- Generate Access Keys: We will generate an
Access Key IDand aSecret Access Keyfor this user. - Store Keys in GitHub Secrets: We will store these keys in your GitHub repository's secrets, where our workflow can access them securely without exposing them in the code.
The next video segment walks through this entire process.
Deployments with Docker and Elastic Beanstalk
Let's continue with the 'Deployments with Docker and Elastic Beanstalk' video. This section clearly demonstrates how to create an IAM user, assign permissions, and configure GitHub Secrets.
Watch the video from 36:37 to 39:25. Follow these steps: Navigate to the IAM service in your AWS console. Create a new user group and attach the AWSElasticBeanstalkFullAccess policy. This grants all necessary permissions for EB. Create a new user with Programmatic access and add it to the group you just created. After the user is created, AWS will show you an Access key ID and a Secret access key. Copy these immediately; you will not be able to see the secret key again. In your GitHub repository, go to Settings > Secrets and variables > Actions. Create a new repository secret named AWS_ACCESS_KEY_ID and paste the corresponding value. Create another secret named AWS_SECRET_ACCESS_KEY and paste its value.

With this setup, your workflow can authenticate with AWS without ever exposing your secret keys.
3. Creating the Deployment Workflow
Now, let's update our .github/workflows/main.yml file to add the deployment stage. A best practice is to separate build and deploy logic into distinct jobs. This makes the pipeline clearer and more modular.
Our updated workflow will have two jobs:
build-and-publish: This job will be responsible for building the Spring Boot JAR, then building the Docker image and pushing it to Docker Hub. This is largely what we created in the last lesson. It creates our official, versioned artifact.deploy: This new job will run only afterbuild-and-publishsucceeds. It will check out the source code and use a specialized GitHub Action to deploy it to the Elastic Beanstalk environment we just created.
For the deployment, we will use the popular einaregilsson/beanstalk-deploy action. This action simplifies the process by packaging our source code (including the Dockerfile) into a zip file and deploying it to Elastic Beanstalk, which will then build and run our container.
Here is the complete main.yml file. Replace the previous content with this.
name: Spring Boot CI/CD Pipeline

on:
  push:
    branches: [ "main" ]

jobs:
  build-and-publish:
    name: Build and Publish Docker Image
    runs-on: ubuntu-latest
    steps:
      - name: Checkout code
        uses: actions/checkout@v4

      - name: Set up JDK 17
        uses: actions/setup-java@v4
        with:
          java-version: '17'
          distribution: 'temurin'
          cache: maven

      - name: Build with Maven
        run: mvn -B package --file pom.xml

      - name: Login to Docker Hub
        uses: docker/login-action@v3
        with:
          username: ${{ secrets.DOCKERHUB_USERNAME }}
          password: ${{ secrets.DOCKERHUB_TOKEN }}

      - name: Build and push Docker image
        uses: docker/build-push-action@v6
        with:
          context: .
          push: true
          tags: ${{ secrets.DOCKERHUB_USERNAME }}/your-repo-name:latest # IMPORTANT: Replace with your repo name

  deploy:
    name: Deploy to AWS Elastic Beanstalk
    runs-on: ubuntu-latest
    needs: build-and-publish # This job runs only after the build-and-publish job succeeds
    steps:
      - name: Checkout code
        uses: actions/checkout@v4

      - name: Deploy to Elastic Beanstalk
        uses: einaregilsson/beanstalk-deploy@v21
        with:
          aws_access_key: ${{ secrets.AWS_ACCESS_KEY_ID }}
          aws_secret_key: ${{ secrets.AWS_SECRET_ACCESS_KEY }}
          application_name: your-eb-app-name # IMPORTANT: Replace with your EB application name
          environment_name: your-eb-env-name # IMPORTANT: Replace with your EB environment name
          region: your-aws-region # IMPORTANT: e.g., us-east-1
          deployment_package: deploy.zip

      - name: Create deployment package
        run: zip -r deploy.zip . -x ".git/*" ".github/*"
Before you commit, make sure you replace the placeholder values:
your-repo-name: The name of your image repository on Docker Hub.your-eb-app-name: The name of the application you created in Elastic Beanstalk.your-eb-env-name: The name of the environment within your EB application.your-aws-region: The AWS region where you created your EB environment (e.g.,us-east-1,eu-west-2).
Test your understanding!
In the deploy job, we are packaging the source code into a deploy.zip file and sending that to Elastic Beanstalk. Why do you think we are doing this instead of telling EB to pull the image we just pushed to Docker Hub?
Show answer
This is an excellent question that touches on different deployment strategies.
- Simplicity: The "source bundle" approach (sending a zip with the
Dockerfile) is the simplest way to get started with EB and Docker. Thebeanstalk-deployaction handles the packaging, and EB handles the image build. - Best Practice: In a real-world scenario, you are right to question this. We pushed an image to Docker Hub to create a versioned, immutable artifact. The most robust deployment strategy would be to tell EB to pull that specific image. This can be done by creating a
Dockerrun.aws.jsonfile that points to the image on Docker Hub and deploying that file instead.
For this lesson, we chose the simpler source bundle method to introduce cloud deployment concepts without adding the complexity of another configuration file. However, publishing to Docker Hub remains a crucial best practice for versioning, auditing, and potential use by other services. Our pipeline now demonstrates both a simple deployment path and proper artifact management.
4. Triggering the Deployment
You are now ready to launch your automated deployment.
- Commit the updated
.github/workflows/main.ymlfile to your local repository. - Push the changes to the
mainbranch on GitHub.
git add .github/workflows/main.yml
git commit -m "feat: Add CD pipeline to deploy to Elastic Beanstalk"
git push origin main
This push will trigger the workflow. You can watch it run in the "Actions" tab of your GitHub repository. You should see the build-and-publish job run first, followed by the deploy job.
The final video segment shows what to expect during and after the deployment.
Deployments with Docker and Elastic Beanstalk
Finally, let's watch how the automated deployment process unfolds in both GitHub Actions and AWS, and how to verify the result.
Watch from 39:25 to 44:36. You will see: The GitHub Actions workflow executing the deploy step. The corresponding activity in the AWS Elastic Beanstalk console, which will show an 'environment is updating' status. The S3 bucket where EB stores the deploy.zip artifact. Once the workflow and the EB update complete, the public URL for the environment now serves the newly deployed application instead of the sample page. You will need to access your Spring Boot application's endpoint (e.g., http://<your-eb-url>/api/some-endpoint) to see it working.
After the deployment succeeds, navigate to your Elastic Beanstalk URL. Instead of the sample page, your Spring Boot application should now be running and ready to accept requests.
Conclusion
Congratulations! You have successfully built a complete, end-to-end CI/CD pipeline. Your development process is now automated from the moment you commit code to the point where it's live in the cloud. This is a fundamental skill for any modern backend developer.
Key Takeaways:
- Continuous Deployment (CD) automates the release of software to a production or staging environment.
- Platform-as-a-Service (PaaS) like AWS Elastic Beanstalk abstracts away infrastructure management, simplifying deployment.
- IAM Roles and Policies are the standard way to grant secure, programmatic access to AWS resources for automated systems.
- GitHub Actions jobs can be chained with
needsto create multi-stage pipelines (e.g., build first, then deploy). - Deploying a source bundle with a
Dockerfileis a straightforward method for containerized deployments on Elastic Beanstalk.
This lesson concludes our course on the foundations of backend development with Java and Spring. You have journeyed from basic web concepts through building robust REST APIs, connecting to databases, securing your application, and finally, automating its deployment. You now have a solid foundation to build upon as you tackle more complex, enterprise-level challenges. Keep building