Hello! Welcome to our next lesson in the Containerization and CI/CD module.
In our previous session, you gained a solid conceptual understanding of CI/CD pipelines. We discussed the key stages—Source, Build, Test, and Deploy—and the value they bring in automating software delivery. Now, it's time to move from theory to practice.
Today's lesson addresses the learning outcome: Create a basic CI pipeline using GitHub Actions to build and test the application on code push. We will take the manual build and test commands you've been running on your local machine and automate them. By the end of this lesson, you will have a working pipeline that automatically verifies your code every time you push a change to your repository, providing immediate feedback on its health.
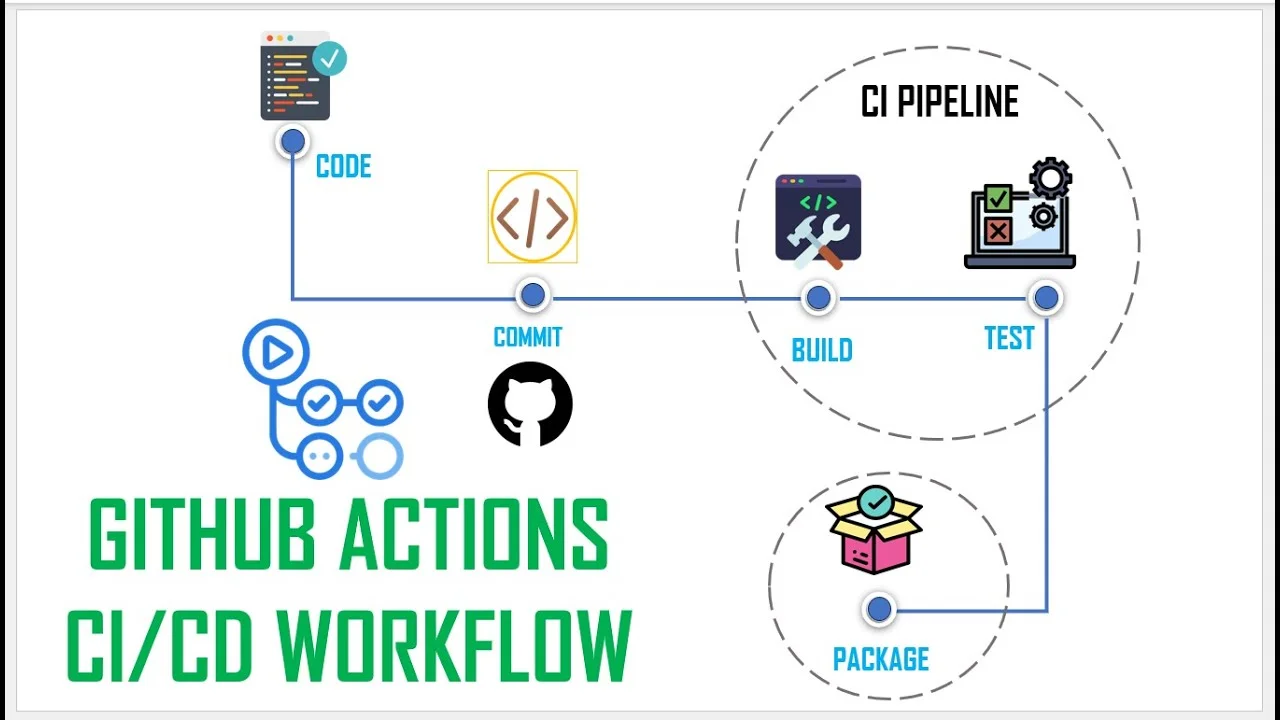
1. What is GitHub Actions?
GitHub Actions is a powerful automation tool built directly into GitHub. It allows you to create custom workflows that respond to events in your repository, such as a code push or a pull request. We'll use it to define and run our CI pipeline.
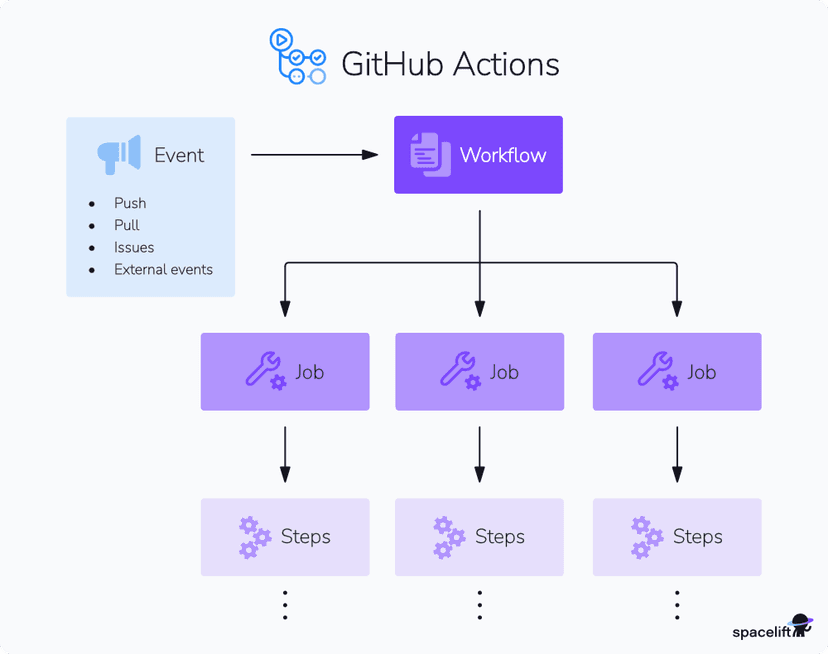
A workflow is defined in a YAML file and is composed of several key components:
- Workflow: The overall automated process.
- Event: The trigger that starts the workflow (e.g.,
push). - Job: A set of steps that execute on a virtual server, called a runner.
- Step: An individual task within a job, which can run shell commands or use a reusable Action.
- Action: A pre-packaged, reusable command that simplifies complex tasks (e.g., checking out code or setting up Java).
To get a feel for how these concepts translate into a workflow file, let's explore a guide that breaks down the YAML syntax.
Step-by-Step Guide to Spring Boot CI/CD Using GitHub Actions
The article 'Step-by-Step Guide to Spring Boot CI/CD Using GitHub Actions' provides clear explanations of the main keywords used to define a workflow.
Please read the sections 'What is GitHub Action', 'Events to Trigger the Workflow', 'Jobs', and the breakdown under 'Compile the project'. Focus on understanding the purpose of the keywords name, on, jobs, runs-on, steps, uses, and run.
2. Building Your CI Workflow Step-by-Step
We are now ready to create our first workflow. This workflow will perform the "Build" and "Test" stages of our pipeline. For a Java Maven project, this means compiling the code, running the unit tests, and packaging the application.
We will create a single job named build-and-test that performs the following steps:
- Checks out the source code from our repository.
- Sets up the correct JDK version.
- Caches Maven dependencies to speed up future runs.
- Runs the
mvn packagecommand to build the application and run tests.
The following video provides an excellent walkthrough of this process. We will follow its structure to build our workflow.
GitHub Actions CI/CD pipeline | Step by Step guide
The video 'GitHub Actions CI/CD pipeline | Step by Step guide' by Ali Bouali is a practical tutorial on building a CI pipeline. We'll use specific segments to guide us through each step of creating our YAML file.
You will watch this video in segments as we build our workflow. For now, there's nothing to watch, but keep it ready. We will refer back to it as we proceed.
Step 1: Create the Workflow File
First, you need to create the directory structure and the YAML file for your workflow inside your Spring Boot project. GitHub Actions automatically discovers workflows placed in a specific folder.
GitHub Actions CI/CD pipeline | Step by Step guide
Let's see how to create the correct folder structure and the initial part of our workflow file.
Watch from 07:33 to 10:46. Follow the instructions to create the .github/workflows directory and a main.yml file within it. Add the name and the on trigger for the main branch as shown.
After this step, your main.yml file should look something like this:
name: Java CI with Maven

on:
  push:
    branches: [ "main" ]
Step 2: Define the Job and Steps
Next, we'll define our job. This involves specifying the runner environment and outlining the sequence of steps.
GitHub Actions CI/CD pipeline | Step by Step guide
This segment shows how to define a job, name it, and specify the runner.
Watch from 10:46 to 12:35. Add the jobs block with a single job named build. Specify ubuntu-latest as the runner.
Your file will now have a jobs section:
# ... (name and on sections) ...

jobs:
  build:
    name: Build and Test
    runs-on: ubuntu-latest
    steps:
      # We will add steps here
Step 3: Implement the Workflow Steps
Now, let's fill in the steps with the actions needed to build and test our application.
1. Check out the code: The first step in any CI job is to get a copy of your repository's code onto the runner.
GitHub Actions CI/CD pipeline | Step by Step guide
Let's add the first, essential step: checking out the code.
Watch from 12:35 to 15:41. Add the actions/checkout@v3 step to your workflow file. The video uses v2, but it's good practice to use a more recent version like v3 or v4. Notice how the presenter explains finding these actions on the GitHub Marketplace.
2. Set up JDK and Cache Dependencies: The runner needs the correct Java version. We can also use this step to cache our Maven dependencies, which will make subsequent pipeline runs much faster.
GitHub Actions CI/CD pipeline | Step by Step guide
Now, let's configure the Java environment for our Spring Boot application.
Watch from 15:41 to 17:56. Add the actions/setup-java@v3 step. Set the java-version to 17 and the distribution to temurin (a popular OpenJDK build).
To enable caching, we simply add a cache property to this step. This is a powerful feature of the setup-java action.
Building and testing Java with Maven
The official GitHub documentation provides a clean and simple way to enable Maven caching.
Read the section 'Caching dependencies' to see how to add the cache: maven line to your setup-java step. Update your main.yml file accordingly.
3. Build and Test with Maven: Finally, with the environment set up, we can run the Maven command to compile, test, and package our application.
GitHub Actions CI/CD pipeline | Step by Step guide
This is the core step of our CI pipeline, where we execute the Maven build.
Watch from 17:56 to 20:55. The video demonstrates running mvn test and then mvn package in separate steps. For simplicity, we can combine these. The package lifecycle phase in Maven automatically runs the test phase first. Add a single run step with the command mvn -B package. The -B flag runs Maven in batch mode, which is ideal for non-interactive CI environments.
3. The Complete Workflow and Execution
After following all the steps, your complete main.yml file should look like this:
name: Java CI with Maven

on:
  push:
    branches: [ "main" ]
  pull_request:
    branches: [ "main" ]

jobs:
  build:
    name: Build and Test
    runs-on: ubuntu-latest

    steps:
    - name: Checkout code
      uses: actions/checkout@v4

    - name: Set up JDK 17 and cache Maven packages
      uses: actions/setup-java@v4
      with:
        java-version: '17'
        distribution: 'temurin'
        cache: maven

    - name: Build with Maven
      run: mvn -B package --file pom.xml
Note: I've also added a pull_request trigger, which is a common practice to ensure code is tested before it's even merged.
Now, commit this file to your local repository and push it to the main branch on GitHub.
git add .github/workflows/main.yml
git commit -m "feat: Add CI workflow for build and test"
git push origin main
Once you've pushed the change, navigate to your repository on GitHub and click the "Actions" tab. You should see your workflow running!
GitHub Actions CI/CD pipeline | Step by Step guide
This final segment shows what to expect in the GitHub UI and how to debug a common initial setup error.
Watch from 20:55 to 25:04. Observe how to monitor the job's progress and view the logs for each step. The video also shows a great real-world example of debugging a typo in the directory name (.actions instead of .github), which is a very common mistake for beginners.
Click on your workflow run to see the Build and Test job. You can expand each step to see its detailed log output. A green checkmark means everything succeeded!
Test your understanding!
What would you change in the workflow file if your team decided to use a develop branch for new features, and you wanted the CI pipeline to run on pushes to that branch in addition to main?
Show answer
You would update the on trigger section to include the develop branch in the list:
on:
  push:
    branches: [ "main", "develop" ]
  pull_request:
    branches: [ "main", "develop" ]
Conclusion
Congratulations! You have successfully created your first automated Continuous Integration pipeline. You've taken a crucial step from manual, local commands to a repeatable, automated process that safeguards your project's quality.
Key Takeaways:
- GitHub Actions workflows are defined in YAML files located in the
.github/workflowsdirectory. - Workflows are triggered by events (like
push) and consist of one or more jobs. - Jobs run on runners and are made up of a sequence of steps.
- We use pre-built Actions like
actions/checkoutandactions/setup-javato handle common tasks. - The
runcommand executes shell scripts, allowing us to run ourmvn -B packagecommand. - The "Actions" tab in GitHub provides real-time monitoring and detailed logs for your workflow runs.
What's Next?
Our CI pipeline now builds and tests the code, but the resulting .jar file simply disappears when the runner shuts down. In our next lesson, Extend the CI pipeline to automatically build and publish a Docker image to a registry, we will add more steps to our workflow. We will use the Dockerfile you created in a previous lesson to build a Docker image and push it to a container registry like Docker Hub, making it ready for deployment.