Welcome to the first lesson of your SvelteKit course! We'll start by hitting the ground running, just as you prefer. Our goal today is to get your development environment set up by creating a new SvelteKit project. Since you have a solid background in Next.js, we'll leverage that experience by directly contrasting SvelteKit's file structure and routing conventions with the Next.js App Router you're familiar with. This will help you quickly get your bearings and understand the "SvelteKit way" of building applications.
Creating Your First SvelteKit Project
Let's begin by scaffolding a new SvelteKit application. SvelteKit provides a command-line interface (CLI) that makes this process straightforward. You'll use npx, which comes bundled with Node.js, to run the SvelteKit project creator.
The following video from the Syntax channel provides a great walkthrough of this initial setup. As you watch, pay close attention to the choices made during the scaffolding process.
Svelte 5 Basics - Complete Svelte 5 Course for Beginners
Watch this segment from "Svelte 5 Basics - Complete Svelte 5 Course for Beginners" to see the project creation process in action.
Follow the instructions from the beginning of the setup process. When prompted by the CLI, make these selections: Project Name: You can name it sveltekit-intro or anything you like. Template: Choose "Minimal". We want to start with the leanest possible project to understand the fundamentals. Type checking: Select "TypeScript". Additional options: For now, just add ESLint (for code linting) and Prettier (for code formatting). We'll add TailwindCSS in the next lesson. After the CLI finishes, follow the final steps shown in the video: navigate into your new project directory (cd sveltekit-intro), install the dependencies (npm install), and start the development server (npm run dev -- --open).
Once you run npm run dev, your new SvelteKit application should open in your browser, running on http://localhost:5173. You should see a simple welcome page.
Understanding the Project Structure
Now that you have a running project, let's examine the files and folders the CLI created. Coming from a MERN and Next.js background, you'll find some parts familiar and others new.
This article from DEV Community provides an excellent, practical overview of the default project structure.
Getting Started with SvelteKit: Setup, Project Structure & First App - DEV Community
This article breaks down the purpose of each key file and folder in a new SvelteKit project.
Read the section titled The Project Structure. This will introduce you to the core directories: src/: Your main application source code. src/routes/: This is where SvelteKit's file-based routing lives. We'll dive deeper into this next. src/lib/: A special directory for your reusable code, like components, utilities, or stores. We will explore this more in the section on creating a reusable component below. static/: For files that don't need processing, like favicon.png or robots.txt.
SvelteKit vs. Next.js: File-Based Routing
Both SvelteKit and Next.js use file-based routing, but their conventions differ. Your experience with the Next.js App Router will make understanding SvelteKit's approach much faster.
Recall the Next.js App Router structure, where folders define route segments and special files like page.tsx, layout.tsx, and error.tsx define the UI for that route.
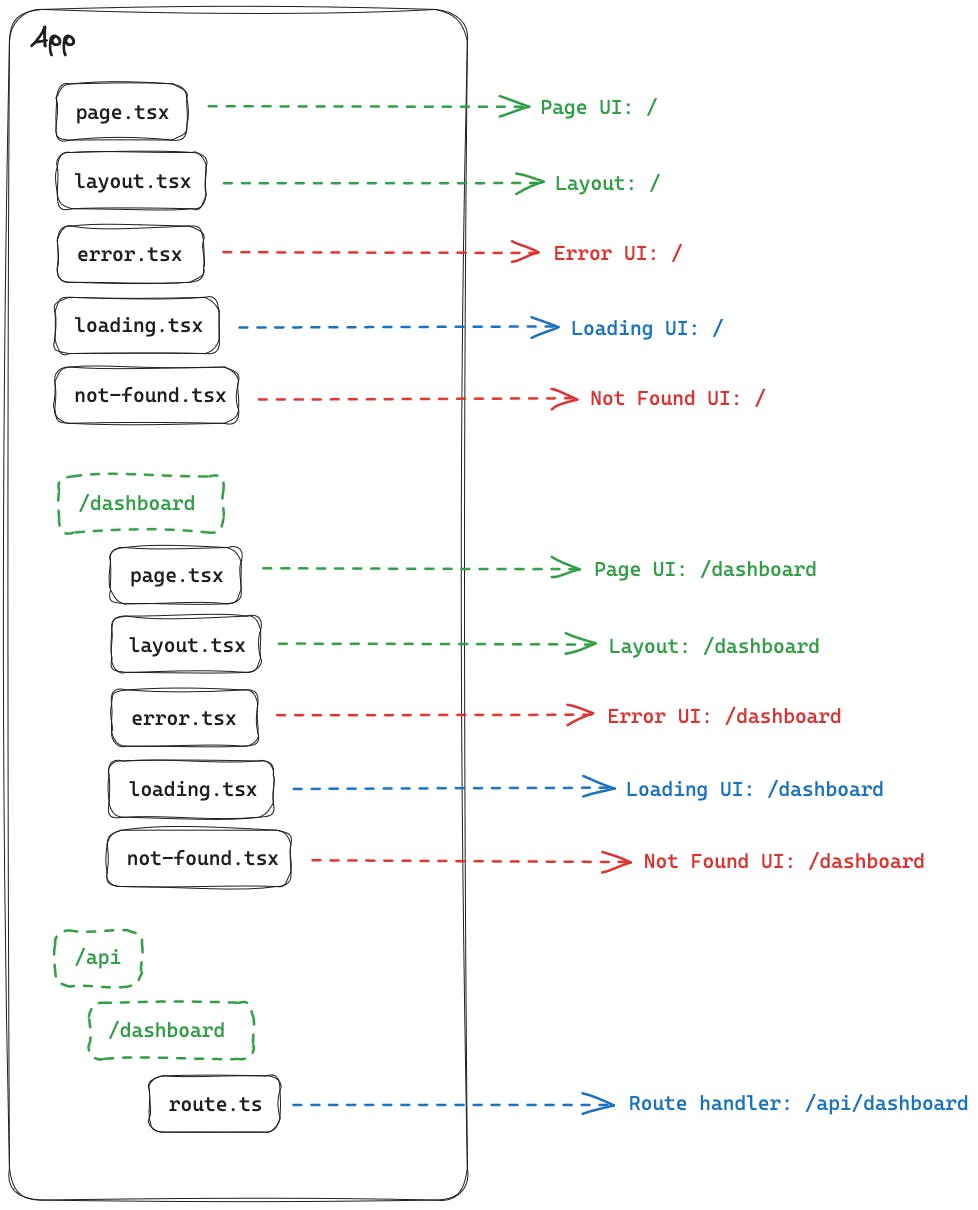
SvelteKit operates on a similar principle, but with a distinct file-naming convention.
The key difference is the use of the + prefix. In SvelteKit, files that are part of the routing system are prefixed with +. This convention makes it easy to colocate route-specific files (like pages and layouts) with other helper modules in the same directory, without them being mistaken for routes.
Let's look at a direct comparison:
| Concept | Next.js (app directory) |
SvelteKit (src/routes directory) |
|---|---|---|
| Page UI | page.tsx |
+page.svelte |
| Layout UI | layout.tsx |
+layout.svelte |
| Error UI | error.tsx |
+error.svelte |
| API Endpoint | route.ts |
+server.js or +server.ts |
| Server Data Loading | Async Server Component | +page.server.js |
| Universal Data Loading | (Varies) | +page.js |
This article provides a concise written comparison of these routing patterns.
SvelteKit vs Next.js in 2026: A Developer's Honest Comparison — Teta Learn
This reading will solidify your understanding of the parallels between the two frameworks.
Focus on the section File-Based Routing. It shows a side-by-side comparison of the folder structures for a simple blog.
The short video below is an excellent and rapid tour of all the special + files in SvelteKit. Watching it will give you a complete mental map of the tools available for routing, data loading, and API creation.
SvelteKit 1.0 Route Files Explained in 4 Minutes (SvelteKit 1.0 Routing Tutorial)
This video, "SvelteKit 1.0 Route Files Explained in 4 Minutes," quickly breaks down the purpose of each route file.
Watch the entire video from start to finish. It will introduce you to: +page files for creating pages. +layout files for shared UI. +error files for handling errors. +server files for building API endpoints.
Here is an image of a more developed SvelteKit project. You can see how the src/routes and src/lib directories get filled out in a real-world application.

Hands-On: Creating Your First Page
To put this knowledge into practice, let's create a new page in your application. We will create an "About" page that lives at the /about URL.
Getting Started with SvelteKit: Setup, Project Structure & First App - DEV Community
This reading will guide you through the practical steps of creating a new route.
Follow the instructions in the article under the heading Routes & Pages. To summarize the steps: Inside the src/routes/ directory, create a new folder named about. Inside the src/routes/about/ folder, create a new file named +page.svelte. Add some simple HTML content to src/routes/about/+page.svelte, for example: <h1>About This App</h1>. Once you save the file, the development server will automatically pick it up. You can now navigate your browser to http://localhost:5173/about and see your new page.
Finally, let's briefly touch on the src/lib directory. As your application grows, you will place reusable components here.
Getting Started with SvelteKit: Setup, Project Structure & First App - DEV Community
This section explains the purpose and best practices for using the src/lib/ folder.
Read the section titled The lib/ Folder to understand its role. Don't worry about the code examples with $state for now; we will cover that in detail in a future lesson. The key takeaway is that src/lib is your project's internal library, and you can import from it using the $lib alias (e.g., import MyComponent from '$lib/components/MyComponent.svelte';).
Conclusion
In this lesson, you created your first SvelteKit project and took a tour of its fundamental structure. By comparing it directly with Next.js, you've seen how SvelteKit handles file-based routing with its + file convention. You also put that theory into practice by creating a new page.
Key Takeaways:
- SvelteKit projects are created using
npx sv create. - The
src/routesdirectory defines your app's URLs. - Special route files are prefixed with
+(e.g.,+page.svelte,+layout.svelte,+server.ts). - The
src/libdirectory is for reusable code, and you can import from it using the$libalias.
In the next lesson, we'll continue setting up our project by integrating a tool you're interested in: TailwindCSS. We'll install and configure it to get you ready for styling your components.