Introduction
Welcome to your second lesson. In our previous session, we deconstructed the AI agent into its four core components: the LLM as the brain, Tools as the hands, Planning for strategy, and Memory for context. We established that an agent's power comes from its ability to perform actions, not just generate text.
Today, we transition from theory to practice. This lesson directly addresses the learning outcome: Build a simple function-calling agent using an LLM API to interact with external tools. We will build the fundamental connection between the agent's "brain" (the LLM) and its "hands" (a tool). This mechanism, known as function calling or tool calling, is what enables an LLM to interact with the outside world—to query databases, call APIs, and execute code. Mastering this is the first and most critical step in building the sophisticated project finance agents that are your ultimate goal.
The Problem: LLMs are Isolated Brains
A Large Language Model, by itself, is a closed system. It was trained on a vast but static dataset. It has no access to real-time information, private databases, or the ability to perform precise computations.
For instance, if you ask an LLM, "What is the current lending rate for commercial solar projects in Nigeria?", it might give you a generic or outdated answer. It cannot access live financial data. Function calling solves this.
The core idea is simple:
- You describe a set of available tools (e.g., a function to get interest rates) to the LLM.
- When you ask a question, the LLM determines if one of its tools can help.
- Instead of answering directly, the LLM outputs a structured message saying, "Please run this tool with these specific arguments."
- Your application code executes the tool and sends the result back to the LLM.
- The LLM then uses this new information to provide a final, data-informed answer.
This diagram from OpenAI illustrates the workflow perfectly:
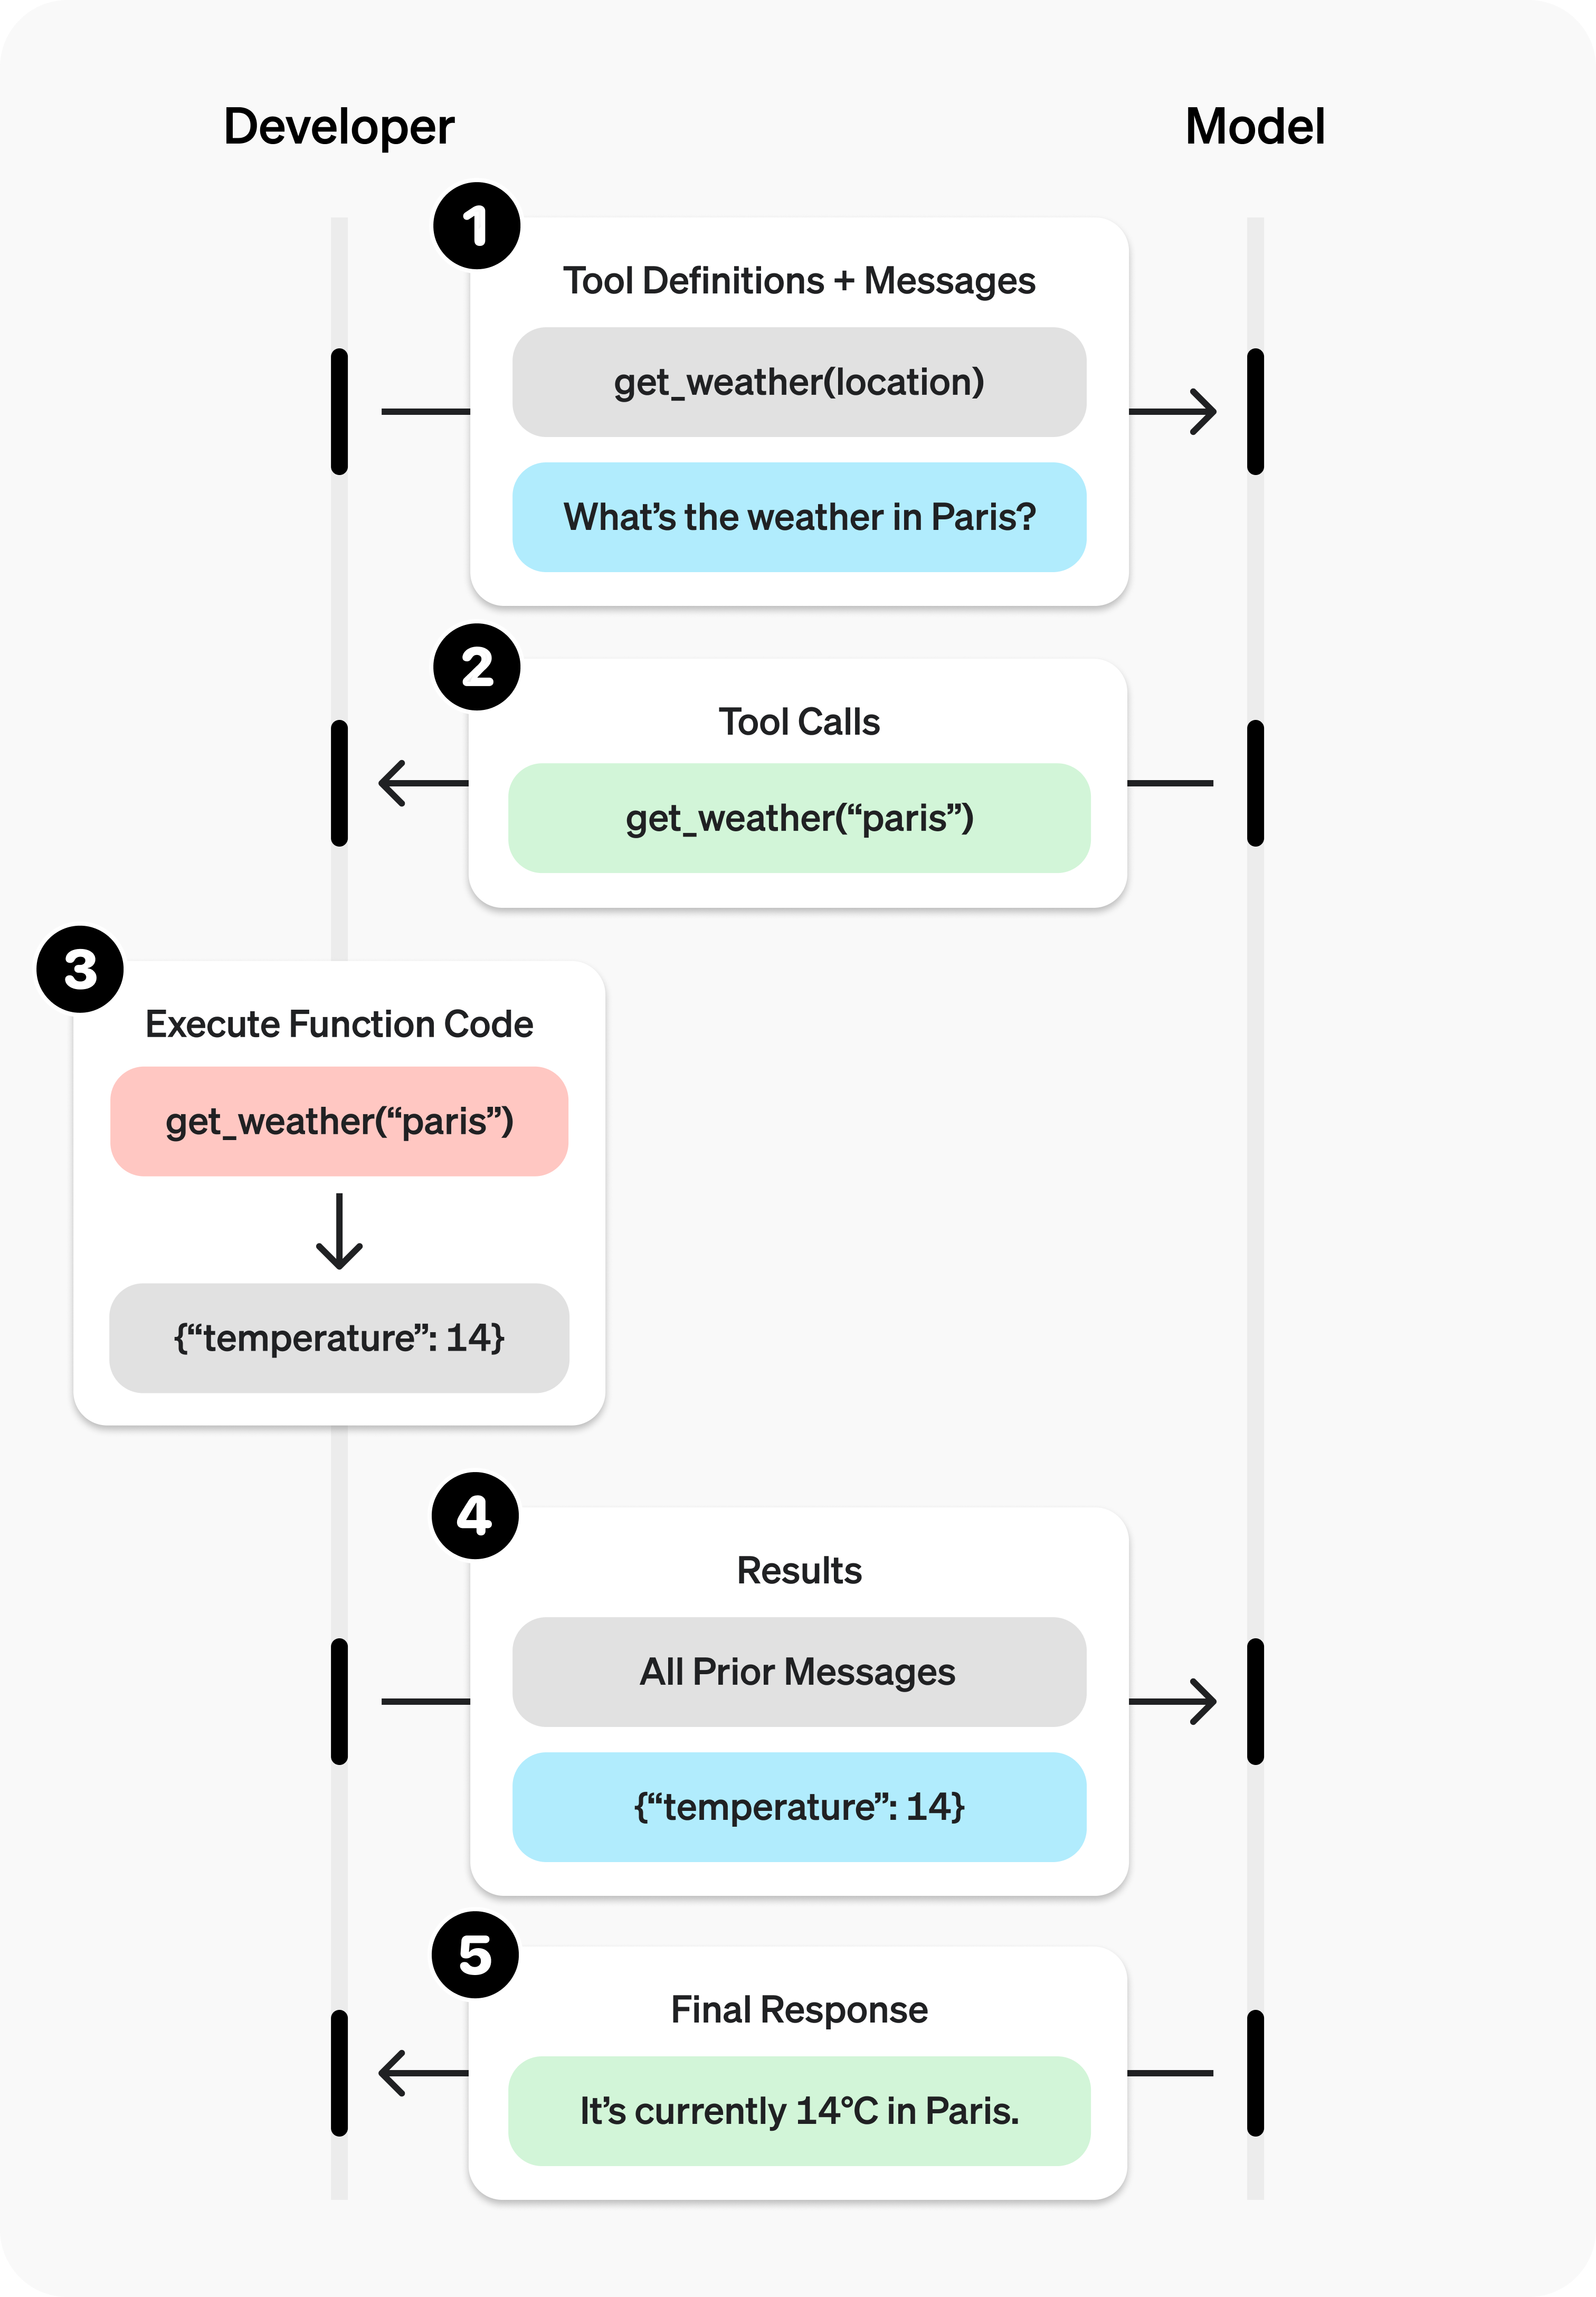
The Five-Step Function Calling Flow
Let's walk through the implementation of this flow. We'll use the OpenAI API with Python, as it's a common industry starting point. The principles, however, are nearly identical across other major providers like Anthropic or Google.
For a comprehensive, hands-on walkthrough, the following video is an excellent resource. We will follow a similar structure in our explanation.
OpenAI Function Calling - Full Beginner Tutorial
The video 'OpenAI Function Calling - Full Beginner Tutorial' by Dave Ebbelaar provides a clear, step-by-step guide to implementing function calling from scratch. We will cover the same core concepts.
First, watch from the beginning to 06:14. This will set the stage by explaining why function calling is a game-changer and demonstrating the limitations of an LLM without it.
Now, let's build our agent. We will create a simple tool relevant to project finance: a Debt Service Coverage Ratio (DSCR) calculator.
Step 1: Define the Tool in Python
First, we create a standard Python function. This is our "tool."
import json

def get_dscr(revenue: float, debt_service: float) -> float:
    """
    Calculates the Debt Service Coverage Ratio (DSCR).

    Args:
        revenue (float): The project's net operating income or cash flow available for debt service.
        debt_service (float): The total debt service (principal + interest) for the period.

    Returns:
        float: The calculated DSCR.
    """
    if debt_service == 0:
        return float('inf')  # Handle division by zero
    return revenue / debt_service
Step 2: Create the Tool's JSON Schema
This is the most critical part. We need to describe our Python function to the LLM in a format it understands: a JSON schema. This schema tells the model the tool's name, its purpose, and the parameters it requires.
tools = [
    {
        "type": "function",
        "function": {
            "name": "get_dscr",
            "description": "Calculates the Debt Service Coverage Ratio (DSCR) for a project, a key metric in project finance.",
            "parameters": {
                "type": "object",
                "properties": {
                    "revenue": {
                        "type": "number",
                        "description": "The project's cash flow available for debt service (CFADS) or net operating income.",
                    },
                    "debt_service": {
                        "type": "number",
                        "description": "The project's total debt service obligations for the period.",
                    },
                },
                "required": ["revenue", "debt_service"],
            },
        }
    }
]
Notice how the descriptions for the function and its parameters are written for the LLM. They guide the model on when and how to use the tool.
Step 3: First API Call — The LLM's Decision
Now, we send a prompt to the LLM, along with the description of the tools it can use.
from openai import OpenAI
client = OpenAI() # Assumes OPENAI_API_KEY is set in your environment

messages = [
    {
        "role": "user",
        "content": "A C&I solar project in Kenya is projected to have cash flow of $2.5M and its debt service for the year is $1.8M. Can you calculate the DSCR?"
    }
]

response = client.chat.completions.create(
    model="gpt-4o",
    messages=messages,
    tools=tools,
    tool_choice="auto",  # 'auto' lets the model decide whether to use a tool
)

response_message = response.choices[0].message
print(response_message)
Instead of a text answer, the response_message will contain a tool_calls object. It will look something like this:
ChatCompletionMessage(
    content=None,
    role='assistant',
    function_call=None,
    tool_calls=[
        ToolCall(
            id='call_abc123',
            function=Function(
                arguments='{"revenue":2500000,"debt_service":1800000}',
                name='get_dscr'
            ),
            type='function'
        )
    ]
)
The LLM correctly identified the tool get_dscr and extracted the arguments 2500000 and 1800000 from the user's natural language query. The content is None because the model has paused to ask for the tool to be run.
Step 4: Execute the Tool and Get the Result
Our application code now needs to parse this response, execute the function, and prepare the result.
# First, append the assistant's message (with the tool call) to our history
messages.append(response_message)

# Check if the model decided to call a tool
tool_calls = response_message.tool_calls
if tool_calls:
    # A mapping of tool names to our actual Python functions
    available_tools = {
        "get_dscr": get_dscr,
    }

    for tool_call in tool_calls:
        function_name = tool_call.function.name
        function_to_call = available_tools[function_name]
        function_args = json.loads(tool_call.function.arguments)

        # Call the actual Python function with the arguments
        function_response = function_to_call(**function_args)

        # Append the tool's output to the message history
        messages.append(
            {
                "tool_call_id": tool_call.id,
                "role": "tool",
                "name": function_name,
                "content": str(function_response), # Content must be a string
            }
        )

print(messages[-1])
The message we just added will look like this, providing the result of our calculation back to the model:{'tool_call_id': 'call_abc123', 'role': 'tool', 'name': 'get_dscr', 'content': '1.3888888888888888'}
The use of **function_args is a common and powerful Python idiom. Given your CS background, you'll recognize this as unpacking a dictionary into keyword arguments, which maps perfectly to the JSON object of arguments provided by the LLM.
Step 5: Second API Call — The Final Answer
Finally, we send the updated messages list, which now includes the tool's output, back to the model.
second_response = client.chat.completions.create(
    model="gpt-4o",
    messages=messages,
)

final_answer = second_response.choices[0].message.content
print(final_answer)
The final_answer will be a user-friendly, natural language response, such as:
"The Debt Service Coverage Ratio (DSCR) for the C&I solar project in Kenya is approximately 1.39x. This indicates that the project's cash flow is sufficient to cover its debt obligations by a factor of 1.39."
To see this entire two-step flow in action, the next segment of the recommended video is invaluable.
OpenAI Function Calling - Full Beginner Tutorial
This part of the tutorial demonstrates the complete loop: making the first call, parsing the response, executing the function, and making the second call to get a final answer.
Please watch from 09:14 to 17:00. This is the most important part of the video as it covers the full end-to-end implementation of a single function call.
Encapsulating Logic in an Agent Class
While calling the API directly is great for understanding the mechanics, in a real application, you'd want to structure this logic more cleanly. A common approach is to create an Agent class that handles the conversation loop.
The following article demonstrates how to build a simple Agent class from scratch. While it uses the Anthropic API, the underlying pattern of the agent loop is identical and provides a great model for robust code.
Building an AI agent from scratch in Python
The article 'Building an AI agent from scratch in Python' by Leonie Monigatti shows how to structure the function-calling logic within a reusable class.
Read the sections titled 'Component 3: Tool Use' and 'Component 4: Agent Loop'. Focus on how the Agent class is initialized with tools and how the run_agent function implements the loop to handle tool calls. This encapsulates the five steps we just walked through.
Test your understanding!
Now it's your turn to build. Your task is to extend the agent we've designed.
-
Create a new tool: Write a Python function
calculate_loan_payment(principal, annual_rate, years)that calculates the monthly payment for a loan using the standard formula. The formula for a monthly paymentMis:where is the principal, is the monthly interest rate (annual rate / 12), and is the total number of payments (years * 12).
-
Define the JSON schema for this new tool.
-
Add it to the
toolslist alongside theget_dscrtool. -
Write a user prompt that would require the agent to use your new
calculate_loan_paymenttool, and run the full two-step process to get a final answer. For example: "What would the monthly payment be for a $5M project loan with a 6% annual interest rate over 10 years?"
Show answer
Here is a possible solution.
1. Python function:
def calculate_loan_payment(principal: float, annual_rate: float, years: int) -> float:
    """Calculates the monthly loan payment."""
    monthly_rate = annual_rate / 12 / 100
    num_payments = years * 12
    if monthly_rate == 0:
        return principal / num_payments if num_payments > 0 else 0

    payment = principal * (monthly_rate * (1 + monthly_rate)**num_payments) / ((1 + monthly_rate)**num_payments - 1)
    return payment
2. JSON Schema:
{
    "type": "function",
    "function": {
        "name": "calculate_loan_payment",
        "description": "Calculates the fixed monthly payment for a loan based on principal, annual interest rate, and term in years.",
        "parameters": {
            "type": "object",
            "properties": {
                "principal": {
                    "type": "number",
                    "description": "The total amount of the loan."
                },
                "annual_rate": {
                    "type": "number",
                    "description": "The annual interest rate as a percentage (e.g., 6 for 6%)."
                },
                "years": {
                    "type": "integer",
                    "description": "The loan term in years."
                }
            },
            "required": ["principal", "annual_rate", "years"]
        }
    }
}
3. Running the agent:
After adding the new schema to your tools list and the new function to your available_tools dictionary, you could use this prompt:
user_prompt = "What would the monthly payment be for a $5M project loan with a 6% annual interest rate over 10 years?"
The agent should first call calculate_loan_payment with arguments {"principal": 5000000, "annual_rate": 6, "years": 10}. The function would return approximately 55510.04. After the second API call, the final answer would be something like: "The monthly payment for a $5,000,000 loan at a 6% annual rate over 10 years would be approximately $55,510.04."
Conclusion
In this lesson, you have successfully built your first functioning AI agent component. You have moved beyond simple text generation and enabled an LLM to use an external tool to perform a specific, relevant task.
Key Takeaways:
- Function calling is a multi-step conversation between your application and the LLM.
- The process involves a two-step API call: the first for the LLM to decide on a tool, and the second to generate a response using the tool's output.
- The JSON schema is the contract that describes your tools to the LLM. The clarity and quality of your descriptions are crucial for the model to use the tools correctly.
You have built a solid foundation. You now understand the core mechanism that underpins almost all advanced agentic capabilities.
In the next lesson, "Implement advanced prompt engineering techniques for financial data extraction and analysis," we will build on this. Now that your agent can use data provided by a tool, we will focus on getting better at extracting that data from unstructured sources in the first place, turning raw text from documents and articles into the structured arguments our tools require.