Hello! Welcome to your next lesson in the Authentication and Authorization module.
In our last lesson, we established the foundation for user security by implementing password hashing and verification. You learned how to use pwdlib (the modern standard) to irreversibly transform passwords into secure hashes, a stark contrast to Django's more abstracted, built-in system.
Now that we can verify a user's password, we need a way to remember that they are authenticated for subsequent API requests without them having to send their credentials every time. This is where JSON Web Tokens (JWTs) come in.
Today's learning outcome is to create and decode JWT access tokens for stateless authentication. We will focus on the core mechanics of how tokens are generated and validated. In the upcoming lessons, we'll integrate these mechanics into actual API endpoints.
1. From Stateful Sessions to Stateless Tokens
In your Django experience, you're likely familiar with session-based authentication. After a user logs in, Django creates a session record in the database (or cache) and sends a sessionid cookie to the client. On subsequent requests, the server uses this ID to look up the session data. This is a stateful system because the server must store the state of each user's session.
For modern APIs, especially those serving single-page applications (SPAs) or mobile clients, a stateless approach is often preferred. This is where JWTs excel. A JWT is a self-contained token that holds all the necessary user information within it. The server doesn't need to store anything; it just needs to validate the token's signature to trust its contents. This makes scaling easier, as any server instance can validate a token without needing access to a shared session store.
2. The Anatomy of a JSON Web Token (JWT)
A JWT is a compact, URL-safe string composed of three parts separated by dots: header.payload.signature.
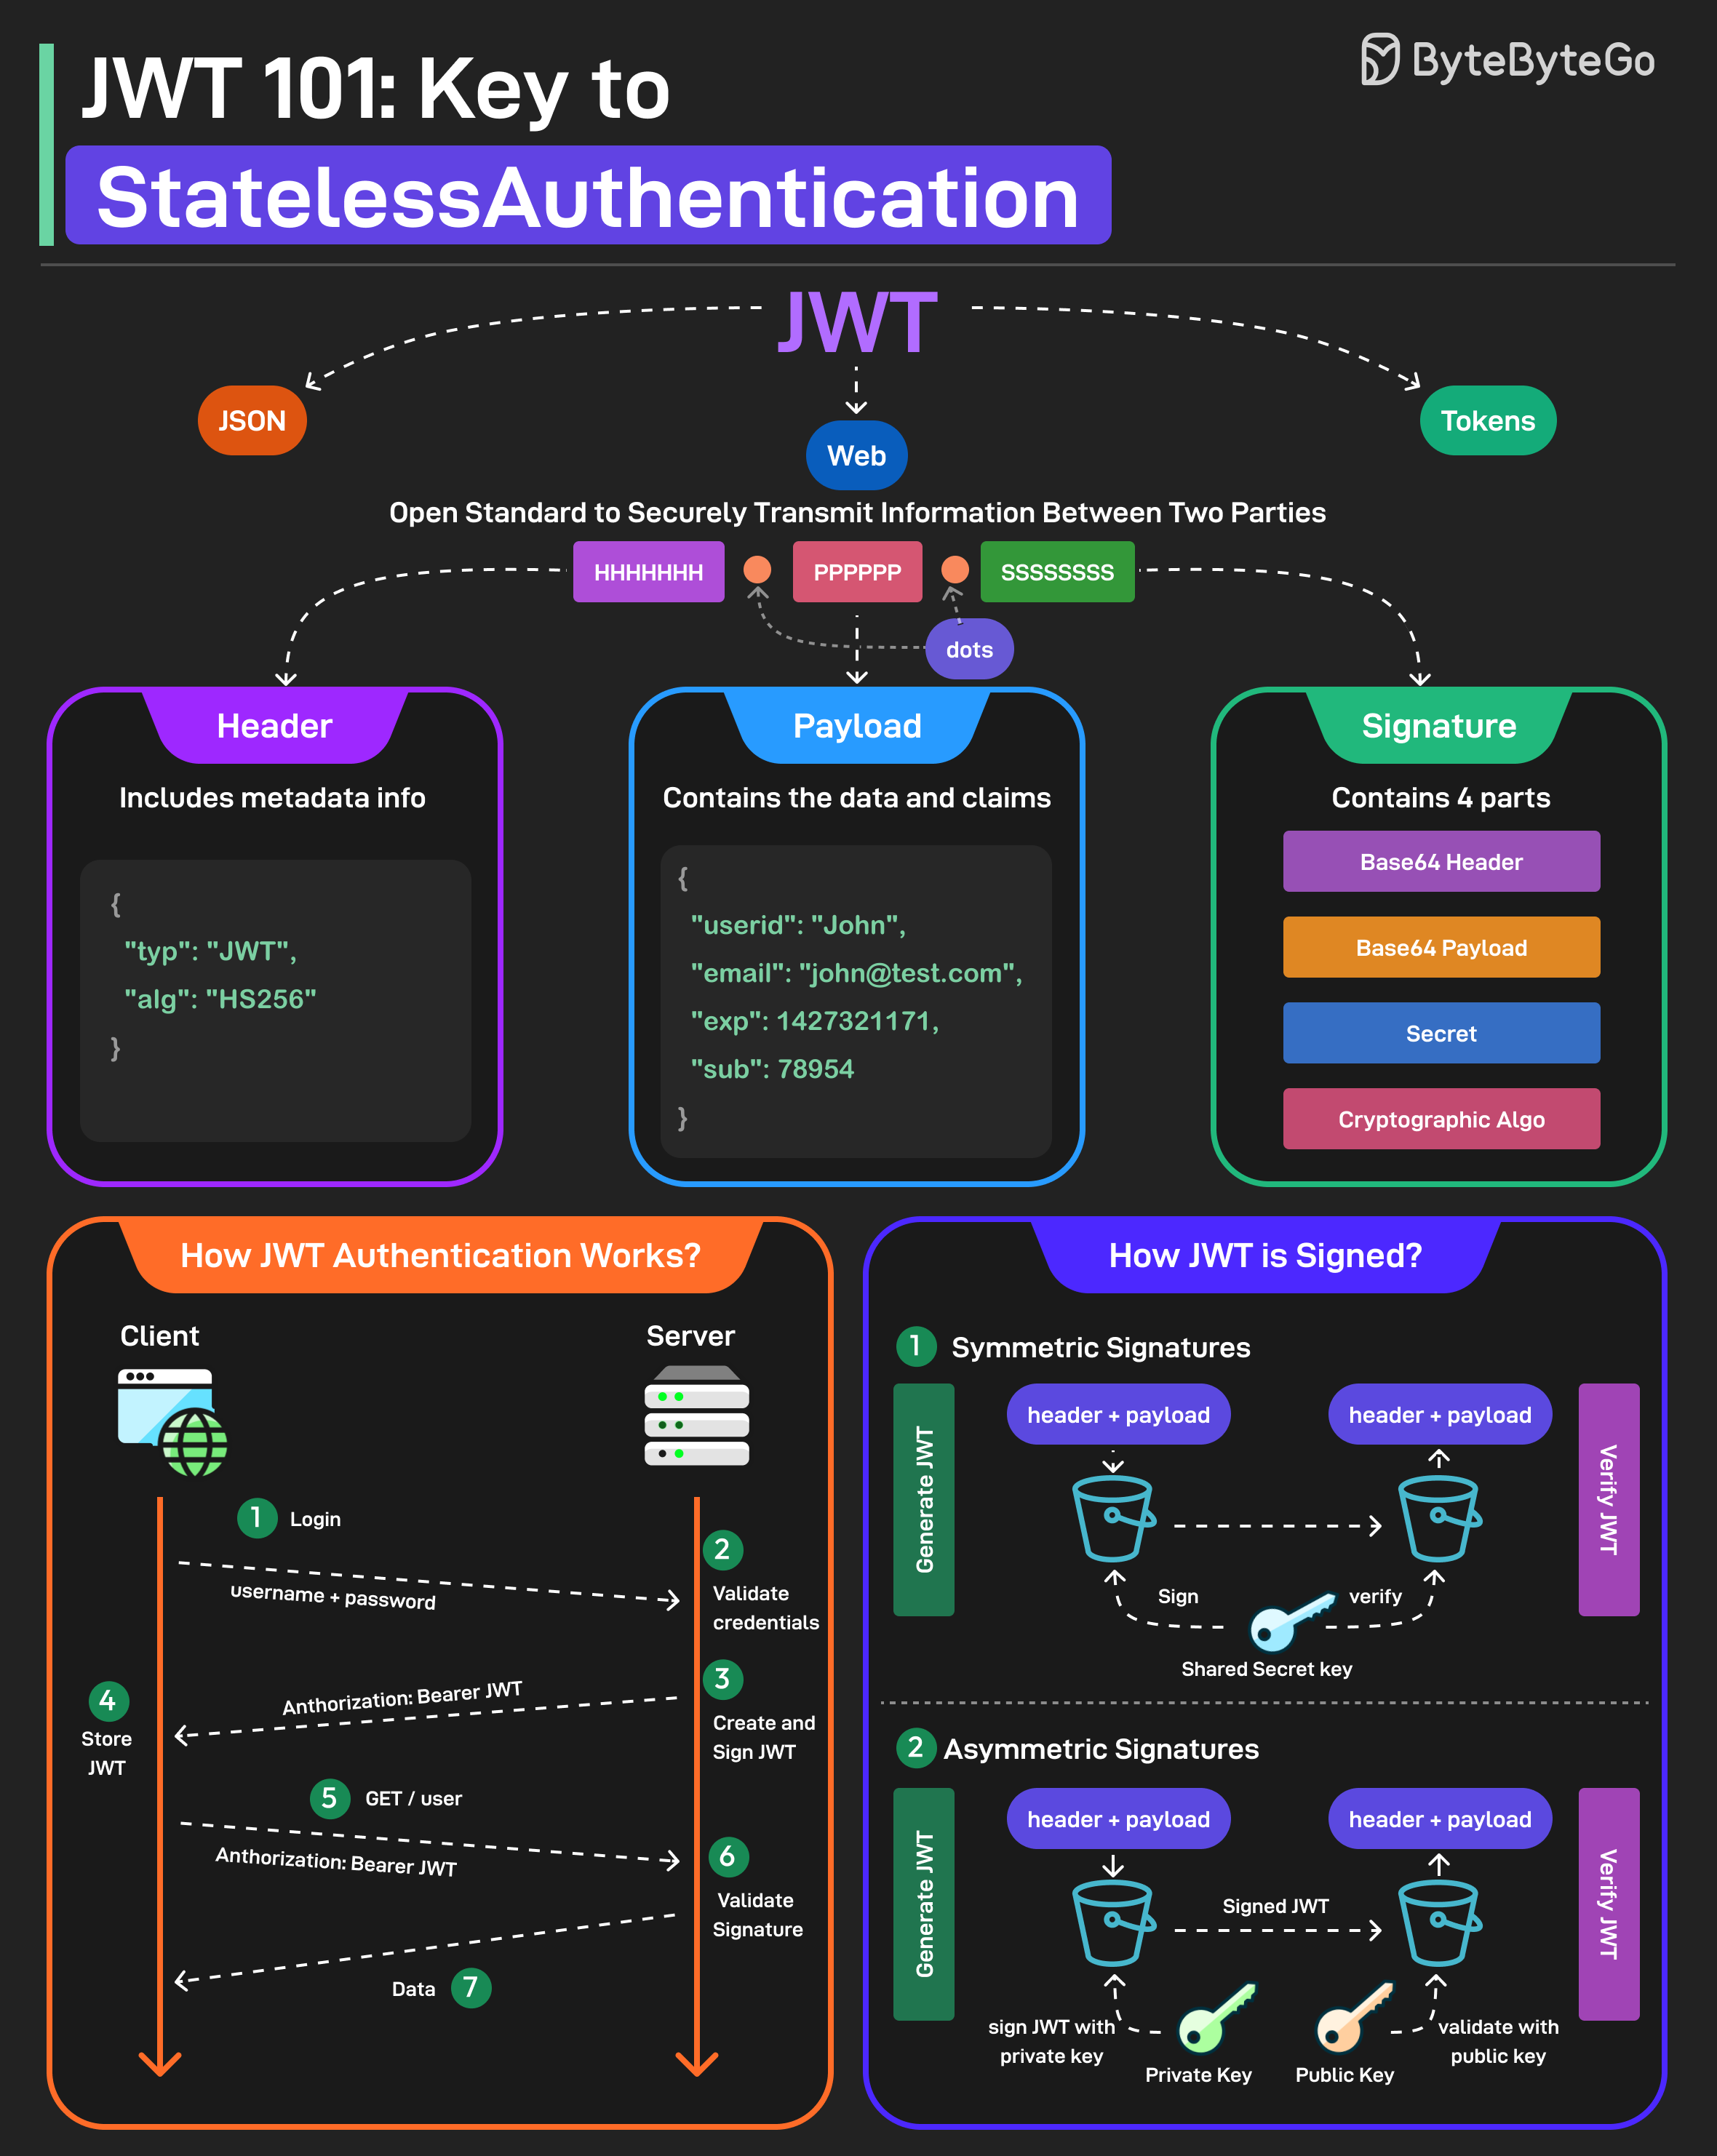
- Header: Typically consists of two parts: the token type (
typ), which isJWT, and the signing algorithm being used (alg), such asHS256. - Payload: Contains the claims. These are statements about an entity (typically, the user) and additional data. Important standard claims include:
sub(Subject): Identifies the principal that is the subject of the JWT. We'll use this to store the user's ID.exp(Expiration Time): Identifies the expiration time on or after which the JWT MUST NOT be accepted. This is crucial for security.iat(Issued At): Identifies the time at which the JWT was issued.
- Signature: To create the signature, you take the encoded header, the encoded payload, a secret, and sign them with the algorithm specified in the header. This signature ensures that the token hasn't been tampered with.
Let's quickly review a short article that reinforces this structure.
Best Practices for API Authentication & Authorization
This article from Shiladitya Majumder provides a clear, concise definition of a JWT and its three-part structure. It serves as a great textual reference.
Read the short section '3. JWT (JSON Web Token) — The Modern API Standard'. Pay attention to the decoded payload example to see what claims look like.
3. Setting Up the JWT Environment
To work with JWTs in FastAPI, we need a library to handle the encoding and decoding, and we need to configure our application with a secret key.
While several libraries exist (python-jose is another popular choice), the official FastAPI documentation now recommends PyJWT. We also need a professional way to manage our secret key, rather than hardcoding it. For this, we'll use pydantic-settings, which you encountered in a previous module.
The following video from Corey Schafer provides an excellent guide to setting up this environment.
Python FastAPI Tutorial (Part 10): Authentication - Registration and Login with JWT
This video walks through installing the necessary packages and creating a robust configuration file to manage our application's secrets.
Please watch these two segments: Package Installation (01:29 - 04:30): Focus on the installation of PyJWT for token operations and pydantic-settings for configuration management. The explanation of why pydantic-settings is a modern, superior choice to a simple .env file is particularly relevant to your goals. Configuration Setup (10:06 - 15:00): Pay close attention to how a config.py file is created using BaseSettings. Note how it defines the SECRET_KEY, ALGORITHM, and ACCESS_TOKEN_EXPIRE_MINUTES, and how it loads these values from an .env file. This is a critical pattern for secure, professional applications.
After following the video, you should have:
PyJWTandpydantic-settingsinstalled.- An
.envfile containing yourSECRET_KEY. Remember to add this file to your.gitignore! - A
config.pyfile that defines and loads your settings.
4. Creating (Encoding) an Access Token
Creating a JWT involves two main steps:
- Constructing a Python dictionary (
dict) that represents the payload, including thesubandexpclaims. - Using
jwt.encode()to sign and serialize this payload into a token string.
Let's build a utility function, create_access_token, to handle this. We'll place it in a new file, auth.py, to keep our security logic organized.
# In a new file, e.g., app/auth.py

from datetime import datetime, timedelta, UTC
from jose import jwt  # Note: The video uses PyJWT, which is preferred. I'll use PyJWT syntax.


# To be correct with the video's recommendation:
import jwt

from . import config # Assuming your config file is in the same directory


# Load settings from your config file
settings = config.settings()

def create_access_token(data: dict, expires_delta: timedelta | None = None):
    """
    Creates a new JWT access token.
    """
    to_encode = data.copy()


    # Set the expiration time
    if expires_delta:
        expire = datetime.now(UTC) + expires_delta
    else:


        # Default to 30 minutes if not provided
        expire = datetime.now(UTC) + timedelta(minutes=settings.access_token_expire_minutes)

    to_encode.update({"exp": expire})


    # Encode the token
    encoded_jwt = jwt.encode(
        to_encode,
        settings.secret_key.get_secret_value(), # Use .get_secret_value() for SecretStr
        algorithm=settings.algorithm
    )
    return encoded_jwt
Let's break this down:
- We define a function that takes the payload data (
dict) as an argument. - We calculate the expiration time (
exp) by adding atimedeltato the current UTC time. - We add the
expclaim to our payload dictionary. - Finally, we call
jwt.encode(), passing the payload, our secret key, and the algorithm. Thepydantic-settingslibrary cleverly uses aSecretStrtype for the key, so we must call.get_secret_value()to access the raw string.
5. Decoding (Verifying) an Access Token
When a client sends a token back to us, we must decode and verify it. The jwt.decode() function handles this beautifully. It not only decodes the payload but also automatically performs two critical checks:
- Signature Verification: It checks if the signature is valid using the provided secret key. If not, it raises an error.
- Expiration Check: It checks the
expclaim. If the token has expired, it raises an error.
Because errors can occur (invalid token, expired token), we must wrap the decode call in a try...except block.
Here is a function to verify a token. Add this to your auth.py file.
# In app/auth.py
from fastapi import HTTPException, status


# from jwt import PyJWTError is the modern equivalent of jose.JWTError
from jwt import PyJWTError


# ... (keep the create_access_token function and imports from above)

def verify_access_token(token: str, credentials_exception: HTTPException):
    """
    Decodes and verifies a JWT access token.
    Returns the payload if the token is valid, otherwise raises an exception.
    """
    try:
        payload = jwt.decode(
            token,
            settings.secret_key.get_secret_value(),
            algorithms=[settings.algorithm]
        )


        # Extract the user ID from the 'sub' claim
        user_id: str = payload.get("sub")
        if user_id is None:
            raise credentials_exception

        return user_id # Or you could return the whole payload

    except PyJWTError:


        # This catches any error from jwt.decode (invalid signature, expired, etc.)
        raise credentials_exception
Key points:
- The function takes the token string and a pre-made
HTTPExceptionas arguments. This allows us to reuse the function and raise a consistent error. - The
jwt.decode()call is wrapped in atry...exceptblock. - If
jwt.decode()succeeds, we extract the user identifier from thesubclaim. - If
user_idis missing orjwt.decode()fails for any reason, we raise thecredentials_exception.
To see these functions built in a real-world context, the video you watched earlier is a fantastic resource.
Python FastAPI Tutorial (Part 10): Authentication - Registration and Login with JWT
Let's revisit Corey Schafer's tutorial. This segment focuses on creating the utility functions for creating and verifying tokens.
Watch the section from 19:25 to 26:37. It walks through creating an auth.py file and defines the create_access_token and verify_access_token functions. Notice how the logic matches what we've just discussed, solidifying your understanding of the implementation details.
Conclusion
Congratulations! You now understand the fundamental mechanics of creating and decoding JSON Web Tokens, the cornerstone of modern API authentication.
Key Takeaways:
- JWTs enable stateless authentication, which is ideal for APIs, contrasting with Django's default stateful session system.
- A JWT consists of a Header, Payload (with claims like
subandexp), and a Signature. - The
PyJWTlibrary providesencode()anddecode()functions to handle token generation and verification. - A secret key is essential for signing tokens, and it must be kept secure, managed via configuration (e.g., using
pydantic-settings), not hardcoded. - Decoding a token with
PyJWTautomatically validates both its signature and expiration time, and failures should be handled with atry...exceptblock.
Preview of the Next Lesson:
We have our core token-handling functions, but they aren't connected to our API yet. In the next lesson, we will build a login endpoint that returns JWT tokens upon valid credentials using an OAuth2PasswordRequestForm dependency. You'll see how to take a username and password, verify them, and use the create_access_token function we built today to grant the user access.