Hello! Welcome back to our series on mastering FastAPI.
In our last lesson, we took a major step in securing our API. We implemented the get_current_user dependency to protect routes and ensured users could only modify their own resources by performing ownership checks. This gave us functionality equivalent to Django REST Framework's IsAuthenticated and IsOwnerOrReadOnly permissions.
Today, we'll build on that foundation to implement a more granular authorization layer: Role-Based Access Control (RBAC). Our goal is to implement dependencies that can check a user's role (e.g., "admin" vs. "user"), allowing us to restrict certain actions, like deleting other users' data, to privileged accounts. This is the FastAPI parallel to DRF's IsAdminUser permission class, but as you'll see, the dependency injection system gives us a more flexible and powerful way to achieve it.
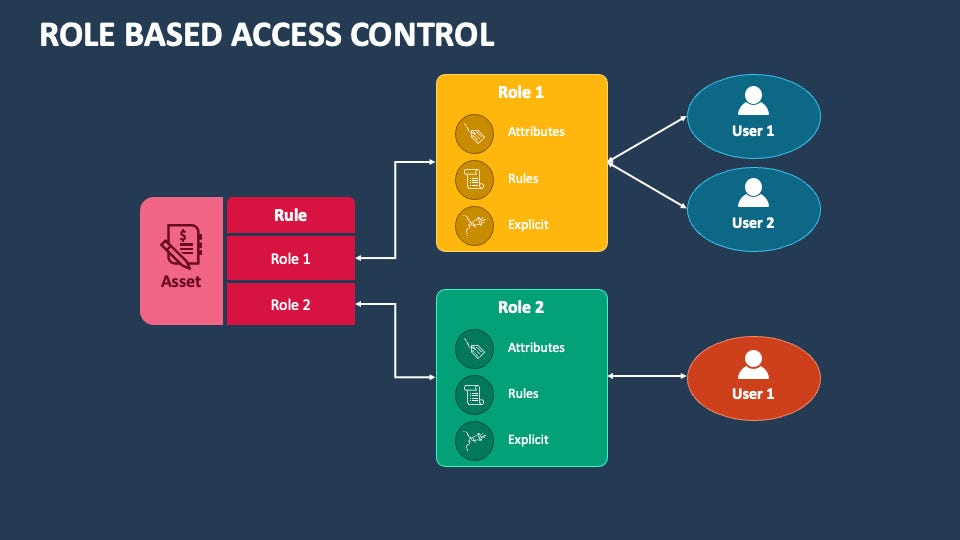
What is Role-Based Access Control (RBAC)?
At its core, RBAC is a security model that controls access to resources based on the roles of individual users within an organization. Instead of assigning permissions to users one-by-one, you assign permissions to roles, and then assign roles to users. This simplifies administration, especially as the number of users and resources grows.
1. Adding Roles to the User Model
To check for a user's role, we first need a place to store it. The most direct way to do this is by adding a role field to our User model in the database.
In Django, this would be as simple as adding role = models.CharField(max_length=50, default='user') to your User model. The process with SQLAlchemy is very similar. We'll add a new column to our User table to store the role as a string, with a default value of "user" for all new and existing users.
This video will walk you through the practical steps of modifying the SQLAlchemy model and applying the change to your database using an Alembic migration.
Role-Based Access Control Using Dependency Injection (User Roles) - FastAPI Beyond CRUD (Part 13)
This first video segment from Ssali Jonathan's 'FastAPI Beyond CRUD' series demonstrates how to add a role field to the user model and generate an Alembic migration to update the database schema.
Watch the clip from 00:12:42 to 00:17:50. Pay attention to: How the role column is added to the User model using mapped_column. The use of server_default='user' to ensure existing users in the database are assigned a default role. The process of auto-generating a new migration file with alembic revision --autogenerate. Applying the migration with alembic upgrade head.
After updating the model, we also need to ensure that new users are assigned a role upon creation and that this role is included in the access token. This makes the role readily available for our authorization logic.
Role-Based Access Control Using Dependency Injection (User Roles) - FastAPI Beyond CRUD (Part 13)
Now, let's see how to assign the default role during user creation and, importantly, how to embed that role into the JWT payload.
Watch the brief segment from 00:17:50 to 00:19:11. Notice how the role is set in the user creation service and then added as a claim when the JWT is encoded. While the video adds it to the token, our existing get_current_user dependency from the last lesson fetches the full user object from the database, so the role will be available on current_user.role regardless. This database-first approach is robust against stale token data if a user's role changes.
2. The Role-Checking Dependency
Now for the main event: creating a dependency that checks for roles. We could create a specific is_admin dependency, but that's not very reusable. What if we need to check for a "manager" or "editor" role later?
A better approach is to create a single, parameterized dependency. We can tell it which roles are allowed for a specific endpoint. A class is the perfect tool for this.
The Django Analogy: Think of this as creating a flexible permission class in DRF where you can pass arguments, like permission_classes = [HasRole('admin', 'moderator')].
In FastAPI, we'll create a RoleChecker class:
- The
__init__method will accept a list of allowed roles. - The
__call__method, which makes the class instances callable, will contain the actual checking logic. This method will itself useDepends(get_current_user)to get the current user.
Let's watch how this is built.
Role-Based Access Control Using Dependency Injection (User Roles) - FastAPI Beyond CRUD (Part 13)
This clip is the core of our lesson. It details the creation of a class-based dependency, RoleChecker, that encapsulates our authorization logic.
Watch from 00:19:11 to 00:25:39. Focus on: The structure of the RoleChecker class. How __init__ stores the allowed_roles. How the __call__ method is an async def function that depends on get_current_user. The core logic: if current_user.role not in self.allowed_roles, raise an HTTPException with status code 403 Forbidden.
Here is the key logic from the video in a simplified form:
from fastapi import Depends, HTTPException, status


# Assume get_current_user and User schema are imported

class RoleChecker:
    def __init__(self, allowed_roles: list[str]):
        self.allowed_roles = allowed_roles

    async def __call__(self, current_user: User = Depends(get_current_user)):
        if current_user.role not in self.allowed_roles:
            raise HTTPException(
                status_code=status.HTTP_403_FORBIDDEN,
                detail="You do not have permission to perform this action",
            )
This pattern is clean, reusable, and type-safe.
3. Protecting Routes with the RoleChecker
With our RoleChecker class defined, we can now create instances of it for different permission levels and apply them to our routes.
For example, to create a check that only allows admins:admin_only_check = RoleChecker(allowed_roles=["admin"])
To apply this, FastAPI gives us a very clean way to add dependencies that run but whose return value we don't need in the function body: the dependencies list in the path operation decorator.
This next segment shows exactly how to use our new checker.
Role-Based Access Control Using Dependency Injection (User Roles) - FastAPI Beyond CRUD (Part 13)
Finally, let's see how to apply our RoleChecker to protect endpoints. This demonstrates the elegance of using the dependencies argument in route decorators.
Watch from 00:25:39 to 00:31:42. Notice the two ways to apply the dependency: As a standard parameter in the function signature (e.g., _ = Depends(admin_only_check)). More cleanly, using the decorator argument: @router.post("/", dependencies=[Depends(admin_only_check)]). This second method is preferred for authorization checks as it clearly separates permission logic from business logic parameters.
Here's an example of how you might protect a route for deleting users, making it accessible only to admins:
# In a file where you define reusable dependencies
admin_access = RoleChecker(allowed_roles=["admin"])
user_and_admin_access = RoleChecker(allowed_roles=["user", "admin"])


# In your user_router.py file
@router.delete(
    "/{user_id}",
    status_code=status.HTTP_204_NO_CONTENT,
    dependencies=[Depends(admin_access)] # <-- Protection!
)
async def delete_user(user_id: int, db: DbSession):


    # This code will only execute if the current user has the 'admin' role.
    # ... logic to delete the user ...
    return Response(status_code=status.HTTP_204_NO_CONTENT)
This nested dependency pattern (RoleChecker depending on get_current_user) is extremely common and powerful for building layered authorization.
4. Thinking Ahead: Advanced RBAC and ABAC
The simple string-based role we've implemented is great for many applications, but as systems grow, you might need more. What if a user has multiple roles? What if permissions are more granular than just a role name (e.g., "can edit posts in the 'news' category")?
This leads to more advanced models like:
- Granular RBAC: Using many-to-many tables for
users_rolesandroles_permissions. - Attribute-Based Access Control (ABAC): Where permissions depend on attributes of the user (role, department), the resource (sensitivity level), and the environment (time of day).
You don't need to implement this now, but as someone interested in modern architecture, it's valuable to see what a production-grade system looks like.
Building a Modern User Permission Management System with ...
This article, 'Building a Modern User Permission Management System', provides an excellent overview of a more advanced permission system using FastAPI and SQLAlchemy.
Please read the following sections from the article: Database Design: Look at the schema with separate users, roles, and permissions tables, linked by relationship tables. Compare this to the single role field we used. Database Models with SQLAlchemy 2.0: See how this schema is translated into SQLAlchemy models with relationship() definitions. Authentication and Authorization Utilities: Skim down to the has_permission function. This is the heart of an ABAC system. Notice how it checks for direct user permissions, role permissions, and even group permissions before returning a boolean. The require_permission function then wraps this logic into a dependency, just like we did.
This article gives you a mental roadmap for how to evolve the simple RBAC system we built today into a comprehensive, attribute-based authorization engine if your project requires it.
Conclusion
Congratulations! You've successfully extended FastAPI's dependency injection system to handle role-based authorization. You now have a clear, reusable, and testable pattern for controlling access to your API endpoints based on user roles.
Key Takeaways:
- RBAC starts at the data layer: You need to store user roles in your database, typically on the
Usermodel. - Class-based dependencies are ideal for parameterized checks: The
__init__method configures the dependency (e.g., with allowed roles), and the__call__method executes the check. - Dependencies can depend on other dependencies: Our
RoleCheckerrelies onget_current_userto get the authenticated user, creating a clean chain of responsibility. - Use the
dependenciesdecorator argument for pure authorization: This keeps your endpoint signatures clean by separating permission checks from the parameters your business logic needs. - FastAPI's patterns scale: The dependency system can be extended from simple role checks to complex ABAC systems by elaborating on the logic within the dependency.
Preview of the Next Lesson:
Our application is growing in complexity. We now have logic for authentication, users, posts, and permissions spread across different files. In the next lesson, we will focus on Modern API Architecture and Project Structure. We will learn how to organize a FastAPI project into a scalable folder structure, manage settings, and begin introducing patterns like the repository and service layers to prepare our application for long-term maintenance and growth.