Introduction
In our last lesson, we explored the theory behind system-assigned and user-assigned managed identities, establishing a conceptual foundation for how Azure services can authenticate securely without credentials. Now, it's time to put that theory into practice.
This lesson is a hands-on walkthrough where you will configure a system-assigned managed identity for an Azure App Service. You will then grant this identity permission to access an Azure Key Vault and modify a .NET application to retrieve a secret securely. This "passwordless" pattern is a cornerstone of modern Azure security and a critical skill for the AZ-204 exam.
The Credential-less Authentication Flow
Before we dive into the Azure portal and your code, let's visualize the end-to-end process. By enabling a managed identity, you are creating a trust relationship between your App Service and other Azure resources, brokered by Microsoft Entra ID.
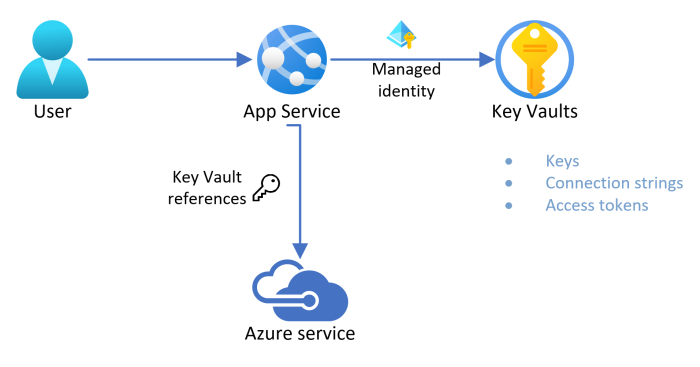
The process works in a sequence:
- Enable Identity: You enable a system-assigned managed identity on your App Service. Azure creates a corresponding service principal in Microsoft Entra ID.
- Grant Permissions: You assign an RBAC (Role-Based Access Control) role, such as "Key Vault Secrets User," to this new identity on your Key Vault. This grants it permission to read secrets.
- Request Token: When your deployed .NET code tries to access Key Vault using the
DefaultAzureCredentialclass from the Azure Identity library, the SDK makes a request from a local endpoint on the App Service infrastructure to get an access token. - Access Secret: The SDK then uses this token to make a REST API call to Key Vault. Key Vault validates the token with Microsoft Entra ID and checks the role assignment. If everything is valid, it returns the secret to your application.
This entire exchange happens without a single password or connection string being stored in your application's configuration files.
Step 1: Configure the Identity and Permissions
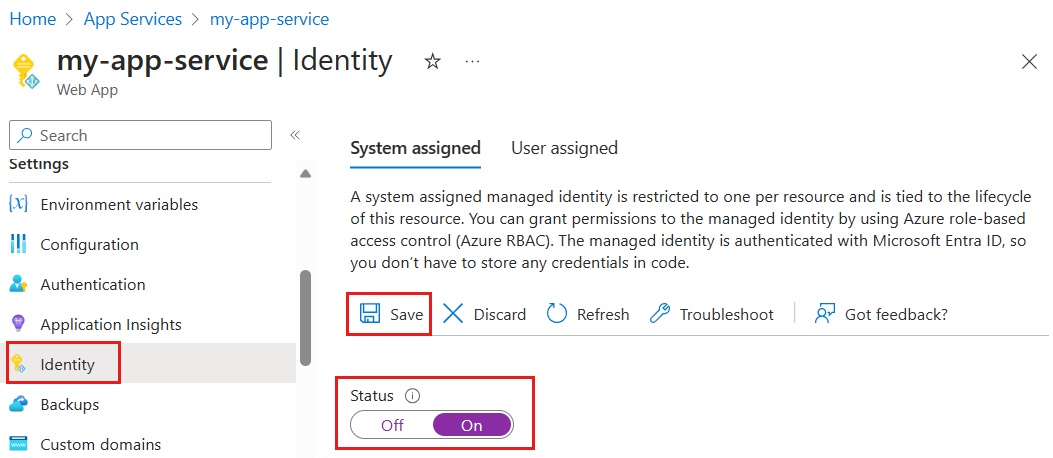
The first two steps—enabling the identity and granting it permissions—are configuration tasks you'll perform in Azure. You can do this through the Azure Portal, Azure CLI, or PowerShell. For your first time, the portal is very intuitive, but knowing the CLI commands is valuable for automation and the exam.
The following screenshot shows where you'll enable the identity in the portal.
The video below provides a complete, practical demonstration of creating the App Service, enabling its identity, and then granting it the necessary permissions on the Key Vault.
Use Azure Managed Identities and Azure Key Vault to Protect Your .NET API Secrets!
The video "Use Azure Managed Identities and Azure Key Vault" by Israel Quiroz provides a clear walkthrough of the configuration steps.
Watch these two segments to see the Azure configuration in action: Enable the identity: Observe how a system-assigned managed identity is enabled for a newly created App Service. Grant permissions: Pay close attention to how an access policy is created in Key Vault. Note that this video uses the older "Access Policies" model. The current best practice, and what you should focus on for the exam, is to use the Access control (IAM) blade to assign an RBAC role like Key Vault Secrets User. The process is conceptually the same: you are granting the App Service's identity permission to read secrets.
Step 2: Update Your .NET Application
With the Azure infrastructure configured, the next step is to update your .NET application to leverage this new identity. This involves removing hardcoded secrets and using the Azure SDK to fetch them from Key Vault at runtime.
As a .NET developer, you'll appreciate the simplicity provided by the Azure.Identity library. The key component is the DefaultAzureCredential class. It's a powerful tool that automatically tries several authentication methods in a specific order.
- When your code is running in Azure (e.g., in an App Service with a managed identity),
DefaultAzureCredentialwill automatically detect and use that identity. - When you run the same code on your local development machine, it will try to authenticate using your Visual Studio, Azure CLI, or PowerShell credentials.
This allows you to write one piece of code that works seamlessly in both your local and deployed environments.
You'll need to install two NuGet packages:
Azure.Identity: Provides theDefaultAzureCredential.Azure.Security.KeyVault.Secrets: Provides theSecretClientto interact with Key Vault.
// In your Program.cs or Startup.cs
using Azure.Identity;
using Azure.Security.KeyVault.Secrets;

// ...

var keyVaultUri = new Uri("https://YOUR-KEY-VAULT-NAME.vault.azure.net/");

// DefaultAzureCredential will use the managed identity when deployed to Azure
var client = new SecretClient(keyVaultUri, new DefaultAzureCredential());

// Now you can fetch secrets without any credentials in your code
KeyVaultSecret secret = await client.GetSecretAsync("YourSecretName");
string secretValue = secret.Value;

// Use the secretValue in your application (e.g., as a connection string)
The following video clip walks you through this exact process: removing secrets from appsettings.json and modifying Program.cs to use DefaultAzureCredential.
Use Azure Managed Identities and Azure Key Vault to Protect Your .NET API Secrets!
This clip from the same video demonstrates the required code changes in a .NET 7 API project.
Watch from the code changes to see how to: Ensure the correct NuGet packages (Azure.Identity, Azure.Security.KeyVault.Secrets) are installed. Remove sensitive data like connection strings and Key Vault credentials from appsettings.json. Update Program.cs to use DefaultAzureCredential to create a SecretClient and connect to Key Vault using only its URL.
Step 3: Deploy and Verify
The final step is to deploy your updated application and see it all work together. A powerful way to confirm that the managed identity is working correctly is to observe the application fail before the identity is configured, and then succeed afterward.
The following walkthrough demonstrates this "fail-then-succeed" sequence perfectly.
Azure Key Vault Security Guide | Managed Identity for Web API Secrets (Hands-On Demo!)
The video "Azure Key Vault Security Guide" by Learn Smart Coding provides a fantastic end-to-end demonstration.
Follow these steps in the video to see the whole process come to life: First, watch the deployment and initial failure. The application is deployed but gets an "unauthorized" error when trying to access Key Vault because no identity has been configured. Next, see how the system-assigned identity is enabled for the App Service in the Azure portal. Then, observe how the Key Vault Secrets User role is assigned to this identity using RBAC (IAM). This is the recommended approach. Finally, watch as the application is refreshed and successfully retrieves the secret, proving the managed identity connection is working.
This sequence provides undeniable proof that the managed identity is handling the authentication, as no code or configuration changes were made between the "fail" and "succeed" states—only Azure infrastructure configuration was changed.
For a detailed, text-based alternative that uses the Azure CLI for configuration, you can review the official Microsoft tutorial.
Tutorial - Use Azure Key Vault with an Azure web app in .NET
This official Microsoft Learn tutorial provides a step-by-step guide using the Azure CLI and .NET.
Focus on these sections: Configure the web app to connect to Key Vault: This section contains the az webapp identity assign and az role assignment create commands, which are the CLI equivalents of the portal steps you saw in the videos. Modify the app to access your key vault: This shows the code modifications for a .NET application, reinforcing the use of DefaultAzureCredential.
Conclusion
Congratulations! You have now completed the practical implementation of one of Azure's most important security features. By moving credentials out of your application and into Azure's identity platform, you have significantly improved the security posture of your application.
Here are the key takeaways from this lesson:
- Configuring a managed identity to access Key Vault is a three-step process: enable the identity, grant it permissions via RBAC, and update your code to use
DefaultAzureCredential. - The
DefaultAzureCredentialclass is the cornerstone of this pattern in .NET, as it seamlessly adapts to both local development environments and deployed Azure environments. - This passwordless pattern is a best practice that eliminates the risk of leaked secrets from configuration files or source code.
This lesson concludes our module on managing secrets. In the next module, we will shift our focus to application performance, starting with how to implement caching strategies using Azure Cache for Redis.