Welcome to the next lesson in your journey to mastering Azure Blob Storage. In our previous session, you got hands-on experience creating a storage account and your first containers using both the Azure Portal and the Azure CLI. This gave you the fundamental infrastructure needed to store data.
Today, we'll connect that infrastructure to your core expertise: .NET development. The learning outcome for this lesson is to perform blob operations (create, upload, manage) on containers using the Azure SDK for .NET. We will write C# code to upload, list, download, and delete blobs, moving from managing infrastructure to manipulating the data within it.
1. Setting Up Your .NET Project
To begin, you'll need a simple .NET project. A console application is perfect for this exercise.
-
Open your terminal and create a new console app:
dotnet new console -n BlobManager cd BlobManager -
Next, you need to install the official Azure Blob Storage client library from NuGet. This package contains all the classes required to interact with the Blob service.

You can install it using the .NET CLI:
dotnet add package Azure.Storage.Blobs
2. Understanding the Azure Storage SDK Clients
The Azure SDK for .NET is designed with a clear object hierarchy that maps directly to the structure of your storage account. Understanding these three primary client classes is key:
BlobServiceClient: Represents your storage account. Use it for account-level operations like listing containers or creating new ones.BlobContainerClient: Represents a specific container within your account. You'll use this to list blobs within that container or perform container-level actions.BlobClient: Represents a specific blob (a file) inside a container. This is the object you'll use for operations like uploading, downloading, or deleting the blob's data.
You typically start with a BlobServiceClient and then get more specific clients from it, like so:BlobServiceClient → GetBlobContainerClient() → GetBlobClient()
3. Connecting to Your Storage Account
To connect your application to Azure, you need to authenticate. There are two common ways to do this in a development environment.
Option A: Connection String (Simple for Local Dev)
A connection string is a single string that contains all the information needed to connect and authenticate to your storage account, including a secret access key. This is convenient for local development but should not be hardcoded or checked into source control in a production application.
You can find your connection string in the Azure Portal:
- Navigate to your storage account.
- Under Security + networking, select Access keys.
- Click Show next to one of the connection strings and copy it.
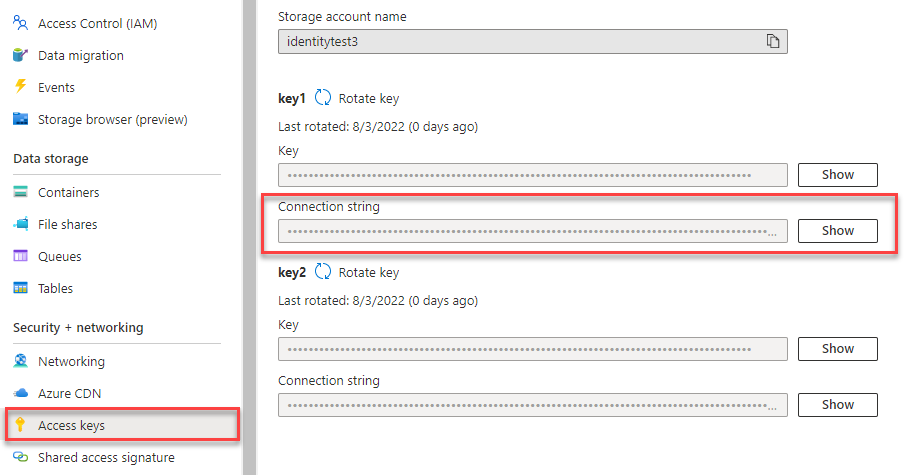
You can then create a BlobServiceClient instance like this:
using Azure.Storage.Blobs;

string connectionString = "YOUR_CONNECTION_STRING";
BlobServiceClient blobServiceClient = new BlobServiceClient(connectionString);
Option B: DefaultAzureCredential (Recommended for Production)
The recommended approach for modern applications is passwordless authentication using DefaultAzureCredential. This class automatically uses the credentials of the environment it's running in.
- Locally, it can use the credentials from your Azure CLI login (
az login), Visual Studio, or other development tools. - In Azure, when deployed to a service like App Service or Azure Functions with a managed identity, it will automatically use that identity to authenticate.
This avoids handling secrets like connection strings in your code. To use it, you first need to add the Azure.Identity package:
dotnet add package Azure.Identity
Then, you can instantiate the client by providing your storage account's URL:
using Azure.Identity;
using Azure.Storage.Blobs;

// Replace <your-account-name> with the name of the storage account you created
var blobServiceUri = new Uri("https://<your-account-name>.blob.core.windows.net");
BlobServiceClient blobServiceClient = new BlobServiceClient(blobServiceUri, new DefaultAzureCredential());
For today's lesson, using the connection string is the most straightforward way to get started.
4. Performing Blob Operations with the SDK
Now for the hands-on part. The following video by Nick Chapsas provides a fantastic, developer-focused walkthrough of the most common blob operations. The code is clear and the pace is perfect for an experienced engineer.
Getting started with Azure Blob Storage in .NET Core | Azure Tutorial
Watch this video to see a practical demonstration of using the .NET SDK for blob operations. The host, Nick Chapsas, builds a service that covers everything from setup to deletion.
Follow the video through these key stages: Setup and Connection: This section covers installing the NuGet package and configuring the BlobServiceClient, similar to what we've just discussed. Downloading a Blob: See how to get a container client, then a blob client, and download its content as a stream. Listing Blobs: Learn how to asynchronously iterate through all the blobs in a container. Uploading from a File: This demonstrates the common scenario of uploading a file from your local disk. Uploading from a Stream: Watch how to upload in-memory data (like a JSON string) by converting it to a stream. Deleting a Blob: Finally, see how to remove a blob from your container.
5. Putting It All Together: A Practical Exercise
Let's consolidate what you've learned by writing a complete program that performs a full lifecycle of blob operations.
Open the Program.cs file in the project you created and replace its content with the following code. Make sure to replace the placeholder values for your connection string and storage account name. This example will use the documents container you created in the last lesson.
using Azure.Storage.Blobs;
using Azure.Storage.Blobs.Models;
using System.IO;
using System.Threading.Tasks;
using System;

class Program
{
    static async Task Main()
    {
        Console.WriteLine("Azure Blob Storage - .NET SDK Quickstart\n");

        // --- 1. CONNECT TO AZURE STORAGE ---
        // Get the connection string from an environment variable or app setting.
        // For this lesson, we'll paste it directly. NEVER do this in production.
        string connectionString = "PASTE_YOUR_CONNECTION_STRING_HERE";

        // Create a BlobServiceClient object
        BlobServiceClient blobServiceClient = new BlobServiceClient(connectionString);

        // --- 2. GET CONTAINER CLIENT AND CREATE LOCAL FILE ---
        string containerName = "documents"; // The container you created in the last lesson
        BlobContainerClient containerClient = blobServiceClient.GetBlobContainerClient(containerName);

        Console.WriteLine($"Working with container: {containerName}");

        // Create a local file to upload
        string localPath = "data";
        Directory.CreateDirectory(localPath);
        string fileName = "quickstart" + Guid.NewGuid().ToString() + ".txt";
        string localFilePath = Path.Combine(localPath, fileName);

        await File.WriteAllTextAsync(localFilePath, "Hello, from my .NET App!");

        // --- 3. UPLOAD THE BLOB ---
        // Get a reference to a blob
        BlobClient blobClient = containerClient.GetBlobClient(fileName);

        Console.WriteLine($"Uploading to Blob storage as blob:\n\t{blobClient.Uri}\n");

        // Upload data from the local file
        await blobClient.UploadAsync(localFilePath, true);

        // --- 4. LIST BLOBS ---
        Console.WriteLine("Listing blobs in container...");
        await foreach (BlobItem blobItem in containerClient.GetBlobsAsync())
        {
            Console.WriteLine($"\t{blobItem.Name}");
        }
        Console.WriteLine();

        // --- 5. DOWNLOAD THE BLOB ---
        string downloadFilePath = localFilePath.Replace(".txt", "DOWNLOADED.txt");
        Console.WriteLine($"Downloading blob to\n\t{downloadFilePath}\n");

        // Download the blob's contents and save it to a file
        await blobClient.DownloadToAsync(downloadFilePath);

        // --- 6. DELETE THE BLOB & CLEAN UP ---
        Console.Write("Press any key to begin clean up...");
        Console.ReadLine();

        Console.WriteLine("Deleting blob...");
        await blobClient.DeleteAsync();
        Console.WriteLine($"Deleted blob: {blobClient.Name}");

        Console.WriteLine("Deleting local files...");
        File.Delete(localFilePath);
        File.Delete(downloadFilePath);
        Console.WriteLine("Done.");
    }
}
To run this exercise:
- Replace
"PASTE_YOUR_CONNECTION_STRING_HERE"with the actual connection string from your storage account. - Save the
Program.csfile. - Run the application from your terminal:
dotnet run
You will see the program print its progress as it uploads, lists, downloads, and finally cleans up the blob and local files.
Conclusion
In this lesson, you successfully bridged the gap between your .NET skills and Azure Storage. You now have the practical ability to programmatically manage blobs, which is a fundamental skill for any Azure developer.
Key takeaways from today's session:
- The Azure SDK for .NET uses a client hierarchy:
BlobServiceClientfor the account,BlobContainerClientfor containers, andBlobClientfor individual blobs. - Authentication can be handled via connection strings for simple local development or, preferably, with
DefaultAzureCredentialfor secure, passwordless access. - The core operations are performed with intuitive async methods:
UploadAsync,GetBlobsAsync,DownloadToAsync, andDeleteAsync/DeleteIfExistsAsync.
In our next lesson, we will expand on blob management by learning how to set and retrieve blob metadata programmatically using the Azure SDK for .NET. This will allow you to attach custom, queryable data to your blobs, enabling more advanced application scenarios.