Hello! Let's continue our journey into containerization on Azure.
In our last lessons, you learned how to deploy and configure a single container using Azure Container Instances (ACI). This is perfect for simple tasks and isolated workloads. Now, we'll explore a more powerful service designed for building scalable, modern applications and microservices: Azure Container Apps (ACA).
Today, you will learn how to deploy your containerized .NET application to Azure Container Apps. We'll cover what makes ACA different from ACI and walk through the deployment process using both the Azure Portal and the Azure CLI, which are key skills for the AZ-204 exam.
From Single Instances to Managed Environments
Azure Container Instances gives you direct control over individual containers. Azure Container Apps takes a higher-level approach by providing a fully managed environment built on Kubernetes, without you needing to manage the underlying cluster complexity.
This image clearly illustrates the conceptual difference:
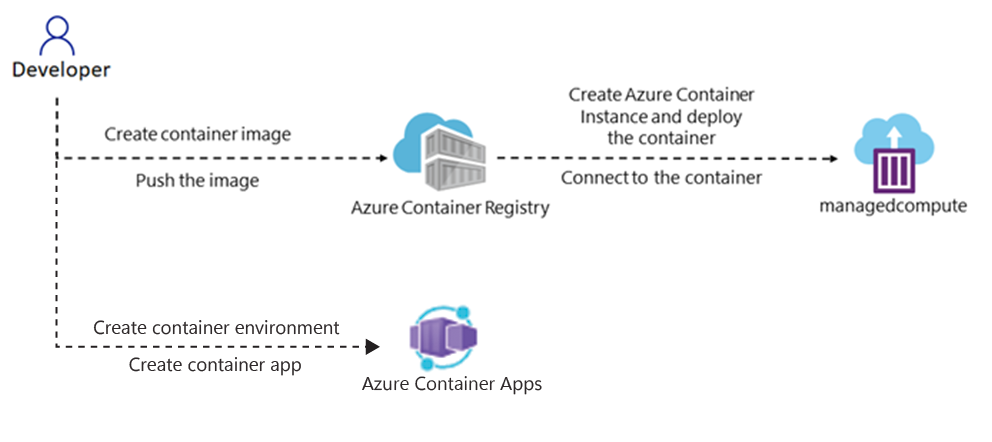
With ACI, you deploy containers directly. With ACA, you deploy apps into a managed environment that provides built-in features like networking, observability, and scaling for all the apps within it.
What is Azure Container Apps?
Before we deploy, let's get a clear understanding of what Azure Container Apps offers. It's a serverless platform that simplifies running containerized applications, making it an ideal choice for microservices and event-driven architectures.
How To Deploy Your Application To Azure Container Apps Using GitHub Actions | CI/CD Pipeline
This video from Milan Jovanović provides a concise and clear introduction to Azure Container Apps and its core benefits.
Watch the first part of the video from the introduction. Pay attention to the key features he highlights: Managed Service/Serverless: You focus on your app, not the infrastructure. Orchestration: ACA handles the complexities of managing container lifecycles, similar to Kubernetes. Dynamic Scaling & Scale to Zero: Your app can automatically scale based on load and even scale down to zero replicas to save costs when idle.
The fundamental components you'll work with are:
- Container App Environment: An isolated boundary for a group of container apps. Apps within the same environment share a virtual network and logging configuration.
- Container App: Represents your application, service, or microservice. It's defined by a container image and configuration settings.
- Revision: An immutable snapshot of a container app's configuration and image. Every time you update your app, you can create a new revision. This enables safe deployments and A/B testing, which we will touch on in a future lesson.
Deployment Method 1: Using the Azure Portal
The Azure Portal provides a visual, step-by-step way to deploy your first container app. This is an excellent way to understand all the moving parts before moving to automated methods.
This next video segment demonstrates the entire manual deployment process. It assumes you already have a container image pushed to Azure Container Registry (ACR), which you've done in previous lessons.
How To Deploy Your Application To Azure Container Apps Using GitHub Actions | CI/CD Pipeline
Let's continue with Milan Jovanović's video. He will walk you through creating the necessary resources and deploying a .NET application from ACR.
Watch the following segments: Manual Deployment: Follow the steps to create an ACR (you can use your existing one), and then the Container App Environment and the Container App itself. Verification: See how to access the deployed application and verify it's running. Focus on these key configuration steps during the process: Selecting the Image Source (Azure Container Registry). Enabling Ingress to allow external HTTP traffic. Setting the Target Port.
A Note on the Target Port for .NET Applications
One of the most critical settings during deployment is the Target Port. This is the port your application is listening on inside the container. If this is misconfigured, Ingress won't be able to forward traffic to your app.
For .NET applications using the official Microsoft base images, the default port has changed.
.NET on Azure Container Apps overview | Microsoft Learn
This official documentation has a crucial detail about deploying .NET apps.
Read the section titled Define a target port. The table shows the default port for different .NET Core versions.
As the documentation states:
- ASP.NET Core 7 and earlier default to port 80.
- ASP.NET Core 8 and later default to port 8080.
When you configure Ingress in the portal, you must set the Target Port to match the version of .NET your container is using. This is a common point of failure, so it's essential to get it right.
Deployment Method 2: Using the Azure CLI
For automation and efficiency, the Azure CLI is the tool of choice. While you could use az containerapp create and configure each setting, the Azure team has provided a powerful shortcut command: az containerapp up.
This single command can create the resource group, ACR, container app environment, and the container app itself, and even build your image from local source code. For today, we'll use it to deploy an existing image from your ACR.
Deploy Azure Container Apps with the az containerapp up Command
This Microsoft Learn article introduces the az containerapp up command and its various uses.
Please read the following sections: The introduction to understand what the up command does. Set up your Azure CLI environment: Ensure you have the containerapp extension installed. You likely did this in a previous lab, but it's good to verify. Deploy from an existing image: This shows the command syntax for our scenario.
Now, let's put it into practice. To deploy the .NET web app image you pushed to your ACR in a previous lesson, you can use a command like this.
First, ensure the admin user is enabled on your ACR so that Container Apps can pull the image. You can do this with the command: az acr update -n <YourACRName> --admin-enabled true.
Then, run the up command. Replace the placeholders with your actual resource names.
az containerapp up \
  --name my-dotnet-app-aca \
  --resource-group <YourResourceGroupName> \
  --image <YourACRName>.azurecr.io/my-dotnet-app:v1 \
  --registry-server <YourACRName>.azurecr.io \
  --ingress external \
  --target-port 8080
(Note: Use target port 80 if your application is based on .NET 7 or earlier.)
This command instructs Azure to:
- Look for (or create) a Container Apps environment in your resource group.
- Create a container app named
my-dotnet-app-aca. - Pull the specified image from your ACR. You'll be prompted for the registry credentials (username and password), which you can find under "Access keys" in your ACR resource in the Azure portal.
- Configure external
ingressso the app is accessible from the public internet. - Forward incoming traffic to port
8080inside the container.
After a few minutes, the command will complete and output the URL of your running application.
For Your Reference: Visual Studio Integration
Given your extensive background in .NET and Visual Studio, it's worth noting that there is a seamless deployment experience directly within the IDE. The Visual Studio publish wizard can guide you through creating all the necessary Azure resources and deploying your application without ever leaving the IDE.
While we won't walk through it as an exercise to stay focused on exam objectives, the following video provides an excellent demonstration of this workflow.
Use Azure Container Apps to build, deploy, diagnose, and monitor your .NET apps
This video from the Microsoft Azure Developers channel shows the end-to-end Visual Studio publish experience for Container Apps.
If you're interested, watch the segment from the VS publish demo. This shows how a .NET developer can go from code to a running container app with just a few clicks.
Conclusion
Great work! You have now deployed a containerized application to Azure Container Apps, a powerful, serverless platform for modern applications. This is a significant step beyond running single containers with ACI.
Let's summarize the key takeaways:
- Azure Container Apps is a managed service for running containerized apps and microservices, abstracting away the complexity of Kubernetes.
- Core components include the Environment, which provides a secure boundary, and the Container App, which runs your code.
- To deploy, you need a container image, and you must configure Ingress (to allow traffic) and the correct Target Port (e.g., 8080 for .NET 8).
- You can deploy visually via the Azure Portal or use the streamlined
az containerapp upcommand in the Azure CLI for speed and automation.
In our next lesson, we will dive into one of the most compelling features of Azure Container Apps: auto-scaling. You'll learn how to configure rules that allow your application to automatically scale its replicas in and out based on HTTP traffic or other metrics.