Welcome back! In our last lesson, we focused on the theory behind partitioning in Cosmos DB, establishing it as the most critical design decision for ensuring scalability and performance. We saw that you must choose a partition key when you create a container. Now, it's time to put that theory into practice.
Today's lesson addresses the learning outcome: Create a Cosmos DB account, database, and container programmatically using the .NET SDK. We'll move from design to implementation, writing the C# code to provision the resources we've been discussing. Given your extensive background in .NET, you'll find the SDKs quite intuitive. We will explore two distinct approaches using two different .NET SDKs, clarifying when and why you'd choose each one.
1. The Cosmos DB Resource Hierarchy
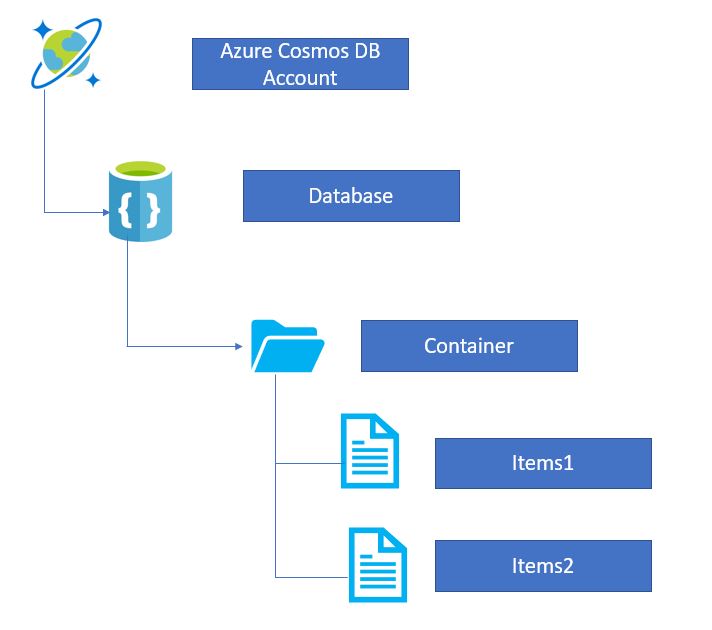
Before we write any code, let's quickly solidify our understanding of the Cosmos DB resource hierarchy. Everything you provision fits into a clear, nested structure.
Azure Cosmos DB Tutorial | Globally distributed NoSQL database
This short segment from Adam Marczak's "Azure Cosmos DB Tutorial" provides a concise overview of the resource hierarchy.
Please watch from the explanation of the structure. Focus on the relationship between the Account, Database, Container, and Items.
As the video explained, the structure is as follows:
- Account: The top-level resource, representing your Cosmos DB service instance. It's the unit of global distribution and management.
- Database: A logical container for your containers. It can be used to manage throughput for a group of containers.
- Container: This is where your data lives, analogous to a table in SQL Server. A container is the unit of partitioning and throughput scaling.
- Items: The individual JSON documents stored within a container.
2. Approach 1: The Data Plane SDK (Microsoft.Azure.Cosmos)
The first and most common SDK you'll use as an application developer is the data plane SDK. Its primary purpose is to perform data operations (Create, Read, Update, Delete - CRUD) on items. However, it also includes convenience methods to create databases and containers, often using a "create if not exists" pattern.
This approach is ideal for application startup logic where you want to ensure the necessary database and container are available before the application starts processing requests. Crucially, this SDK assumes the Cosmos DB Account already exists.
The following video demonstrates this entire process, from setting up a project to creating the resources and even adding an item.
Azure Cosmos DB Tutorial | Globally distributed NoSQL database
This demo walks through creating a database and container using the data plane SDK in a simple .NET console application.
Watch the segment from the .NET demo. Pay close attention to these steps: Adding the Microsoft.Azure.Cosmos NuGet package. Instantiating the CosmosClient using the account's URI and a primary key. Calling CreateDatabaseIfNotExistsAsync. Calling CreateContainerIfNotExistsAsync and, importantly, specifying the partition key path ("/partitionKeyPath").
Let's break down the key C# code snippets from that pattern:
-
Install the Package:
dotnet add package Microsoft.Azure.Cosmos -
Create the Client: The
CosmosClientis your entry point to the service. You'll typically instantiate one instance and reuse it for the lifetime of your application. For this demo, we use the endpoint URI and a key, which you can find in the "Keys" blade of your Cosmos DB account in the Azure portal.using Microsoft.Azure.Cosmos; var endpointUri = "<your-cosmos-db-uri>"; var primaryKey = "<your-primary-key>"; CosmosClient client = new CosmosClient(endpointUri, primaryKey); -
Create the Database and Container: Notice how the methods are asynchronous and follow a
Create...IfNotExistsAsyncpattern. This makes them safe to run on application startup.// The database name string databaseId = "MyAwesomeDatabase"; // The container name string containerId = "ProductCatalog"; // The partition key path from our previous lesson's design string partitionKeyPath = "/categoryId"; // Create the database if it doesn't exist Database database = await client.CreateDatabaseIfNotExistsAsync(databaseId); // Create the container if it doesn't exist Container container = await database.CreateContainerIfNotExistsAsync(containerId, partitionKeyPath);
This is the moment where your partitioning strategy from the previous lesson becomes code. The partitionKeyPath parameter tells Cosmos DB which property to use for distributing your data.
3. Approach 2: The Management Plane SDK (Azure.ResourceManager.CosmosDB)
What if you need to create the Cosmos DB Account itself? This is common in deployment scripts or infrastructure-as-code (IaC) scenarios. For this, you use the management plane SDK. This SDK is designed for provisioning and managing Azure resources, effectively acting as a C# interface for the Azure Resource Manager (ARM).
This approach gives you full control over the entire resource lifecycle, from the resource group down to the container settings.
The following resource provides a complete, code-first guide to using the management plane SDK.
Azure Resource Manager Cosmos DB SDK (.NET)
This guide provides the necessary NuGet packages and C# code snippets to provision a full Cosmos DB stack, from the account to the container.
Please read through the following sections of the guide: Installation: Note the two required packages. Authentication: See how DefaultAzureCredential is used. 1. Create Cosmos DB Account: Review the code for defining and creating the account. 2. Create SQL Database: Observe how to create a database within the account. 3. Create SQL Container: Note the code for creating the container, including its partition key and indexing policy.
Let's summarize the key steps from that guide into a cohesive workflow.
-
Install Packages: You need both the Cosmos DB management library and the identity library for authentication.
dotnet add package Azure.ResourceManager.CosmosDB dotnet add package Azure.Identity -
Authenticate and Create ARM Client: Unlike the data plane SDK, the management SDK is designed to authenticate using
DefaultAzureCredential. This is a powerful mechanism that automatically tries several authentication methods (e.g., environment variables, managed identity, Azure CLI login). If you're running this code on your local machine and are logged in withaz login, it will use those credentials seamlessly.using Azure.Identity; using Azure.ResourceManager; var credential = new DefaultAzureCredential(); var armClient = new ArmClient(credential); -
Define and Create Resources: The workflow follows the resource hierarchy. You get a handle to a parent resource (like a resource group) and then use its collection property to create a child resource.
-
Get Resource Group: First, you need a reference to the resource group where the account will live.
// Assumes you have your subscription ID var subscription = await armClient.GetDefaultSubscriptionAsync(); var resourceGroup = (await subscription.GetResourceGroupAsync("my-dotnet-rg")).Value; -
Create Cosmos DB Account: You define the account's properties (location, consistency level, etc.) in a
CosmosDBAccountCreateOrUpdateContentobject.var accountCollection = resourceGroup.GetCosmosDBAccounts(); var accountData = new CosmosDBAccountCreateOrUpdateContent(...) { ... }; var operation = await accountCollection.CreateOrUpdateAsync(WaitUntil.Completed, "my-cosmos-account", accountData); CosmosDBAccountResource account = operation.Value; -
Create Database and Container: The pattern repeats. You get the database collection from the account object, then the container collection from the database object.
// Create Database
var dbCollection = account.GetCosmosDBSqlDatabases();
var dbData = new CosmosDBSqlDatabaseCreateOrUpdateContent(...);
var db = (await dbCollection.CreateOrUpdateAsync(WaitUntil.Completed, "MyAwesomeDatabase", dbData)).Value;

// Create Container
var containerCollection = db.GetCosmosDBSqlContainers();
var containerData = new CosmosDBSqlContainerCreateOrUpdateContent(...) {
    PartitionKey = new CosmosDBContainerPartitionKey { Paths = { "/categoryId" }, ... }
};
var container = (await containerCollection.CreateOrUpdateAsync(WaitUntil.Completed, "ProductCatalog", containerData)).Value;
-
4. Comparing the Two SDKs
You've now seen two different ways to programmatically create Cosmos DB resources. Here’s a quick summary to help you decide which one to use:
| Feature | Microsoft.Azure.Cosmos (Data Plane) |
Azure.ResourceManager.CosmosDB (Management Plane) |
|---|---|---|
| Primary Use Case | Application logic (CRUD), ensuring DB/container exists at runtime. | Infrastructure as Code (IaC), deployment scripts. |
| Can Create Account? | No. | Yes. |
| Typical Auth | Connection String/Key, TokenCredential (e.g., Managed Identity). |
DefaultAzureCredential (Service Principal, CLI Login, Managed Identity). |
| Scope | Operates within an existing Cosmos DB account. | Operates at the Azure subscription/resource group level. |
For the AZ-204 exam, it's important to recognize both approaches and understand their distinct purposes.
Conclusion
In this lesson, we bridged the gap between design and code. You now have the practical skills to provision a Cosmos DB account, database, and container programmatically, a core competency for any Azure developer.
Here are the key takeaways:
- Cosmos DB has a strict resource hierarchy: Account > Database > Container > Item.
- The data plane SDK (
Microsoft.Azure.Cosmos) is used within applications to interact with data and can perform "create if not exists" operations for databases and containers. - The management plane SDK (
Azure.ResourceManager.CosmosDB) is used for infrastructure provisioning, including the creation of the Cosmos DB account itself, and is ideal for deployment automation. - The partition key path is a mandatory parameter specified when creating a container, directly linking your code to the scaling strategy we discussed previously.
In our next lesson, we will focus exclusively on the data plane SDK to perform CRUD operations on Cosmos DB items. We've created the container; now it's time to put some data in it.