Hello! Welcome to the final lesson in our first module, "Foundations of Cleavage Styling."
In our last session, we explored how inherent garment structure—like boning, corsetry, and integrated cups—can provide foundational shape and support. We saw how a garment's internal architecture is a powerful tool for sculpting the bust.
Today, we address a crucial practical consideration: how to ensure these beautifully designed, revealing garments stay exactly where you want them. The learning outcome for this lesson is to apply techniques (e.g., fashion tape, strategic stitching) to secure garments and prevent wardrobe malfunctions with revealing styles. Think of this as the final, critical step that provides the confidence to wear daring cuts. We'll cover the tools and methods for anchoring everything in place, from deep-plunge necklines to backless gowns.
1. The Stylist's Security Toolkit
To prevent garments from gaping, shifting, or slipping, stylists rely on a few key tools. The two most important categories are adhesive tapes and mechanical fasteners. Understanding the difference is key to choosing the right tool for the job.
Adhesive Tapes: Body vs. Fashion Tape
Not all tapes are created equal. For styling, we primarily use two types, which serve very different functions. Your experience with garment construction means you'll appreciate the distinction between a tool for shaping the body versus one for holding fabric together.
The Ultimate Guide to Boob Tape - NOOD
The article 'The Ultimate Guide to Boob Tape' from NOOD provides an excellent overview of the different types of tapes you might encounter.
Please read the section titled 'WHAT TAPE SHOULD YOU USE?'. Focus on the descriptions for 'Boob Tape', 'Gaffer Tape', 'Sports Tape', and 'Fashion tape/ Double-sided apparel tape'.
Based on the reading, here’s a summary:
- Body Tape (or "Boob Tape"): This is a strong, single-sided, skin-safe adhesive tape. Its primary purpose is to lift, shape, and support the bust, essentially acting as a customizable, invisible bra. It adheres to your skin and is pulled in a specific direction to create tension and lift.
- Fashion Tape (or Apparel Tape): This is a weaker, double-sided tape designed to temporarily stick fabric-to-skin or fabric-to-fabric. Its purpose is not support, but to prevent gaping—for instance, holding a plunging neckline in place against your sternum or closing the gap between buttons on a shirt.
- Tapes to Avoid: As the article notes, industrial tapes like gaffer or duct tape should never be used on skin. They are not breathable, their adhesive is harsh, and they can cause significant skin damage upon removal.
Mechanical Fasteners: Safety Pins
The humble safety pin is a reliable, non-adhesive option. While less invisible than tape, it provides a very secure mechanical hold, making it ideal for anchoring thicker fabrics or securing areas under high tension, like the waist tie of a wrap dress. We will explore pinning techniques later in the lesson.
2. Body Taping for Support and Shaping
Let's focus first on body tape, the tool used to create shape and provide support when a traditional bra isn't an option.
Essential Preparation
Proper application begins before the tape even touches your skin. This is a non-negotiable step to ensure the tape adheres properly and to protect your skin.
The video 'How To Apply Boob Tape' by Honeylove provides a clear and concise guide to the essential preparation steps.
Watch from the beginning to 02:00. Pay close attention to the four key pre-application tips provided by the bra designer.
To summarize the crucial prep steps:
- Patch Test: Always test a small piece of tape on your skin (like the inside of your arm) for several hours to check for any allergic reaction.
- Clean Skin: The area must be completely free of oils, lotions, or perfumes. Clean the skin with rubbing alcohol and let it dry fully.
- Protect Sensitive Areas: Never apply body tape directly over your nipples. Always use nipple covers or silicone pasties first.
- Plan Your Placement: Know the neckline of your garment and plan where the tape will go to ensure it remains hidden.
Application Techniques for Different Necklines
The power of body tape lies in its versatility. By changing the placement and direction of the tape, you can create support for virtually any style of garment.

Let's watch these techniques in action.
The Honeylove video also demonstrates the application for several challenging necklines.
Watch the demonstrations for the plunging neckline (02:00 - 02:45), the open back (02:45 - 03:23), and the one-shoulder top (03:23 - 04:19). Notice how they lift the breast before applying the tape and pull upwards to create lift.
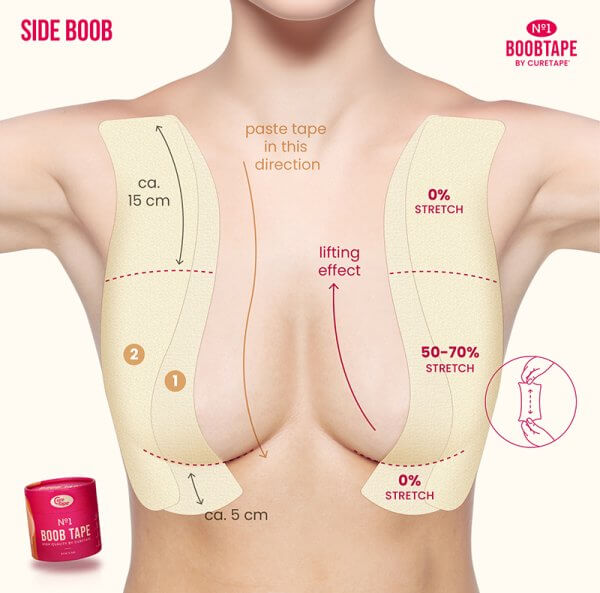
The core principle in all these applications is lift and anchor. You lift the breast tissue into the desired position and then apply the tape from the base of the breast upwards or outwards towards a stable anchor point (like your shoulder or ribcage), creating tension that holds the bust in place.
You also expressed interest in alternative cleavage presentations like "side-boob." This can also be achieved with a specific taping method.
Safe Removal
Removing the tape correctly is just as important as applying it.
The Ultimate Guide to Boob Tape - NOOD
To avoid skin irritation, it's crucial to remove body tape gently. 'The Ultimate Guide to Boob Tape' offers clear instructions.
Read the section titled 'REMOVING THE TAPE'. Focus on the use of oil or warm water to loosen the adhesive before peeling.
Never rip the tape off quickly. Always saturate it with oil (like baby oil or coconut oil) or soak it in a warm shower to dissolve the adhesive, then peel it away slowly and gently.
3. Securing Garments to Prevent Malfunctions
Now we turn to the second challenge: keeping the garment itself from shifting, gaping, or flying open. This is where fashion tape and strategic pinning come into play. Wrap dresses, plunging necklines, and button-front shirts are common culprits.
How to Secure Wrap Dresses for Wedding Guests
The blog post 'How to Secure Wrap Dresses' from Azazie, while focused on one garment type, provides universally applicable techniques for using both fashion tape and safety pins.
Please read the following sections: 'Safety Pin Securing Methods': Pay attention to the table of 'Essential Pinning Locations.' 'Fashion Tape Application Strategies': Note the difference between fabric-to-fabric and skin-safe tape. 'Movement-Specific Precautions': Scan this section to see how these techniques are applied in real-world situations like dancing or being photographed.
Here are the key strategies for securing your garments:
-
Preventing Neckline Gaping:
- Fashion Tape: Apply small strips of double-sided fashion tape along the edge of the neckline, adhering one side to the fabric and the other to your skin. This is perfect for keeping deep V-necks or wrap tops in place.
- Safety Pins: For heavier fabric, use a small safety pin on the inside of the garment to pin the overlapping layer of a wrap dress to the under-layer, about 2-3 inches below the neckline.
-
Closing Gaps in Button-Fronts: Place a small piece of fashion tape horizontally between the buttons where the fabric is pulling to create a seamless closure.
-
Securing Wrap Styles:
- Waist Tie: Use a safety pin to secure the knot of the inner tie so it cannot loosen throughout the day.
- Skirt: If the wrap skirt tends to open when you sit or walk, use fashion tape or a hidden safety pin to secure the overlapping edge to the layer underneath at mid-thigh level.
-
Strategic Stitching (A More Permanent Solution): For a garment you own and wear frequently, a few small, strategically placed stitches can permanently solve a gaping issue. A small hook-and-eye closure can be sewn on the inside of a neckline, or you can add a few tacking stitches to hold a wrap front in place. Your design background will make this a straightforward modification.
Conclusion
Today, we've armed you with the practical skills to ensure any revealing outfit is not only stylish but also secure. By mastering these techniques, you can eliminate the worry of wardrobe malfunctions and wear cleavage-forward looks with total confidence.
Key Takeaways:
- Body tape is for support and shaping, acting as an invisible bra, while fashion tape is for securing fabric to prevent gaping.
- Proper preparation (patch testing, clean skin, nipple covers) and safe removal (with oil or water) are essential when using body tape.
- Specific taping patterns can be used to create lift and shape for any neckline, including plunging, backless, and side-boob styles.
- A combination of fashion tape and strategically placed safety pins can secure necklines, wrap styles, and button-fronts against movement, wind, and shifting.
This lesson concludes our foundational module. We have covered the types of cleavage, the impact of neckline and fabric, the role of inherent structure, and now, the techniques for securing it all.
In our next lesson, we will begin Module 2, "The Art of Support," by diving into the world of underpinnings. We will start by learning how to match specific bra types (e.g., push-up, plunge, balconette) to specific neckline shapes for optimal cleavage.