Hello! Welcome to the final lesson in our module on scalable ETL with AWS Glue.
In our last lesson, we dove deep into optimizing the performance of individual Glue jobs, covering worker types, auto-scaling, and the powerful S3 shuffle manager. Now that we know how to build efficient, standalone jobs and crawlers, it's time to connect them. Real-world data pipelines are almost never a single step; they are sequences of dependent tasks that must be managed and automated.
This lesson directly addresses the learning outcome: Configure Glue workflows to orchestrate sequences of crawlers and jobs. We will learn how to use AWS Glue's native orchestration service to build, visualize, and automate multi-step data processing pipelines. This is a fundamental skill for building robust data solutions on AWS and a key topic for your certification exam.
1. Introduction to Glue Workflows
When you have a pipeline that requires running a crawler to discover a schema, followed by a Glue job to transform the data, and perhaps another job to aggregate the results, you need a way to manage these dependencies. You could write custom scripts or use other AWS services, but Glue provides a built-in, visual tool for this exact purpose: Workflows.
A Glue Workflow allows you to create and visualize complex ETL activities involving multiple crawlers, jobs, and triggers. It manages the execution and monitors the status of all components, giving you a clear overview of your entire pipeline.
Let's start with a short video that introduces the core concepts of Glue triggers and workflows.
AWS Glue 101 | Lesson 3: Glue Triggers and WorkFlows
This video from Johnny Chivers provides a quick and clear introduction to the 'why' behind Glue's scheduling and orchestration features.
Watch the section from 00:53 to 02:10. Focus on understanding the difference between simple time-based triggers and the more complex orchestration capabilities that workflows provide.
2. The Core Components: Triggers and Nodes
As you've just heard, workflows are built from a few key components. Understanding them is essential to designing any pipeline.
AWS Tutorials - Using AWS Glue Workflow
The video 'AWS Tutorials - Using AWS Glue Workflow' does an excellent job of breaking down workflows into their two fundamental components. This conceptual understanding is critical.
Watch from 01:39 to 07:10. Pay close attention to: The distinction between Triggers (which start something) and Nodes (which perform an action). The design pattern of alternating between triggers and nodes. The difference between a workflow's start trigger (Schedule or On-demand) and subsequent event-based triggers that connect the steps.
To summarize and expand on the video's points:
- Nodes: These are the "actions" in your workflow. A node represents a pre-existing AWS Glue Job or Crawler. A key prerequisite for building a workflow is that the jobs and crawlers you intend to orchestrate must already be created.
- Triggers: These are the "connectors" or "starters." They initiate actions. There are two main categories of triggers in a workflow:
- Start Triggers: Every workflow begins with one. It defines how the entire workflow is initiated.
- Event Triggers: These are used inside the workflow to start nodes based on the outcome of other nodes.
Let's dive deeper into the trigger types, as this is crucial for the exam.
Overview of workflows in AWS Glue
The official AWS documentation provides the most precise definitions of trigger types. Let's review it to solidify our understanding.
Read the section that begins with 'Triggers within workflows...'. You don't need to memorize the table, but focus on understanding the three types of start triggers: Schedule: Runs the workflow on a timer (e.g., daily at 9 AM), similar to a cron job. On demand: The workflow must be started manually. EventBridge event: Starts the workflow in response to an event, like a new file landing in an S3 bucket (s3:ObjectCreated:*).
3. Designing Workflow Logic: Sequencing and Parallelism
The real power of workflows comes from creating dependencies and running tasks in a specific order or in parallel. This is achieved using event triggers.
An event trigger can watch one or more nodes and start another node based on a specific condition, such as:
SUCCEEDEDFAILEDSTOPPEDTIMEOUT
Sequential Execution
This is the simplest pattern. A trigger waits for one job to succeed before starting the next.
Example:
- Start Trigger (On-demand) starts Crawler_A.
- Event Trigger_1 watches Crawler_A.
- On the
SUCCEEDEDevent from Crawler_A, Event Trigger_1 starts Job_B.
Parallel Execution and Conditional Waiting
You can also execute multiple jobs or crawlers at the same time and then wait for them all to finish before proceeding.
This is where the "wait for ANY watched event" versus "wait for ALL watched events" logic becomes critical.
- ANY: The trigger fires as soon as one of the watched events occurs.
- ALL: The trigger only fires after all of the specified events have occurred.
Let's look at a visual example.
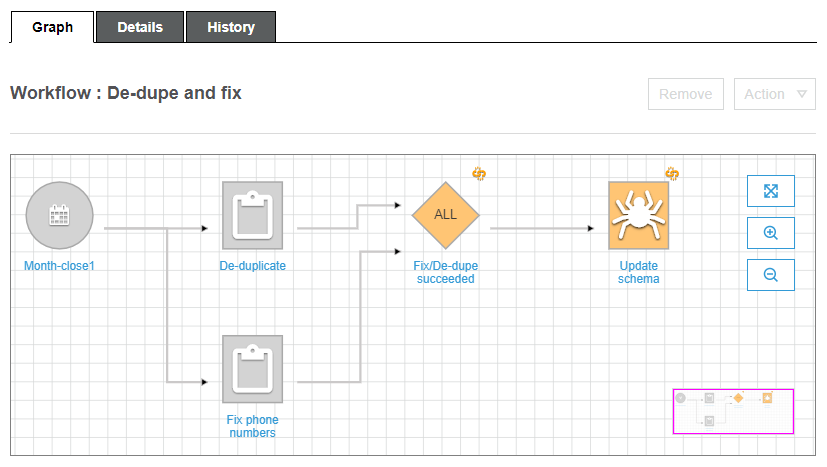
This pattern is extremely common. For instance, you might have crawlers for several independent data sources that can run in parallel, followed by a single job that joins the data after all crawlers have successfully updated the Data Catalog.
Test your understanding!
You have a daily data drop containing two independent files: orders.csv and products.csv. You need to run a crawler for each to update its respective table in the Glue Data Catalog. Only after both crawlers have succeeded should you run a single Glue job called enrich_orders that joins the two tables.
How would you design a Glue Workflow for this? Describe the components and their connections.
Show answer
- Start Trigger: A Schedule trigger configured to run daily at the desired time.
- Parallel Nodes: The schedule trigger would start two nodes simultaneously:
crawler_ordersandcrawler_products. - Event Trigger: A new Event trigger would be configured to watch for the
SUCCEEDEDevent from bothcrawler_ordersandcrawler_products. This trigger must use the "Start after ALL watched events" condition. - Final Node: This event trigger would then start the final Glue job,
enrich_orders.
4. Passing State with Workflow Run Properties
A common challenge in multi-step pipelines is passing information from one job to the next. For example, a job might generate a processing timestamp that a subsequent job needs to use. Glue Workflows solve this with run properties.
Run properties are a set of key-value pairs that you can define at the workflow level. These properties are accessible to every job within that workflow run. A job can not only read these properties but also update them, effectively passing state to downstream jobs.
AWS Tutorials - Using AWS Glue Workflow
The 'AWS Tutorials' video provides an excellent explanation of this powerful feature. Understanding how to pass state is vital for building more dynamic and complex pipelines.
Watch the segment from 11:49 to 14:03. Focus on the concept of run properties as a 'common space' that jobs can read from and write to, enabling them to share information and state.
This feature is a prime candidate for an exam question. A scenario might describe a pipeline where a job's output location depends on a value calculated in a previous job, and workflow run properties would be the ideal solution.
5. Building and Monitoring a Workflow
Now that you understand the components, let's briefly look at the process of building a workflow in the console. The process directly mirrors the concepts we've discussed.
Creating and building out a workflow manually in AWS Glue
This official documentation page walks through the manual creation process. It's a good way to see how the conceptual pieces fit together in the AWS UI.
Skim through this document. You don't need to perform the steps, but pay attention to the flow: You start by creating the workflow itself. You add a start trigger (Step 2). You add jobs/crawlers as nodes for that trigger to start. You then add more event triggers to connect subsequent steps (Step 3).
Once a workflow is running, the AWS console provides a dynamic view that graphically shows the execution status of each component, highlighting which nodes have succeeded, failed, or are currently running. This is invaluable for monitoring and troubleshooting complex pipelines.
For a very detailed, click-by-click demonstration of building a complete workflow, you can refer to the hands-on lab section of the AWS Tutorials video (resource ID LINK) from 14:03 onwards.
Conclusion
Congratulations on completing the final lesson of the AWS Glue module! You've moved from understanding individual components like crawlers and jobs to orchestrating them into complete, automated data pipelines using Glue Workflows.
Key Takeaways:
- Orchestration: Glue Workflows are the native service for orchestrating sequences of Glue jobs and crawlers.
- Core Components: Workflows are built from Nodes (jobs/crawlers) and Triggers (which start nodes).
- Trigger Types: Workflows begin with a start trigger (Schedule, On-demand, or EventBridge event) and use event triggers to manage dependencies between nodes.
- Workflow Logic: You can create sequential and parallel execution paths. Event triggers can watch for the success or failure of ANY or ALL preceding nodes, enabling complex logic.
- State Management: Workflow run properties act as a shared key-value store, allowing jobs within a workflow to pass parameters and state to one another.
Next Up:
So far, our ETL work has focused on AWS Glue, a serverless Spark environment. However, AWS provides another powerful service for big data processing: Amazon EMR (Elastic MapReduce). In our next module, we will dive into EMR, starting with a lesson on how to "Configure EMR clusters with appropriate instance types and auto-scaling policies." We will explore when to choose EMR over Glue and how to manage your own big data cluster environment.