Welcome to the first lesson of your journey into building high-performance AI systems from the ground up. Your goal is to move beyond high-level frameworks and gain the ability to engineer custom AI infrastructure. To do that, a deep understanding of C++ is non-negotiable, and every serious C++ project begins with a robust build system and a clean, scalable structure.
This lesson provides that essential foundation. We will focus on two core components: CMake, the de facto standard for building C++ projects, and the fundamental C++ practice of separating class declarations from their definitions. You'll learn not just how to set up a project, but why it's done this way, establishing the professional habits necessary for building the complex inference engine that is the capstone of this course.
While your experience in Python-based AI might make build systems seem like a solved problem handled by package managers, the C++ world requires a more hands-on approach to compilation and linking. Mastering this process is the first step toward controlling the hardware and unlocking true performance.
1. From Manual Compilation to Automated Builds
In C++, your human-readable source code (.cpp) must go through a two-stage process to become an executable program:
- Compilation: A compiler (like GCC, Clang, or MSVC) translates each
.cppfile into a machine-readable "object file" (.oor.obj). It does this by referencing "header files" (.hor.hpp) which declare the functions and classes available. - Linking: A linker takes one or more object files and "links" them together, resolving references between them to create a single, final executable.
For a project with a handful of files, you could run the compiler and linker manually from the command line. However, this quickly becomes untenable for any real-world application. This is the problem that build systems were created to solve.
The video below gives an excellent overview, starting with manual compilation using gcc, introducing the classic make utility, and finally explaining why a more powerful tool—CMake—is needed for modern, cross-platform development.
CMake Tutorial for Absolute Beginners - From GCC to CMake including Make and Ninja
Watch this "CMake Tutorial for Absolute Beginners" by Gary Explains. It provides the perfect context for why we need tools like CMake.
Start by watching the section on manual compilation with gcc. This will solidify your understanding of how source files become an executable and why doing it by hand is not scalable. Next, watch the introduction to Makefiles. This shows the first level of automation but also hints at its limitations. Finally, focus on the introduction to CMake. Pay close attention to the explanation of CMake as a build system generator and the critical concept of an out-of-source build.
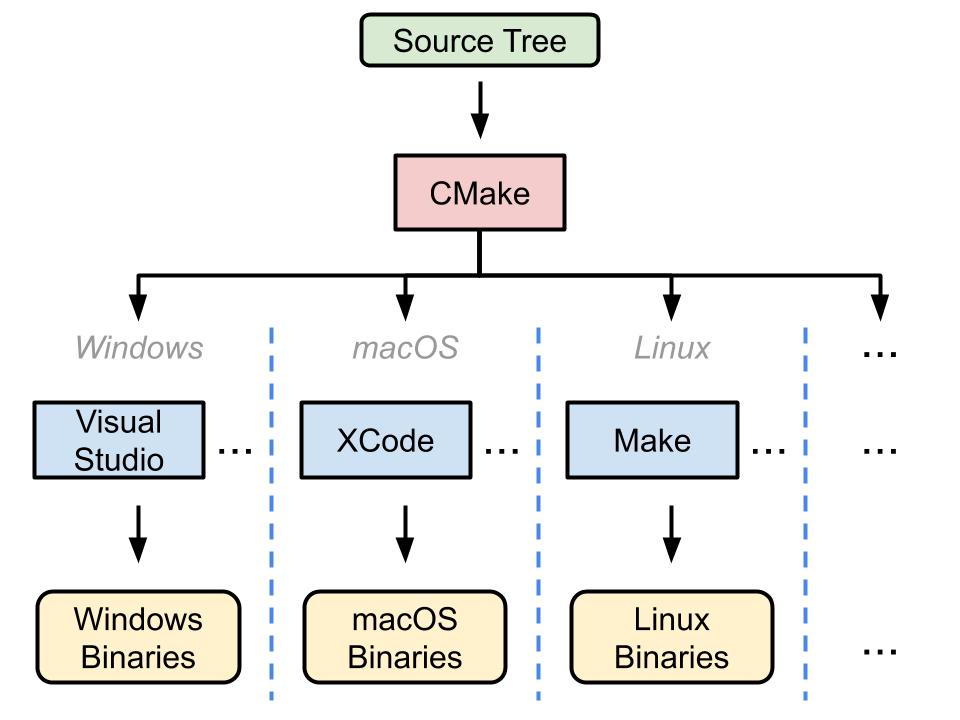
As the video explains, CMake isn't a build system itself; it's a meta-build system. It reads a high-level configuration file you write, named CMakeLists.txt, and generates the native build files for your specific platform (e.g., Makefiles on Linux, Xcode projects on macOS, or Visual Studio solutions on Windows).
This abstraction is what makes CMake so powerful. It allows you to maintain a single, cross-platform project definition.
2. Your First CMake Project
Let's put this into practice by creating a minimal project. The core of any CMake project is the CMakeLists.txt file. For now, we'll start with a single main.cpp file in our project's root directory.
main.cpp
#include <iostream>

int main() {
    std::cout << "Hello, CMake!" << std::endl;
    return 0;
}
CMakeLists.txt
# Specify the minimum version of CMake required.
# This ensures that you can use modern CMake features.
cmake_minimum_required(VERSION 3.15)


# Define the project name. CMake will use this for the generated
# solution/project files.
project(HelloWorld CXX)


# Add an executable target. CMake will create a program named "hello"
# from the specified source file.
add_executable(hello src/main.cpp)
These three commands are the bare minimum for a simple executable:
cmake_minimum_required(): Declares the oldest version of CMake that can correctly process the file. This is crucial for ensuring compatibility and access to modern features.project(): Sets the project name and specifies the language (here,CXXfor C++).add_executable(): Defines an executable target and lists the source files required to build it.
The Out-of-Source Build Workflow
A core tenet of modern CMake is the out-of-source build. All generated files (Makefiles, object files, binaries) are kept in a separate directory, leaving your source code pristine. The workflow is always the same:
- Create a build directory:
mkdir build - Navigate into it:
cd build - Configure: Run CMake to generate the build files:
cmake ..(the..points to the parent directory whereCMakeLists.txtis located). - Build: Run the actual build command:
cmake --build .(this command is a generic wrapper that will callmake,ninja, or whatever the native build tool is).
To see this entire process in action, the following clip from the previous video is a perfect demonstration.
CMake Tutorial for Absolute Beginners - From GCC to CMake including Make and Ninja
Now, watch the practical demonstration of building a "Hello World" project using the out-of-source build workflow.
Focus on the segment from bare minimum project. The presenter will execute the exact commands described above, showing how the build directory is populated and how the final executable is produced.
3. Separating Interface from Implementation
In our simple example, the main function was in a single file. In any real project, you will have dozens or hundreds of classes, each with its own logic. Placing all that code into one file would be a maintenance nightmare.
The standard C++ practice is to separate a class into two files:
- Header File (
.hor.hpp): Contains the class declaration. This includes the member variables and the signatures of the member functions (methods). It defines the class's public interface—what other parts of your code can see and use. - Source File (
.cpp): Contains the class definition. This is the actual implementation of the member functions declared in the header.
This separation provides several benefits:
- Modularity and Readability: It's easier to understand what a class does by looking at its clean interface in the header.
- Reusability: Other parts of your code can
#includethe header to use the class without needing to know about its internal implementation. - Faster Compilation: If you only change the implementation in a
.cppfile, only that file needs to be recompiled. If you change a header, every file that includes it must be recompiled.
This next video provides a clear, step-by-step guide to this separation.
Header & Implementation File for C++ Classes | C++ Tutorial
This tutorial, "Header & Implementation File for C++ Classes" by OttoBotCode, perfectly demonstrates the concept.
Watch the entire video. It's short and to the point. Pay attention to: The use of #pragma once to prevent a header from being included multiple times. How method definitions in the .cpp file are tied to the class using the scope resolution operator (::), for example void Monster::take_damage(...). The difference between including your own headers (#include "monster.h") and system headers (#include <iostream>).
4. A Professional Project Structure with CMake
Now, let's combine these two ideas: a structured file layout and a CMake configuration that understands it. A common and effective way to organize a project is to separate public headers from source code.
Let's adopt this structure. We'll create a small library for a Greeter class and an executable that uses it.
greeter_project/
├── CMakeLists.txt
│
├── include/
│   └── greeter/
│       └── Greeter.h
│
└── src/
    ├── Greeter.cpp
    └── main.cpp
-
include/greeter/Greeter.h(The Interface)#pragma once #include <string> class Greeter { public: Greeter(std::string name); void say_hello() const; private: std::string name_; }; -
src/Greeter.cpp(The Implementation)#include "greeter/Greeter.h" #include <iostream> Greeter::Greeter(std::string name) : name_(name) {} void Greeter::say_hello() const { std::cout << "Hello, " << name_ << "!" << std::endl; } -
src/main.cpp(The Consumer)#include "greeter/Greeter.h" int main() { Greeter my_greeter("World"); my_greeter.say_hello(); return 0; }
How do we write a CMakeLists.txt for this? We use a target-based approach. We'll define a greeter_lib target and an app target and then specify the relationship between them.
CMakeLists.txtcmake_minimum_required(VERSION 3.15) project(GreeterProject CXX) # 1. Create a library target. # This compiles Greeter.cpp into a library named "greeter_lib". add_library(greeter_lib src/Greeter.cpp) # 2. Specify the library's public interface. # This tells CMake that anyone linking against "greeter_lib" needs # to have the "include" directory in their include path to find Greeter.h. target_include_directories(greeter_lib PUBLIC include) # 3. Create an executable target. add_executable(app src/main.cpp) # 4. Link the executable against the library. # This connects "app" to "greeter_lib", ensuring they are linked together # and that "app" inherits the include directories from "greeter_lib". target_link_libraries(app PRIVATE greeter_lib)
This CMakeLists.txt file is the blueprint for a modern, modular C++ project. Each command has a clear purpose, defining targets and their properties rather than using global settings. This approach is fundamental to managing the large, multi-component systems you'll be building.
For further reading on best practices for structuring projects and organizing your CMake files, the following resource is excellent.
How to structure your project — Modern CMake
This guide from the "Modern CMake" book provides a concise overview of a conventional and scalable project layout.
Read the introductory section that presents the file structure, focusing on the motivation for the include directory and the nested project-name subdirectory. Also, note the explanation of why CMakeLists.txt files belong in source directories but not include directories.
Your Task
Now it's time to build your first structured C++ project. You will create a very simple, fixed-size 2D vector class and a program to test it.
-
Create the Project Structure:
- Create a root directory for your project (e.g.,
VectorProject). - Inside it, create an
include/vector_lib/directory and asrc/directory.
- Create a root directory for your project (e.g.,
-
Implement the
Vector2DClass:- In
include/vector_lib/, createVector2D.hwith the class declaration. It should have twodoublemembers,xandy, a constructor, and a methodprint()that prints its coordinates. - In
src/, createVector2D.cppwith the implementations of the constructor and theprint()method.
- In
-
Create the Main Executable:
- In
src/, createmain.cpp. In themainfunction, includevector_lib/Vector2D.h, create an instance of yourVector2Dclass, and call itsprint()method.
- In
-
Write the
CMakeLists.txt:- In the root directory, create a
CMakeLists.txtfile. - Use
add_library()to create avector_libtarget fromVector2D.cpp. - Use
target_include_directories()to expose theincludedirectory as part of the library's public interface. - Use
add_executable()to create anapptarget frommain.cpp. - Use
target_link_libraries()to linkappagainstvector_lib.
- In the root directory, create a
-
Build and Run:
- From your project's root directory, use the out-of-source build workflow (
mkdir build,cd build,cmake ..,cmake --build .). - Run your executable from within the
builddirectory and verify its output.
- From your project's root directory, use the out-of-source build workflow (
This task synthesizes everything we've covered and serves as your first step in building C++ projects in a professional, scalable manner.
Conclusion
In this lesson, you have laid the crucial groundwork for all future work in this course. You now understand the role of a build system and why CMake is the tool of choice for modern, cross-platform C++ development. You've also put into practice the fundamental principle of separating a class's interface from its implementation.
Key takeaways include:
- CMake is a cross-platform build system generator that automates compilation and linking.
- The out-of-source build is the standard workflow, keeping your source directory clean.
- Header files (
.h) define a class's public interface, while source files (.cpp) provide the private implementation. - Modern CMake uses a target-based approach (
add_library,target_link_libraries, etc.) to create modular and maintainable projects.
In the next lesson, we will move from project structure to one of the most important topics in high-performance C++: memory management. You will learn the difference between the stack and the heap by implementing a class that manually manages its own dynamic memory. This will be our first concrete step toward understanding the resource management challenges inherent in building a custom inference engine.