Welcome to the final lesson of our API Design and Packaging module. In the previous lesson, we finalized the public contract of our library by creating a professional, C++-compatible hnsw.h header file using include guards and the extern "C" linkage specifier. With a stable API defined, we are now ready to package the implementation into a format that other programs can use.
This lesson will guide you through configuring CMake to compile your entire HNSW project into a dynamically linked shared library—a .so file on Linux or a .dylib on macOS. This is the standard method for distributing C libraries, allowing them to be loaded at runtime by various applications. Mastering this process is a fundamental skill for any systems programmer, as it's the bridge between writing code and delivering a usable software component.
Static vs. Shared Libraries: A Quick Refresher
Before diving into CMake, let's briefly revisit the two main types of libraries in the C/C++ world. Given your computer science background, this will likely be a review, but it's important to frame our goal.
Shaduri Easily Create Shared Libraries with CMake (Part 1)
This article provides a concise overview of static and shared libraries.
Read the introductory section "Libraries - A Quick Refresher". Pay close attention to the key difference: static libraries are bundled into the executable at compile time, while shared libraries are loaded by the operating system at runtime. Our goal today is to create the latter.
For our project, creating a shared library is ideal. It allows the core vector search logic to be maintained and updated independently and enables different applications—even those written in other languages like Python—to use it without being recompiled.
Instructing CMake to Build a Shared Library
By default, when you use the add_library() command in CMake, it creates a static library. We can change this behavior in a couple of ways.
The most direct method is to add the SHARED keyword to the command:add_library(hnsw SHARED ${HNSW_SOURCES})
However, modern CMake projects typically offer a more flexible approach by allowing the user of the build system to choose the library type. This is done using a special CMake variable called BUILD_SHARED_LIBS.
How to CMake Good - 1b - Adding a Library
This short video provides a clear, practical demonstration of how add_library and BUILD_SHARED_LIBS work.
First, watch the segment that shows how to specify the library type explicitly as SHARED. Then, watch the following part which demonstrates how the BUILD_SHARED_LIBS variable can be used to control the default library type from the command line, which is the idiomatic approach.
To implement this, you simply add an option() to your root CMakeLists.txt file. This creates a user-configurable cache variable that controls the behavior of add_library() whenever the type isn't explicitly specified.
# In your project's root CMakeLists.txt
cmake_minimum_required(VERSION 3.16)
project(HNSW C)


# Provide a user-facing option to control the library type. Defaults to ON.
option(BUILD_SHARED_LIBS "Build libraries as shared" ON)


# ... other project-wide settings ...

add_subdirectory(src) # Assuming your library code is in a 'src' directory
With this in place, any add_library(hnsw ${HNSW_SOURCES}) call inside src/CMakeLists.txt will now produce a shared library by default, but a user can override this by running cmake -DBUILD_SHARED_LIBS=OFF ...
Controlling Symbol Visibility
One of the most important aspects of creating a high-quality shared library, especially for performance-critical systems, is controlling symbol visibility. When you build a shared library, which functions and global variables should be accessible to the outside world?
- MSVC (Windows): Hides all symbols by default. You must explicitly export your public API using
__declspec(dllexport). - GCC/Clang (Linux/macOS): Exports all symbols by default. This is convenient but dangerous, as it "leaks" internal implementation details, increasing the chances of name collisions and preventing certain compiler optimizations.
The best practice is to hide everything by default and only expose the functions in your public API. While you can do this with complex preprocessor macros, modern CMake provides a much cleaner, automated solution: the GenerateExportHeader module.
Deep CMake for Library Authors - Craig Scott - CppCon 2019
This segment from a CppCon talk by Craig Scott, a CMake developer, provides a definitive explanation of symbol visibility and the modern CMake approach to managing it. This is a deep dive that aligns perfectly with your interest in low-level systems engineering.
Watch the clip from Symbol Visibility Control. The speaker clearly explains the problem, the compiler-specific attributes, and how the generate_export_header command automates the entire process, generating a header file that defines a portable _EXPORT macro for your library.
To implement this for our hnsw library, we'll add the following to its CMakeLists.txt:
# In src/CMakeLists.txt


# ... add_library(hnsw ...) ...

include(GenerateExportHeader)
generate_export_header(hnsw
    EXPORT_MACRO_NAME HNSW_API


    # This creates hnsw_export.h in the build directory
)


# Add the build directory to the include path so hnsw_export.h can be found
target_include_directories(hnsw PUBLIC
    "${CMAKE_CURRENT_BINARY_DIR}"


    # ... other include directories ...
)
This command generates a file named hnsw_export.h containing the necessary logic. It also automatically defines a preprocessor macro (like hnsw_EXPORTS) for your library target, so the generated header knows whether it's being compiled as part of the library (exporting) or by a consumer (importing).
You then include this generated header in hnsw.h and use the HNSW_API macro on all public function declarations:
// In hnsw.h


#ifndef HNSW_H
#define HNSW_H


#include "hnsw_export.h" // Include the generated header
#include <stddef.h>
#include <stdint.h>


#ifdef __cplusplus
extern "C" {


#endif

typedef struct HnswIndex HnswIndex;

// Add the HNSW_API macro to every function in the public API
HNSW_API HnswIndex* hnsw_load(const char* path, size_t dim);
HNSW_API void hnsw_destroy(HnswIndex* index);
// ... and so on for all other public functions


#ifdef __cplusplus
} // extern "C"


#endif


#endif /* HNSW_H */
Versioning and ABI Compatibility
A shared library defines not just an API (the source code contract) but also an Application Binary Interface (ABI), which is the low-level contract covering calling conventions, data structure layout, and symbol names. If you change the ABI (e.g., by adding a parameter to a function), programs compiled against the old library version will crash.
Operating systems use version numbers embedded in the library filenames to manage this. On Linux, you'll often see a pattern like this:
libhnsw.so.1.0.0: The real, fully-versioned library file.libhnsw.so.1: Thesoname, a symbolic link pointing to the real file. The runtime loader uses this to find a compatible library. It only changes when the ABI breaks (a major version bump).libhnsw.so: Thelinker name, another symlink used by the compiler when linking new applications.
CMake manages this with two target properties: VERSION and SOVERSION.
Deep CMake for Library Authors - Craig Scott - CppCon 2019
Let's return to the CppCon talk for an expert explanation of how library versioning works on Unix-like systems and how to map it to CMake properties.
Watch the segment from Versioning Strategy. It explains semantic versioning, the different library files (real name, soname, linker name), and how the VERSION and SOVERSION properties in CMake control their creation. Pay special attention to the warning about what happens if you omit SOVERSION.
To add versioning to our library, we set these properties on the target. Let's say we're releasing version 1.0.0.
# In src/CMakeLists.txt
set_property(TARGET hnsw PROPERTY VERSION "1.0.0")
set_property(TARGET hnsw PROPERTY SOVERSION "1")
This tells CMake to create libhnsw.so.1.0.0 and the appropriate libhnsw.so.1 symlink, ensuring correct runtime behavior and compatibility checks.
Installation and Runtime Linking
You've configured CMake, run make, and now have a libhnsw.so.1.0.0 file in your build/src directory. But if you try to run an application linked against it from a different directory, you'll get an error: error while loading shared libraries: libhnsw.so.1: cannot open shared object file.
The operating system's dynamic linker doesn't know to look in your build directory. To solve this, we must create a proper install step that places the library and any executables in a standard, relocatable layout.
CMake's install() command is used for this. It copies build artifacts from the messy build tree to a clean install prefix. Critically, for Linux/macOS, we also need to embed an RPATH into our executables. This is a path that tells the dynamic linker where to look for shared libraries. By using the special $ORIGIN variable, we can tell it to "look in the same directory as the executable itself."
Deep CMake for Library Authors - Craig Scott - CppCon 2019
This final clip from the CppCon talk covers the last two essential topics: creating a robust installation rule and solving the runtime linking problem with RPATH.
First, watch the detailed explanation of the install(TARGETS ...) command from "how we do this with CMake". This covers using GNUInstallDirs to create a relocatable installation. Then, watch the segment explaining the RPATH problem and how CMAKE_INSTALL_RPATH with $ORIGIN solves it. This is a very common point of confusion, and understanding it is a mark of an experienced systems developer.
Here's how we add a complete installation configuration to our project.
In your root CMakeLists.txt:
# At the top of your root CMakeLists.txt
include(GNUInstallDirs) # Defines standard install paths like CMAKE_INSTALL_LIBDIR


# On non-Apple Unix, set the install RPATH to $ORIGIN
if(UNIX AND NOT APPLE)
  set(CMAKE_INSTALL_RPATH "$ORIGIN")
endif()
In your src/CMakeLists.txt:
# After all other target properties
install(TARGETS hnsw
    RUNTIME DESTINATION ${CMAKE_INSTALL_BINDIR}
    LIBRARY DESTINATION ${CMAKE_INSTALL_LIBDIR}
    ARCHIVE DESTINATION ${CMAKE_INSTALL_LIBDIR}
    PUBLIC_HEADER DESTINATION ${CMAKE_INSTALL_INCLUDEDIR} # Installs public headers
)
This comprehensive install command handles all cases:
LIBRARY: Installs the.so/.dylibfiles to thelibdirectory.ARCHIVE: Installs the static library (.a) or Windows import library (.lib) to thelibdirectory.RUNTIME: Installs the Windows.dllto thebindirectory (where executables go).PUBLIC_HEADER: Installs the headers associated with the target (likehnsw.h) into theincludedirectory.
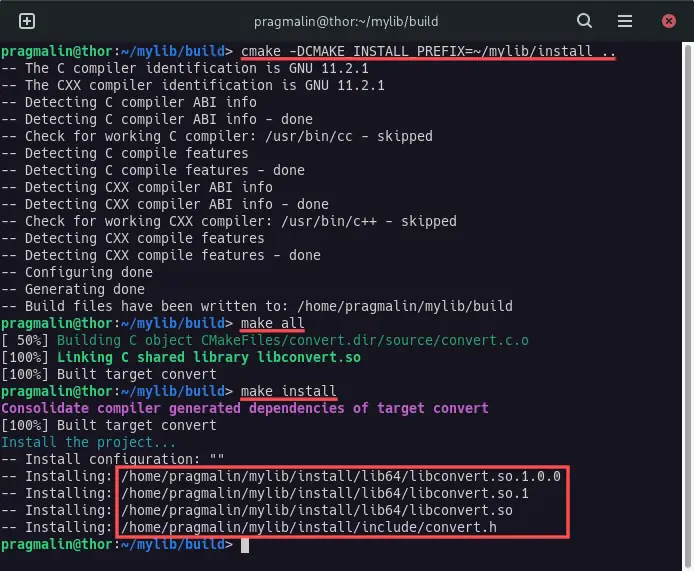
Now, after building, you can run cmake --install . (or make install) to deploy all the components of your library to the location specified by CMAKE_INSTALL_PREFIX.
Conclusion
In this lesson, you've learned how to transform your C project from a collection of source files into a professional, distributable shared library using modern CMake practices. This is a critical step in creating software that can be used by others and integrated into larger systems.
Key Takeaways:
- Shared Library Creation: Use
add_library(.. SHARED)or, preferably, make it configurable with theBUILD_SHARED_LIBSoption. - Symbol Visibility: Always hide internal symbols and explicitly export your public API. Use CMake's
GenerateExportHeadermodule to automate this for cross-platform compatibility. - Library Versioning: Use the
VERSIONandSOVERSIONtarget properties to manage your library's ABI version, which is crucial for runtime compatibility on Unix-like systems. - Installation: Use the
install(TARGETS ...)command with standard destinations fromGNUInstallDirsto create a relocatable package. - Runtime Linking: Solve the "library not found" error on Linux by setting an
INSTALL_RPATHto$ORIGIN, making your executables find libraries located alongside them.
Your C library is now complete, professionally packaged, and ready for use. In our next module, we'll leverage this work by creating Python bindings, allowing you to call your high-performance C functions directly from a simple and powerful Python script.