Introduction
Welcome back! In our last lesson, you got hands-on experience writing, compiling, and loading a kernel module. You saw how to extend a running kernel with new functionality, like a basic character device. Now, we're going to rewind to the very beginning and explore how the kernel itself gets started.
This lesson addresses the learning outcome: Describe the major stages of the Linux boot process, from bootloader handoff to the first user-space process. This is a fundamental topic in embedded systems, critical for board bring-up, debugging early system startup issues, and a frequent subject in advanced technical interviews.
We will trace the journey from the moment power is applied, through the multiple stages of a modern bootloader, to the point where the Linux kernel takes control and, finally, launches the very first program in user space.
1. The Pre-Kernel World: The Role of the Bootloader
Before the Linux kernel can run, the hardware needs to be prepared. In the embedded world, especially on ARM-based SoCs (System-on-Chip), this is typically handled by a multi-stage bootloader. This process is more complex than the traditional PC BIOS/GRUB sequence because embedded hardware is far more diverse.
Let's begin by watching a detailed walkthrough of the boot process on a typical embedded board, the BeagleBone Black. This will provide a concrete example of the concepts we'll discuss.
Embedded Linux Booting Process (Multi-Stage Bootloaders, Kernel, Filesystem)
The video 'Embedded Linux Booting Process' provides an excellent overview of the entire boot sequence, from the initial on-chip ROM code to the kernel launching the init process. It explains the 'why' behind each stage, which is crucial for a deep understanding.
Please watch these two key segments: General Boot Process (01:37 - 05:56): This gives a high-level overview of the stages: ROM Bootloader -> First-Stage Bootloader -> Second-Stage Bootloader -> Kernel -> Init Process. Why Do We Need Multiple Stages? (28:33 - 32:25): This is a critical section that answers common interview questions about why the ROM can't just load U-Boot directly. Focus on the constraints of internal SRAM and the need to initialize external DRAM.
To summarize and structure what you've just seen, let's break down the typical stages:
Stage 0: ROM Code (or Primary Program Loader)
This is the very first piece of code that runs when the SoC is powered on.
- Location: Etched into the silicon of the SoC itself; it is immutable.
- Purpose: It's a tiny, minimal program whose sole job is to find, load, and transfer control to the next-stage bootloader from a boot device (e.g., SD card, eMMC, SPI flash).
- Limitations: It has no knowledge of complex external hardware like DDR RAM. It runs using only the small, fast, on-chip static RAM (SRAM). As bugs are permanent, its functionality is kept to an absolute minimum to reduce risk.
Stage 1: Secondary Program Loader (SPL)
Also known as the MLO (Memory Loader) in the Texas Instruments ecosystem you saw in the video.
- Purpose: The SPL's primary and most critical job is to initialize the external DRAM controller. The main bootloader (like U-Boot) is too large to fit into the SoC's internal SRAM, but the ROM code can't load it into external DRAM because it doesn't know how to configure it. The SPL is the small, board-specific bridge that solves this problem.
- Execution: The ROM code loads the SPL into internal SRAM. The SPL then runs, configures the DRAM, loads the much larger Stage 2 bootloader into DRAM, and passes control to it.
Stage 2: The Main Bootloader (e.g., U-Boot)
This is the powerful, configurable environment you're likely familiar with. Once U-Boot is running in DRAM, the system is much more capable.
- Purpose: U-Boot's main responsibility in the boot sequence is to load the Linux kernel and a description of the hardware into memory.
- Key Tasks:
- Locate the Kernel Image: Finds the kernel file (e.g.,
zImage,uImage) on a storage device. - Locate the Device Tree Blob (DTB): Finds the
.dtbfile, which describes the board's specific hardware layout to the kernel. - Load into RAM: Copies the kernel and DTB into specific addresses in DRAM.
- Prepare Arguments: Sets up kernel command-line arguments (e.g., specifying the root filesystem location, setting the console).
- Jump to Kernel: Transfers execution to the entry point of the Linux kernel, passing the memory addresses of the DTB and command line.
- Locate the Kernel Image: Finds the kernel file (e.g.,
This transfer of execution is the "bootloader handoff."
2. The Handoff: Kernel Entry and Initial Setup
At this point, the bootloader's job is done. It has prepared the environment and now hands control over to the kernel. Let's look at this transition in more detail.
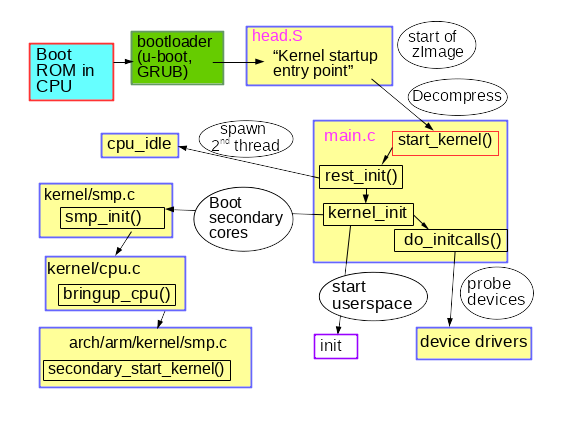
To understand what happens next, let's turn to a more technical article that describes the kernel's first moments.
Demystifying the Kernel Boot Sequence: From 'Starting ... - Bootlin
The article 'Demystifying the Kernel Boot Sequence' from Bootlin is an excellent resource that picks up exactly where the bootloader leaves off. It details the transition from architecture-specific assembly code to the generic C code that initializes the kernel.
Please read the first two sections: 'Where it all starts' and the paragraph immediately following it, up to the heading 'Back to architecture-specific code'. Focus on understanding this critical transition: The role of the initial assembly code (head.S). The setup of initial page tables and enabling the MMU. The jump to the first architecture-independent C function: start_kernel().
From Assembly to C
As the article explains, the first code the kernel executes is highly architecture-specific and written in assembly language (e.g., arch/arm64/kernel/head.S). This assembly code performs the absolute minimum setup required to run C code:
- Decompression: If the kernel is compressed (e.g.,
zImage), a small prepended routine uncompresses it into the correct memory location. - Basic CPU Setup: Ensures the CPU is in the correct state.
- MMU & Page Tables: Creates the first, minimal set of page tables to map the kernel's code into virtual memory and enables the Memory Management Unit (MMU).
- Jump to
start_kernel(): Its final task is to call thestart_kernelfunction, which resides ininit/main.c. This is the main entry point for all architecture-independent kernel initialization.
3. start_kernel(): The Kernel's "main" Function
The start_kernel function is effectively the main() function of the Linux kernel. It is a very long function that, in a highly ordered and synchronous fashion, initializes all the core kernel subsystems. While we'll explore its contents in detail in the next lesson, for now, you should understand its role as the central orchestrator.
Here's a high-level overview of what start_kernel initializes, in a single-threaded context:
- Prints the Linux Banner: This is often the first thing you see in the boot log (
dmesg). - Architecture Setup (
setup_arch): Calls back into architecture-specific code to parse the device tree and kernel command line passed by the bootloader. - Memory Management: Initializes the kernel's main memory allocators (buddy system for pages, SLAB/SLUB for smaller objects). From this point,
kmalloc()becomes available. - Scheduler (
sched_init): Initializes the task scheduler. - Timers and Interrupts (
time_init,init_IRQ): Sets up the core infrastructure for handling time and hardware interrupts. - Console (
console_init): Initializes the console, allowingprintkmessages to appear.
This entire sequence happens synchronously on a single CPU core. At the very end of start_kernel, it calls a function called rest_init.
4. Spawning the First Processes
The rest_init function marks a significant change: the kernel is about to become a multitasking system. It does two crucial things:
- It spawns the
kthreaddprocess (PID 2), which is responsible for creating all other kernel threads (e.g.,kworker,ksoftirqd). - It creates the
kernel_initthread (which will become PID 1).
The kernel_init thread continues the final phase of booting:
- Run Initcalls (
do_initcalls): This is where drivers are initialized. The kernel iterates through a list of functions (initcalls) that drivers have registered. This is when your device drivers'module_initfunctions (or their built-in equivalents) run, probing for the hardware described in the device tree. - Prepare the Root Filesystem: The kernel needs to mount a root filesystem (
/) to find the first user-space program.- The
initrd/initramfs: Often, the kernel first mounts an "initial RAM disk." This is a temporary, in-memory filesystem whose main purpose is to contain drivers needed to access the real root filesystem (e.g., drivers for SATA, NVMe, or an encrypted partition). - Mount the Real Root Filesystem: After loading any necessary drivers from the
initrd, the kernel mounts the final root filesystem specified in the kernel command line (e.g.,/dev/sda1).
- The
- Launch User Space: This is the final step. The kernel looks for an
initprogram (typically/sbin/init,/bin/sh, or others) and executes it. This program becomes the first user-space process, with Process ID (PID) 1.
At this moment, the kernel's boot process is complete. Control has been handed over to user space, and the init process is now responsible for starting all other services and bringing the system to a login prompt.
Analyzing the Linux boot process - Opensource.com
For a consolidated perspective on this final phase, the 'Analyzing the Linux boot process' article provides a good summary of the transition from start_kernel to the first user-space process.
Please read the sections 'From start_kernel() to PID 1', 'From start_kernel() to userspace', and 'Early userspace: who ordered the initrd?'. These sections reinforce the concepts of initcalls, the spawning of kernel_init, and the purpose of the initrd.
Conclusion
You have now traced the entire boot sequence from a cold start to a fully running user space. Understanding this chain of events is essential for low-level system development and debugging.
Key Takeaways:
- Multi-Stage Boot: Embedded systems use a chain of bootloaders (ROM -> SPL -> U-Boot) primarily because the initial ROM code cannot initialize external DRAM.
- The Handoff: The main bootloader (U-Boot) is responsible for loading the kernel, device tree, and command-line arguments into RAM before jumping to the kernel's entry point.
- Kernel Entry: The kernel begins execution in architecture-specific assembly code (
head.S) which sets up the MMU before calling the generic C functionstart_kernel(). - Synchronous Initialization:
start_kernel()acts as the kernel's main function, initializing core subsystems like memory management, the scheduler, and timers in a single-threaded, predictable order. - The Jump to Userspace: The
kernel_initthread is responsible for initializing drivers viainitcalls, mounting the root filesystem (often using aninitrdfirst), and finally executing the/sbin/initprocess, which becomes PID 1.
In our next lesson, we will zoom in on the code itself. We will trace the architecture-specific kernel entry code and the initial setup phases within the start_kernel function, turning the high-level stages you learned today into concrete function calls and data structures.