Introduction
In our last lesson, we traced the PCIe enumeration process, where the kernel scans the bus to discover every device and creates a struct pci_dev for each one. The system now has a complete map of the hardware, but no device-specific driver has claimed responsibility for any of it yet.
This lesson bridges that gap. Our goal is to write a PCIe driver skeleton that registers with the PCI subsystem and reads the device's configuration space. This is the "Hello, World!" of kernel-level PCIe programming. We will build a loadable kernel module that tells the PCI core, "I can handle this specific device," and then, upon being given ownership, will perform the simple task of reading the device's Vendor and Device IDs from its configuration space.
Mastering this fundamental structure is the first step toward writing any functional PCI/PCIe driver.
1. The Anatomy of a PCI Driver
To connect your code to a piece of hardware, the Linux kernel's PCI subsystem requires a standardized structure. This structure primarily involves two key components: an ID table to declare what you support, and a driver object that lists what your driver can do.
Let's break down these components.
A. The Device ID Table: struct pci_device_id
First, you must tell the kernel which specific device(s) your driver is designed for. This is done using an array of struct pci_device_id. Each entry in this array typically contains a Vendor ID (VID) and a Device ID (DID). When the PCI core finds a device that matches an entry in your driver's ID table, it knows your driver is a potential candidate to manage that device.
struct pci_device_id {
	__u32 vendor, device;		/* Vendor and device ID or PCI_ANY_ID */
	__u32 subvendor, subdevice;	/* Subsystem ID's or PCI_ANY_ID */
	__u32 class, class_mask;	/* Class, subclass, prog-if */
	kernel_ulong_t driver_data;	/* Data private to the driver */
};
The table must be terminated with a null entry (all zeros). You'll typically use the PCI_DEVICE() macro to create these entries.
B. The Driver Object: struct pci_driver
This is the main structure that represents your driver. You populate its fields with pointers to your functions and information about your driver. For our skeleton, the most important fields are:
.name: A string for your driver's name, which will appear insysfs..id_table: A pointer to yourpci_device_idarray. This is how the kernel knows which devices this driver supports..probe: A pointer to a function that the kernel will call when it finds a matching, unclaimed device. This is where your driver's initialization for a specific device begins..remove: A pointer to a function that the kernel calls when the device is being removed (e.g., module unload, hot-unplug). This is for all device-specific cleanup.
C. Registration: Connecting to the PCI Core
Once you have your pci_driver structure defined, you register it with the PCI core using pci_register_driver() in your module's init function. Conversely, you unregister it with pci_unregister_driver() in your module's exit function. This registration process is what allows the kernel to start matching devices against your driver's id_table.
2. Building the Driver Skeleton: A Practical Walkthrough
Theory is best understood through practice. We will now build a minimal "Hello, World!" PCI driver. This video provides a clear, step-by-step guide that we will follow.
Linux PCI Driver Tutorial - Part 1: Hello World PCI(e) Driver
Watch this tutorial from Johannes 4GNU_Linux. It walks through the entire process of creating a basic PCI driver skeleton, from setting up the ID table and driver struct to compiling and loading the module.
Watch from 03:14 to 15:40. Follow along as the presenter: Includes <linux/pci.h>. Defines the pci_device_id table for a specific device. Exposes the table to user space with MODULE_DEVICE_TABLE. Implements the probe and remove stubs. Fills out the pci_driver struct. Registers and unregisters the driver in the init and exit functions. Compiles, loads, and unloads the driver, checking dmesg output.
Let's summarize the key steps from the video into a clear sequence.
Step 1: Identify Your Device
Use the lspci -nn command to find the Vendor and Device IDs of a device on your system. For example: 8086:1502.
Step 2: Create the id_table
In your driver source file, define the IDs and create the table:
#include <linux/module.h>
#include <linux/pci.h>


#define MY_VENDOR_ID 0x8086
#define MY_DEVICE_ID 0x1502

static struct pci_device_id my_pci_ids[] = {
    { PCI_DEVICE(MY_VENDOR_ID, MY_DEVICE_ID) },
    { 0, } // Null-terminating entry
};
MODULE_DEVICE_TABLE(pci, my_pci_ids);
The MODULE_DEVICE_TABLE macro is essential. It creates a local variable that allows user-space tools like depmod to extract the device ID information. This enables automatic loading of your driver module when a matching device is present.
Step 3: Implement probe and remove Callbacks
These functions are the heart of your driver's interaction with a device. For a skeleton, they can just print messages.
static int my_pci_probe(struct pci_dev *dev, const struct pci_device_id *id)
{
    pr_info("My PCI Driver: probe function called for device %04x:%04x\n", dev->vendor, dev->device);
    // Further initialization would go here
    return 0; // Return 0 on success
}

static void my_pci_remove(struct pci_dev *dev)
{
    pr_info("My PCI Driver: remove function called for device %04x:%04x\n", dev->vendor, dev->device);
    // Cleanup would go here
}
Notice that the probe function receives a pointer to the struct pci_dev. This object is your handle to the hardware, created by the kernel during enumeration.
Step 4: Define the pci_driver Structure
Now, tie everything together in your pci_driver struct:
static struct pci_driver my_pci_driver = {
    .name     = "my_pci_driver",
    .id_table = my_pci_ids,
    .probe    = my_pci_probe,
    .remove   = my_pci_remove,
};
Step 5: Register in init/exit
Finally, register and unregister the driver structure.
static int __init my_pci_init(void)
{
    pr_info("My PCI Driver: Initializing\n");
    return pci_register_driver(&my_pci_driver);
}

static void __exit my_pci_exit(void)
{
    pr_info("My PCI Driver: Exiting\n");
    pci_unregister_driver(&my_pci_driver);
}

module_init(my_pci_init);
module_exit(my_pci_exit);

MODULE_LICENSE("GPL");
MODULE_AUTHOR("Your Name");
MODULE_DESCRIPTION("A simple PCI driver skeleton.");
At this point, you have a complete, compilable driver skeleton. When you insmod this module, its init function will run, registering my_pci_driver. The PCI core will then check if any existing, unclaimed devices match the my_pci_ids table. If a match is found, your my_pci_probe function will be called immediately.
3. Reading the Configuration Space
Your probe function now has a struct pci_dev *dev. How can you use it to interact with the device? The most basic interaction is reading its configuration space, the same space the kernel used to identify it during enumeration.
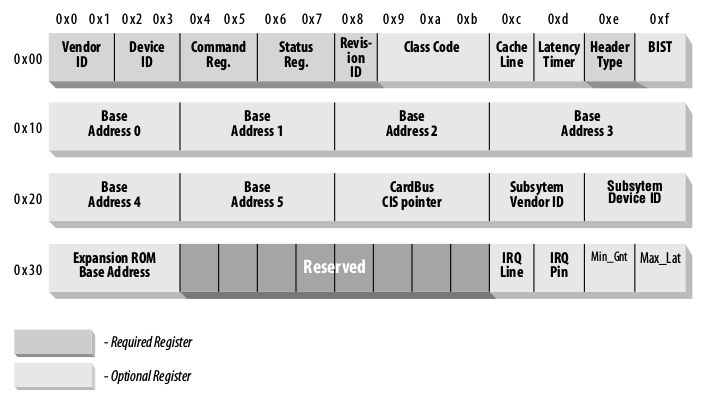
The kernel provides a family of functions for this purpose:
pci_read_config_byte(struct pci_dev *dev, int where, u8 *val)pci_read_config_word(struct pci_dev *dev, int where, u16 *val)pci_read_config_dword(struct pci_dev *dev, int where, u32 *val)
The where parameter is the byte offset into the configuration space (defined by constants in linux/pci_regs.h, such as PCI_VENDOR_ID at offset 0x00). Let's enhance our probe function to read the VID and DID directly from the hardware.
Linux PCI Driver Tutorial - Part 2: Access the configuration space from a PCI(e) driver
This next video builds directly on the previous one. It shows how to use pci_read_config_word within the probe function to read the vendor and device IDs from the hardware itself.
Watch from 04:50 to 07:04. Pay attention to how pci_read_config_word is called with the pci_dev pointer and the correct offsets (PCI_VENDOR_ID, PCI_DEVICE_ID) to retrieve the configuration data.
Here is the updated probe function incorporating this logic:
#include <linux/pci_regs.h> // For PCI_VENDOR_ID, etc.

static int my_pci_probe(struct pci_dev *dev, const struct pci_device_id *id)
{
    u16 vendor_id, device_id;

    pr_info("My PCI Driver: probe function called for device %04x:%04x\n", dev->vendor, dev->device);

    // Read Vendor ID from config space at offset 0x00
    if (pci_read_config_word(dev, PCI_VENDOR_ID, &vendor_id)) {
        pr_err("Failed to read vendor ID\n");
        return -EIO;
    }

    // Read Device ID from config space at offset 0x02
    if (pci_read_config_word(dev, PCI_DEVICE_ID, &device_id)) {
        pr_err("Failed to read device ID\n");
        return -EIO;
    }

    pr_info("Read from config space: Vendor ID=%04x, Device ID=%04x\n", vendor_id, device_id);

    return 0; // Success
}
This simple addition completes our learning objective. The driver now not only binds to the device but also actively communicates with it by reading its configuration registers.
For a complete reference, including a Makefile, you can review the skeleton provided in this excellent article.
Writing a PCI device driver for Linux
This article provides a great textual summary of all the concepts we've discussed and includes a full, working PCI driver skeleton and Makefile at the end.
Review the sections on struct pci_driver, the callback functions, and device access. Then, look at the complete 'PCI driver skeleton' code and the accompanying Makefile. This serves as a great summary and reference.
Interview Scenario
Interviewer: "You've written a new PCI driver for a device, but when you load the module with insmod, your probe function is never called. You've double-checked with lspci -nn that the device is present on the bus. What are the top three most likely causes?"
Click for Analysis
This is a classic debugging scenario that tests your understanding of the driver registration and matching process. Here's a systematic approach:
-
Vendor/Device ID Mismatch: This is the most common error. A typo in the
pci_device_idtable in your driver means it will never match the hardware. The first step is to meticulously compare the IDs in your code against the output oflspci -nn. -
Another Driver Has Claimed the Device: The kernel will only offer a device to a new driver if it's not already claimed. A different driver (e.g., a generic one like
vfio-pci, or an older version of your own driver) might already be bound. You can check this withlspci -k. The output will show the "Kernel driver in use" for each device. If another driver is bound, you would need to unbind it first before your driver can claim the device:# echo "0000:01:00.0" > /sys/bus/pci/drivers/offending_driver/unbind
Then you could try to manually bind your driver:# echo "0000:01:00.0" > /sys/bus/pci/drivers/my_pci_driver/bind -
Driver Registration Failed: An error in your
module_initfunction might causepci_register_driver()to fail or not even be called. The best way to diagnose this is to check the kernel log (dmesg) immediately after yourinsmodcommand. Look for your driver's init messages and any error codes returned bypci_register_driver().
Conclusion
In this lesson, you've built the fundamental skeleton of a Linux PCI driver. You now understand the essential components and the sequence of events that connect your code to a physical device.
Key Takeaways:
- A PCI driver identifies the devices it supports via a
pci_device_idtable. - The
pci_driverstructure holds the driver's name, ID table, and function pointers for key events likeprobeandremove. pci_register_driver()connects your driver to the PCI core, which then calls yourprobefunction for any matching, unclaimed devices.- The
probefunction receives astruct pci_dev*, which is the handle to the device. - You can read from a device's configuration space using functions like
pci_read_config_word(), providing your first real interaction with the hardware.
So far, we've only interacted with the configuration space. The real work of a driver happens in the device's operational memory, which is accessed via Base Address Registers (BARs). In our next lesson, we will extend this driver to request, map, and access a device's BARs for memory-mapped I/O (MMIO).