Introduction
Welcome back! In our last lesson, you successfully created a basic rotation for your sculpture by animating a parent Empty object with keyframes. This was a fantastic first step into the world of animation.
Today, we will build directly on that foundation to achieve one of your key goals: creating a professional-quality, 360-degree turntable animation. This is the classic way to showcase a sculpture from all angles, and it's an essential presentation skill for any 3D artist.
The learning outcome for this lesson is to create a 360-degree turntable animation to showcase a sculpture from all angles.
We will shift from the technique of rotating the sculpture itself to a more flexible and widely-used professional method: rotating the camera and lights around the sculpture. This approach ensures your carefully crafted lighting remains consistent from every angle and keeps your sculpture's own properties clean and ready for any other potential animations.

1. The "Rotating Rig" Method
In the previous lesson, you parented your sculpture to an Empty and rotated the Empty. We're going to use the exact same parenting and keyframing principles, but apply them differently.
The new workflow is:
- Place an Empty at the center of your sculpture. This Empty will act as the pivot for our entire "camera rig".
- Parent your camera and your lights to this Empty.
- Animate the rotation of the Empty.
As the Empty rotates 360 degrees, it will carry the camera and lights with it in a perfect circle, while the sculpture itself remains stationary. This is the most common and robust way to create a turntable.
2. A Complete Walkthrough
The following video provides a concise and clear demonstration of this exact technique. It will guide you through setting up the Empty, parenting the camera and lights, and creating the keyframes for a smooth, continuous rotation.
Blender Tutorial - How to Make a 360 Turntable Animation
This video by Eve Sculpts demonstrates the professional workflow for creating a turntable by rotating the camera and lights. It's a clean and efficient method that we will adopt for your project.
Please watch the segment from 00:58 to 03:00. You don't need to follow along just yet; focus on understanding the process: Adding and Animating the Empty (0:58 - 1:55): Notice how an Empty is added and its rotation is keyframed from 0 to 360 degrees over the timeline. This is the core of the animation. Changing Interpolation (1:55 - 2:19): This is a crucial step for smooth motion. The keyframes are set to 'Vector' (which is the same as 'Linear' that you learned about) to ensure a constant rotation speed without any easing in or out. Parenting the Camera and Lights (2:19 - 3:00): Observe how the camera and lights are parented to the animated Empty. This links their movement to the Empty's rotation, creating the turntable effect.
The video also discusses a key advantage of this method: it keeps your scene organized and avoids complications if you later decide to add separate animations to your sculpture itself.
3. Your Turn: Creating the Turntable
Now, let's apply this technique to your project. Please open the .blend file containing your sculpture, lighting, and backdrop from our previous lessons.
Follow these steps to build your turntable animation:
-
Prepare Your Scene:
- Ensure your main sculpture is centered at the world origin (location 0, 0, 0). If it's not, select it and press
Alt + Gto snap it to the center. - Make sure your camera is framed nicely on the sculpture. You can adjust its distance from the center, but don't worry about its rotation, as the parenting will handle that.
- Set the End Frame in your Timeline. A standard length is 240 frames (for a 10-second animation at 24 fps).
- Ensure your main sculpture is centered at the world origin (location 0, 0, 0). If it's not, select it and press
-
Create the Rotating Rig:
- Place the 3D Cursor at the world origin (
Shift + C). - Add an Empty (
Shift + A>Empty>Plain Axes). You can scale it up (S) to make it easier to select. - In the Outliner, select your camera object. Then, hold
Shiftand select all of your light objects. Finally, still holdingShift, select the Empty you just created. The Empty should be the last object selected and highlighted in a lighter color. - Press
Ctrl + Pand chooseObject (Keep Transform). Your camera and lights are now children of the Empty.
- Place the 3D Cursor at the world origin (
-
Animate the Rig:
- Select only the Empty.
- Go to frame 1 on the Timeline.
- Press
I(or theKkey you used previously) and selectRotationto insert a keyframe. - Go to your end frame (e.g., frame 240).
- Rotate the Empty exactly 360 degrees on the Z-axis. You can do this by pressing
R, thenZ, then typing360, and pressingEnter. - With the Empty still selected, press
Iagain and selectRotationto insert the second keyframe.
-
Ensure Constant Speed:
- In the Timeline, make sure both keyframes for the Empty are selected (they should be yellow/orange).
- Press
Tand choose Linear from the menu.
Press the Spacebar to play the animation. Your camera should now be smoothly orbiting your sculpture, with the lighting moving along with it, creating a professional turntable effect.
4. An Alternative Method: Following a Path
For your broader understanding, it's worth knowing there's another excellent method for this, which uses Constraints. This technique involves creating a circular curve and "constraining" the camera to follow it.
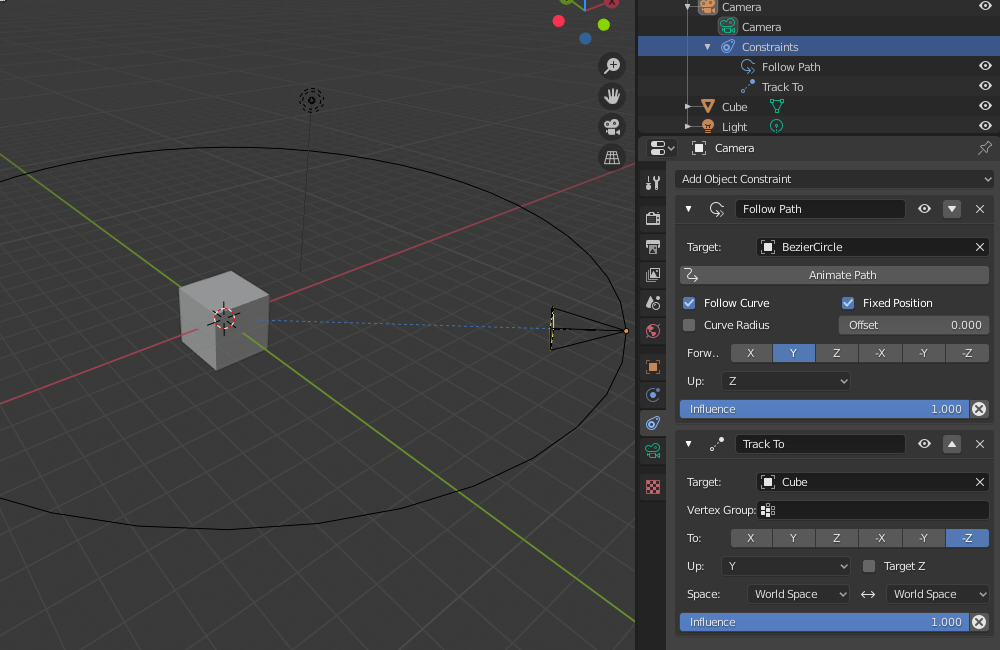
This method can be very powerful, especially if you want the camera to follow a more complex, non-circular path. The following video demonstrates this technique. You don't need to do this for your current project, but it's a valuable tool to be aware of for future work.
How to - Orbit & Rotate Your Camera Around an Object : Blender 4.5
This video by Grant Abbitt demonstrates the 'Follow Path' method. It's a powerful alternative for creating camera motion and introduces you to Blender's constraint system.
You can watch the segment from 00:58 to 03:15 to see this alternative workflow in action. Note the key concepts: A Bezier Circle is added to act as the physical path. The camera is parented to the circle with Follow Path. A Track To constraint is used to keep the camera aimed at the object.
For most standard turntables, the "Rotating Rig" method we used is simpler and perfectly effective.
Conclusion
Excellent work! You have now created a complete, 360-degree turntable animation using a professional and reusable workflow. You've moved beyond simply rotating an object to building a camera rig that orbits your subject, providing a dynamic and comprehensive view of your sculpture.
Key Takeaways:
- A professional turntable is often created by moving the camera and lights, not the object.
- The "Rotating Rig" method involves parenting the camera and lights to a central Empty and animating the Empty's rotation.
- Linear Interpolation is critical for a constant, smooth rotation speed without any jarring starts or stops.
- An alternative "Follow Path" method using constraints offers even more control for complex camera movements.
Next Steps
Your animation is complete! The final step is to turn this sequence from your Blender viewport into a shareable video file. In our next lesson, Configure output settings to render an animation sequence as a video file, we will dive into Blender's Output Properties to set the resolution, file format, and render your turntable into its final video form.