Hello! Welcome to the final lesson in our module on the "Foundations of Accounting for Modelers."
In our last session, we established the architectural blueprint for a professional financial model: the critical separation of inputs, calculations, and outputs. You learned the theory behind why a clean, standardized layout is essential for building robust and auditable models.
Today, we move from theory to practice. We will build the "front door" to our model, implementing the key elements that signal professionalism and control from the moment a user opens the file. Specifically, you will learn to implement a cover page with a table of contents, version control, and an assumptions log.
Think of this as the equivalent of the title block and drawing list on a set of engineering blueprints. It provides identity, navigation, a history of revisions, and a summary of key parameters. Mastering this setup is a non-negotiable skill for any serious FP&A professional aiming for top-tier roles.
1. Anatomy of a Professional Cover Page
The cover page is the first tab in your workbook and serves as the model's command center and calling card. It should be clean, professional, and informative.
Financial Modeling Best Practices: Tips & Tricks
For a clear, industry-standard breakdown of what a cover page should contain, let's turn to an article on financial modeling best practices from Toptal, a network for top freelance talent. It provides a concise and practical list.
Please read the subsection titled 'Cover Page.' Focus on the six key components it recommends including.
As the article outlines, a best-in-class cover page typically includes:
- Model Name & Purpose: A clear title (e.g., "FY24 Budget & 5-Year Strategic Plan") and a brief description of what the model does and for whom it is intended.
- Author Information: Your name and contact details. In a corporate setting, this would also include your department.
- Model Version History: A log tracking changes, dates, and authors. We'll detail this in a moment.
- Model Index (Table of Contents): A navigable list of all the sheets in the workbook.
- Legal Disclaimers: Any necessary statements regarding confidentiality or limitations of the analysis, often provided by a legal department.
- Color-Coding Key: A legend explaining the formatting rules (e.g., Blue font = Input, Black font = Formula).
The image below shows an example of a cover page that incorporates a clean design with a table of contents.

2. Building the Table of Contents (TOC) for Easy Navigation
As models grow to include many worksheets, a TOC with hyperlinks becomes essential. It allows any user to understand the model's structure and jump to any section with a single click.
Documenting Excel Models Best Practices
The following resource from Wall Street Oasis provides a straightforward, manual method for creating a TOC using Excel's hyperlink functionality. It also explains the 'why' behind this practice.
First, read the section 'Table of contents' to understand the manual creation process. Then, read the 'Cell and file hyperlinks' part under the 'Hyperlinks' section to see how the Ctrl + K shortcut works. Focus on linking to a 'Place in This Document'.
To implement a TOC, you will:
- On your cover sheet, list the names of all the worksheets in your model.
- For each name, select the cell and press
Ctrl + K(on Windows) orCmd + K(on Mac) to open the hyperlink dialog box. - In the dialog box, select "Place in This Document."
- Choose the corresponding sheet name from the list and set the cell reference to "A1". This ensures the user always lands at the top-left corner of the sheet.
- Click "OK".
Pro Tip: To create a truly seamless navigation experience, go to cell A1 on every other sheet and insert a hyperlink that links back to the cover page. This allows users to return to the "home base" from anywhere in the model instantly.
3. Implementing Version Control
Financial models are living documents. They are constantly updated, corrected, and revised. Without a system to track these changes, you can quickly lose control, leading to confusion and critical errors.
There are two complementary methods for version control:
A. File Naming Convention: This happens outside the model. You save different versions of the file with a logical naming system. The Wall Street Oasis article you just reviewed discusses a "three-point edition system" (e.g., Model_v2.1.0.xlsx) where:
2represents a major change (e.g., adding a new business unit).1represents a minor change (e.g., updating a forecast methodology).0represents a bug fix or small correction.
Avoid ambiguous names like Model_final_v2_updated.xlsx. A clear, consistent naming system is your first line of defense.
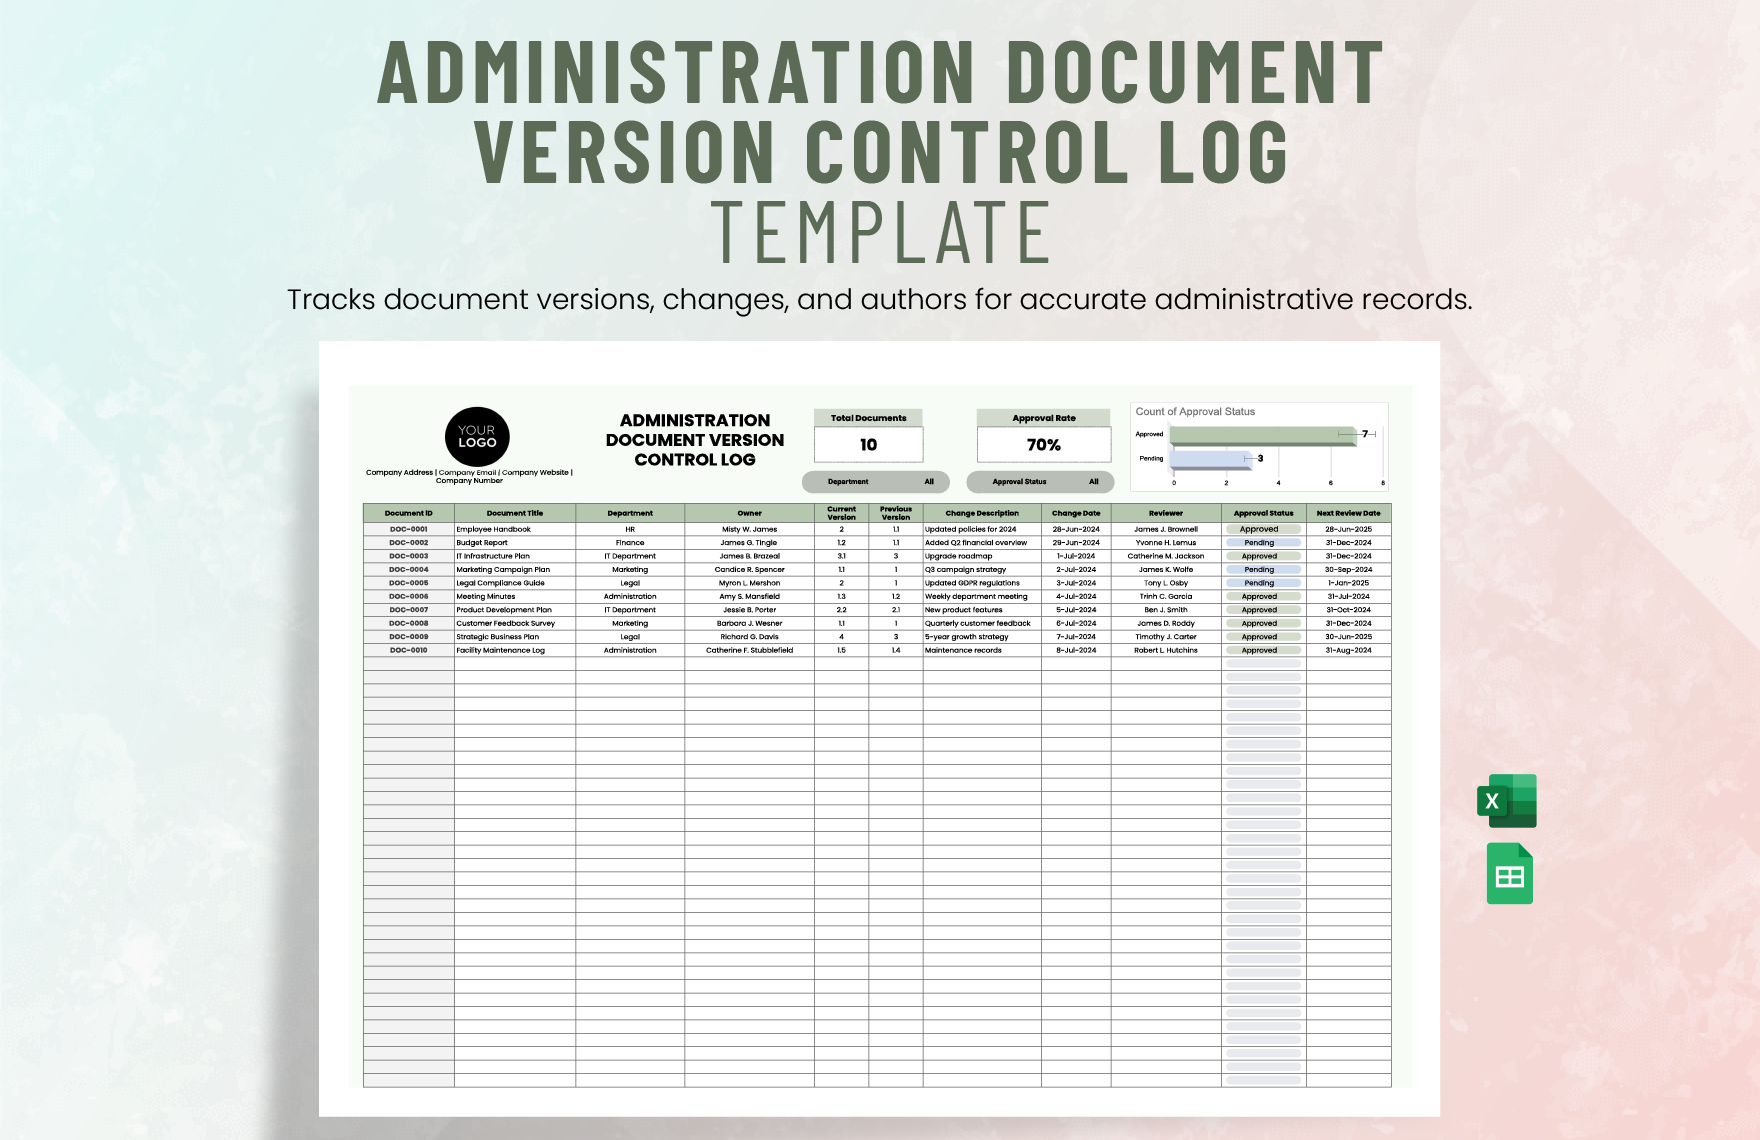
B. Internal Version Log: This is a table directly on your cover page. It provides a detailed narrative of the changes made within each version.
Documenting Excel Models Best Practices
Let's revisit the Wall Street Oasis article to understand the best practices for version control.
Read the section 'Version control,' paying attention to the description of a 'Master “version” Excel sheet' and the tips under 'What to avoid.'
The image below shows a great template for a version control log.
4. Creating a Centralized Assumptions Log
In the last lesson, we learned the importance of separating inputs from calculations. The "assumptions log" is the practical embodiment of this principle. While sometimes included as a small section on the cover page, for any reasonably complex model, it's best to create a dedicated worksheet, often named "Inputs," "Drivers," or "Control Panel."
This sheet contains all the hard-coded numbers that drive the model's calculations. By centralizing them, you make the model easy to understand, update, and audit.
Financial Modeling Best Practices: Tips & Tricks
The Toptal article provides an excellent description of how to structure this dedicated assumptions tab.
Please read the section 'Driver’s Tab: Inputs and Assumptions.' Note the distinction it makes between static vs. dynamic inputs and hard-coded vs. sensitizing parameters.
Key practices for your Assumptions log:
- Organize Logically: Group assumptions by area (e.g., Revenue Growth, Operating Costs, Tax Assumptions, Capital Structure).
- Label Clearly: Every input should have a clear label, the unit of measurement (%, $, etc.), and potentially a source note.
- Follow Formatting Conventions: All inputs on this sheet should be formatted with a blue font to signify they are hard-coded values. All other sheets should link back to this sheet for assumptions—never hard-code a number directly into a formula on a calculation sheet.
Practical Tip: If you're handed an existing model that doesn't follow these rules, how do you find all the hard-coded numbers scattered throughout the workbook?
- Go to a worksheet.
- Press
F5to open the "Go To" dialog box. - Click "Special..."
- Select the "Constants" radio button. Make sure "Numbers" is checked.
- Click "OK".
Excel will highlight every cell on that sheet containing a hard-coded number. You can then format them in blue and evaluate if they should be moved to your central Assumptions Log.
Test your understanding!
You are building a 3-statement model for a company. You need to add a section for "Debt Assumptions." On which sheet should this section be located, and what specific items might it contain? What font color would you use for the values?
Show answer
The "Debt Assumptions" section should be located on your dedicated Inputs (or "Drivers," "Assumptions") sheet.
It would contain hard-coded values such as:
- Interest Rate on New Debt (%)
- Upfront Financing Fee (%)
- Term of New Debt (Years)
- Existing Debt Balances ($)
All the numerical values (the percentage rates, dollar amounts, and years) would be formatted with a blue font. The calculation sheets (e.g., the Debt Schedule) would then link to these cells to perform the interest and principal calculations.
Conclusion
In this lesson, you've acquired the practical skills to build the professional "shell" of a financial model. This structure provides the foundation for all the complex analysis that will be built on top of it.
Key Takeaways:
- A professional cover page acts as the model's front door, including a title, purpose, author, and legal disclaimers.
- A Table of Contents (TOC) with hyperlinks is crucial for navigating complex models efficiently.
- Version control, managed through both file naming and an internal log, is essential for tracking changes and maintaining model integrity.
- A centralized Assumptions Log (on a dedicated "Inputs" tab) is where all model drivers should live, formatted in blue, ensuring transparency and ease of use.
You have now completed the "Foundations of Accounting for Modelers" module. You understand how the three financial statements connect, how business activities translate into accounting entries, and how to structure a model for professional use.
In our next lesson, we will begin the "Financial Forecasting Techniques" module. With our model's shell now defined, we'll start filling it with life, beginning with the most important forecast of all: revenue. You will learn how to apply top-down and bottom-up approaches to build a robust, driver-based revenue forecast.