Welcome back! In our last session, we built the foundations for creating programs that can make decisions using if/else and switch statements. You've learned how to guide your program's execution down different paths based on specific conditions.
Now, we'll add another essential tool to our control flow toolkit: repetition. Many tasks in programming, from processing user data to rendering graphics, involve doing the same thing over and over. This lesson will teach you how to implement loops using Go's single, yet highly versatile, for keyword. Mastering its different forms is crucial for writing efficient and powerful code, which is a non-negotiable skill for any backend developer.
1. The Anatomy of Go's for Loop
Unlike Python, which has both for and while loops, Go simplifies things by providing a single for keyword that can be used in several ways. The most traditional form, which might look familiar if you've ever seen C or Java code, consists of three parts separated by semicolons:
- Initialization: A statement executed once before the loop starts. Typically used to declare a counter variable (e.g.,
i := 0). - Condition: An expression evaluated before each iteration. If it's
true, the loop body executes. Iffalse, the loop terminates. - Post-statement: A statement executed at the end of each iteration. Usually used to increment or decrement the counter (e.g.,
i++).
The general structure is for initialization; condition; post { ... }.
Let's begin by reading a formal explanation and seeing a basic example.
Learn for loops in Go with Examples | golangbot.com
This article from golangbot.com provides a clear breakdown of the for loop's syntax.
Please read the introduction and the section on the for loop syntax. Pay close attention to the three components and how they work together in the example that prints numbers 1 to 10.
To see this in action and hear it explained, the following video provides a great walkthrough of this "classic" for loop structure.
Golang Tutorial #10 - For Loops & While Loops
This segment from a Tech With Tim tutorial directly compares the different styles of writing for loops.
Watch the part that explains the traditional loop structure, from this style of for loop. Notice how the initialization, condition, and post-statement are all neatly contained within the for line itself.
An important detail noted in the golangbot.com article is that variables declared within the for loop's initialization statement (like i in for i := 0; ...) are scoped to the loop. This means they only exist inside the {} and cannot be accessed from outside, which helps prevent bugs and keeps your code clean.
2. The Many Faces of for
The power of Go's for loop lies in its flexibility. The three components in the classic form are all optional. By omitting some of them, you can create different kinds of loops.
The "while" Loop
If you omit the initialization and post-statements, the loop works just like a while loop in other languages. It will continue to execute as long as the condition remains true.
The syntax is simply: for condition { ... }
"Go by Example" provides a very clear demonstration of this form.
As you requested, we'll be using "Go by Example" frequently. This page shows the various forms of the for loop.
Focus on the first example, under the heading The most basic type. See how the counter i is initialized before the loop and incremented inside it.
The Infinite Loop
What if you omit the condition as well? You get an infinite loop: for { ... }.
This might sound like a mistake, but it's an incredibly useful construct in backend development. Web servers, message queue consumers, and other background services are often designed as infinite loops that wait for and process incoming requests or tasks. Of course, you need a way to break out of such loops, which we'll cover next.
3. Controlling the Flow: break and continue
Inside any loop, you have two special keywords to control its execution flow:
break: Immediately terminates the innermost loop it's in. The program continues execution at the first statement after the loop.continue: Immediately stops the current iteration and jumps to the post-statement, starting the next iteration.
These keywords are essential for handling special cases or exit conditions within a loop without complex if/else logic.
The Tech With Tim video provides a fantastic explanation and a practical example of how and when to use break and continue.
Golang Tutorial #10 - For Loops & While Loops
This video clearly distinguishes between break and continue and then applies them to a problem.
First, watch the conceptual explanation of the keywords from these two keywords. Then, see them put into practice in the example from let's actually do an example. The example shows how to find numbers that meet certain criteria and how break can be used to stop after finding the first match.
4. Practice Exercise: The Fibonacci Sequence
Now it's time to apply what you've learned. You've expressed a strong interest in solving algorithmic problems, so let's tackle a classic: the Fibonacci sequence. This sequence starts with 0 and 1, and each subsequent number is the sum of the two preceding ones (0, 1, 1, 2, 3, 5, 8, ...).
This is a perfect problem for a for loop. The following flowchart visualizes the algorithm to find the N-th Fibonacci number.
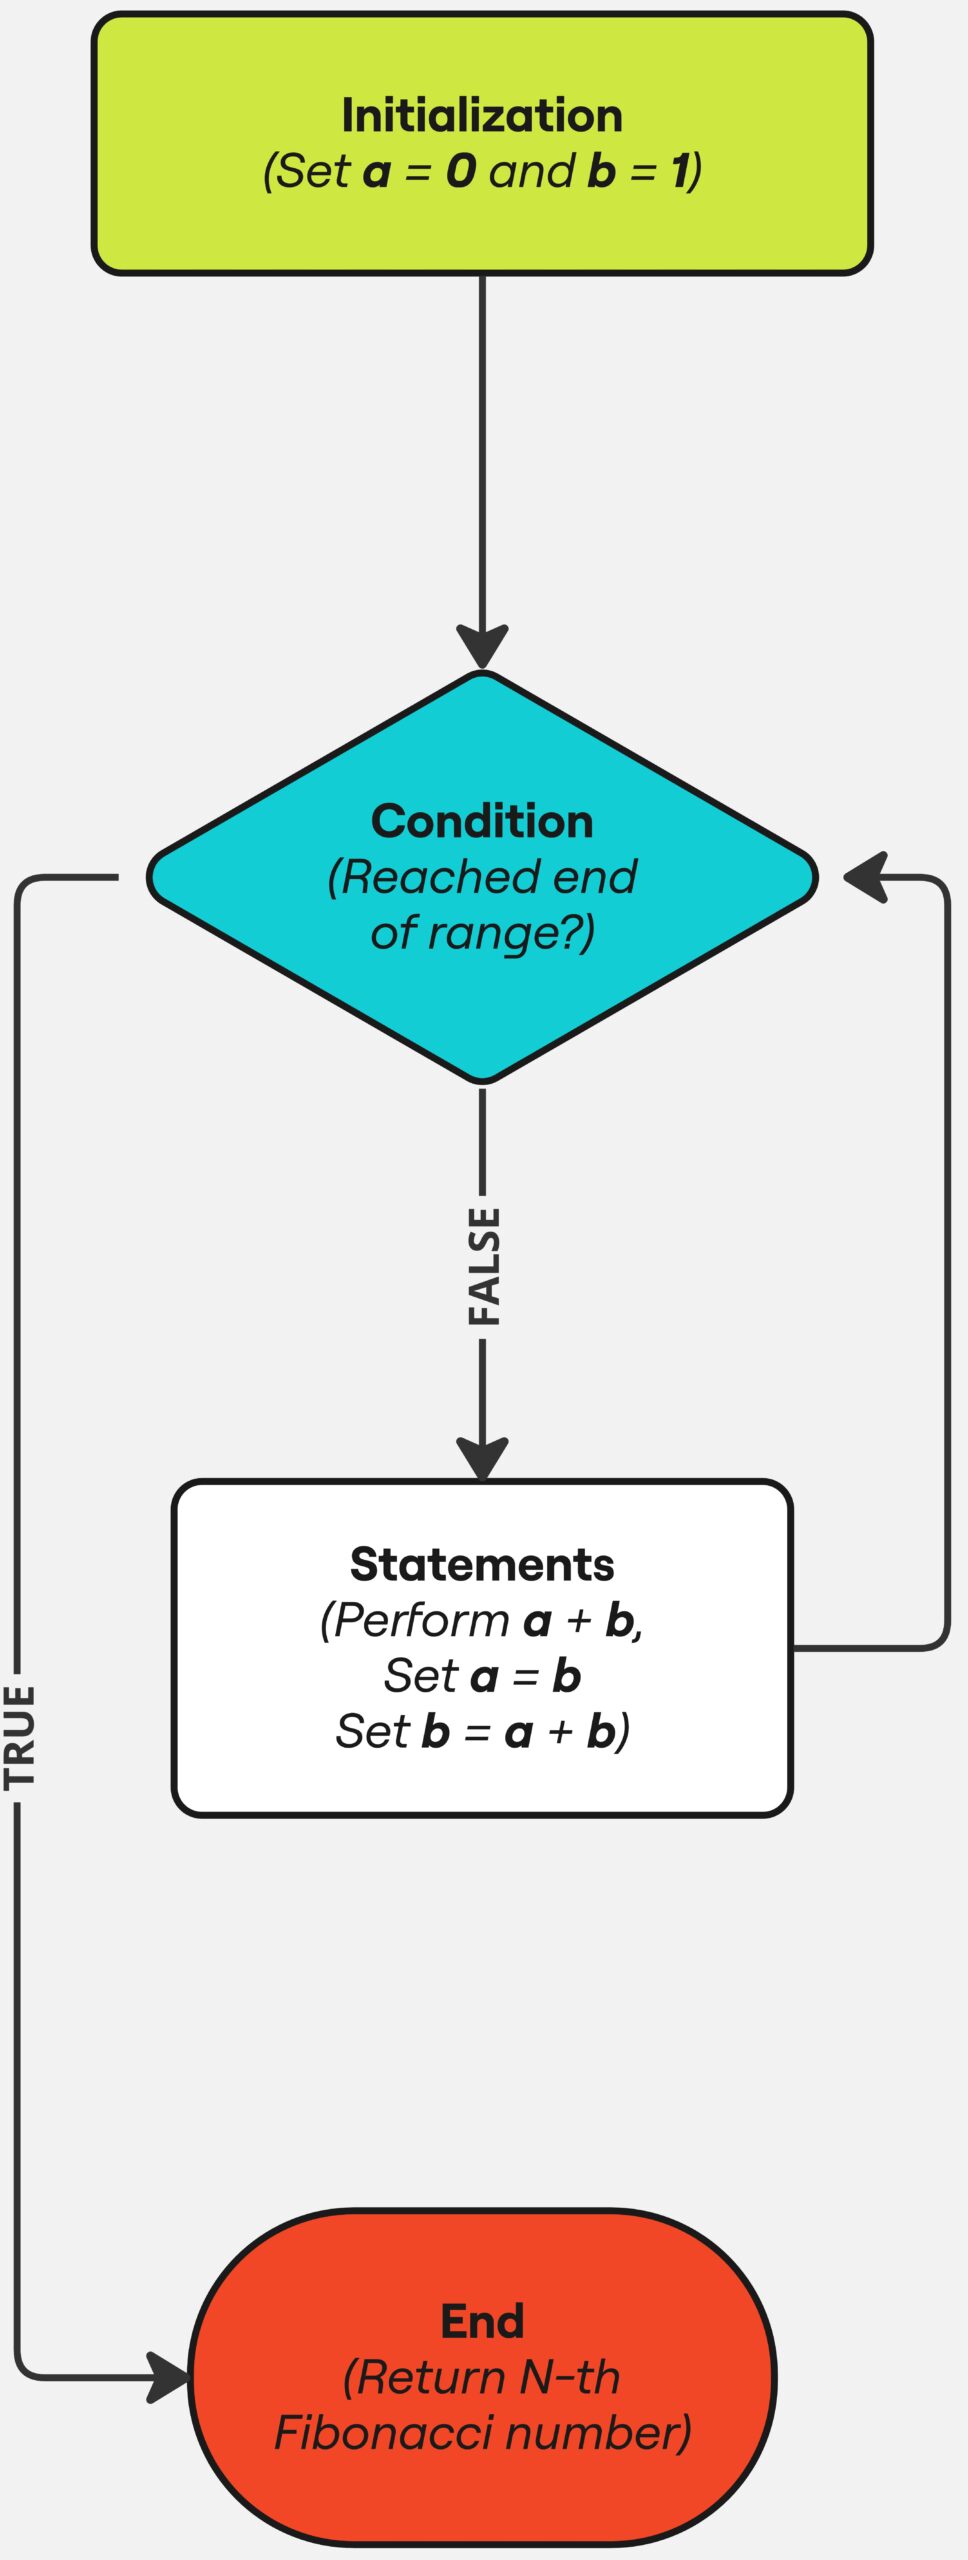
Your task is to translate this flowchart into a Go function.
Instructions:
- Create a new file named
loops.go. - Inside, create a function
fibonacci(n int) int. This function should calculate and return the n-th Fibonacci number. - Use the flowchart as your guide:
- Initialization: Set up two variables to hold the first two numbers in the sequence.
- Loop: Use a
forloop that runs the correct number of times to reach the n-th position. - Statements: Inside the loop, update your variables according to the Fibonacci rule (
a, b = b, a + bis a very Go-like way to do this). - End: Return the correct final value.
- Add a second, simpler function
printOddNumbers(limit int)that uses aforloop and thecontinuekeyword to print only the odd numbers up tolimit.
Here is a skeleton to get you started. Fill in the TODO sections.
package main

import "fmt"

// fibonacci calculates the n-th Fibonacci number.
// F(0)=0, F(1)=1, F(2)=1, F(3)=2, ...
func fibonacci(n int) int {
	if n <= 1 {
		return n
	}

	a, b := 0, 1 // Initialization

	// TODO: Write a for loop that iterates n-1 times.
	// Inside the loop, update 'a' and 'b' to be the next two
	// numbers in the sequence. The Go idiom a, b = b, a + b
	// is perfect for this.
	for i := 1; i < n; i++ {
		a, b = b, a+b
	}

	return b // After the loop, 'b' will hold the n-th Fibonacci number.
}

// printOddNumbers uses 'continue' to print only odd numbers up to a limit.
func printOddNumbers(limit int) {
	fmt.Printf("Odd numbers up to %d:\n", limit)
	// TODO: Write a for loop from 0 to limit.
	// Inside the loop, if the number is even, use 'continue'
	// to skip the print statement. Otherwise, print the number.
	for i := 0; i <= limit; i++ {
		if i%2 == 0 {
			continue
		}
		fmt.Printf("%d ", i)
	}
	fmt.Println() // For a newline at the end.
}

func main() {
	// Test the fibonacci function
	n := 10
	fmt.Printf("The %d-th Fibonacci number is: %d\n", n, fibonacci(n))

	// Test the odd numbers function
	printOddNumbers(20)
}
After implementing the code, run it with go run loops.go. Your expected output should be:
The 10-th Fibonacci number is: 55
Odd numbers up to 20:
1 3 5 7 9 11 13 15 17 19
Conclusion
In this lesson, you've gained a fundamental programming superpower: repetition. By mastering Go's for loop, you can now write code that iterates through sequences, retries operations, and performs computations that would be impossible to write out manually.
Key Takeaways:
- One Loop to Rule Them All: Go uses only the
forkeyword for all looping constructs. - Three Core Forms:
- Classic:
for i := 0; i < 10; i++ { ... } - "While" style:
for condition { ... } - Infinite:
for { ... }
- Classic:
- Flow Control: The
breakkeyword provides an immediate exit from a loop, whilecontinueskips the current iteration and proceeds to the next.
So far, we've been writing all our logic directly inside the main function or, as in the exercise, in other functions within the same file. This can get messy quickly. In our next lesson, we will formalize our understanding of functions, learning how to define them with parameters and multiple return values. This will allow us to create modular, reusable, and much more organized programs.