Hello! In our last lesson, we focused on functions, learning how to define them, pass in data, and receive multiple values in return. We've been using functions from the fmt package, like fmt.Println and fmt.Printf, to see the results of our code, but we haven't yet explored what they can really do.
This lesson changes that. We will take a deep dive into the fmt package, which is your primary tool for printing to the console and formatting strings. For a backend developer, mastering this is essential for everything from logging and debugging to generating formatted text output. We'll start with the basics of printing and then move on to the powerful formatting "verbs" that give you precise control over how your data is displayed.
1. The Three Musketeers of Printing: Print, Println, and Printf
The fmt package provides several functions for output, but three are used constantly:
fmt.Print(): Prints its arguments to the console. It does not add a newline character at the end.fmt.Println(): Does the same asPrint, but it adds a space between its arguments and, crucially, adds a newline character at the end.fmt.Printf(): Prints a formatted string. It takes a template string with special placeholders (called "verbs") and substitutes them with the values of subsequent arguments. It also does not add a newline by default.
Let's watch a short video from the Net Ninja channel that clearly demonstrates the differences between these functions.
Go (Golang) Tutorial #4 - Printing & Formatting Strings
This video provides a great hands-on introduction to the core printing functions in the fmt package.
First, watch the segment that contrasts fmt.Print with fmt.Println to understand the automatic newline behavior. Pay attention to how the \n escape character is used to add newlines manually. You can watch from the beginning. Next, watch the introduction to fmt.Printf and the concept of formatted strings using variables from this section.
2. Formatted Printing with Printf
As you saw in the video, fmt.Printf is where the real power lies. It allows you to create complex strings by embedding variables directly into them. This is done using format specifiers, or "verbs," which are placeholders that start with a % character.
Your experience with Python's f-strings or the .format() method is conceptually similar, but Go's syntax is inherited from the C programming language, which is common across many systems programming languages.
The Go-To Verb: %v
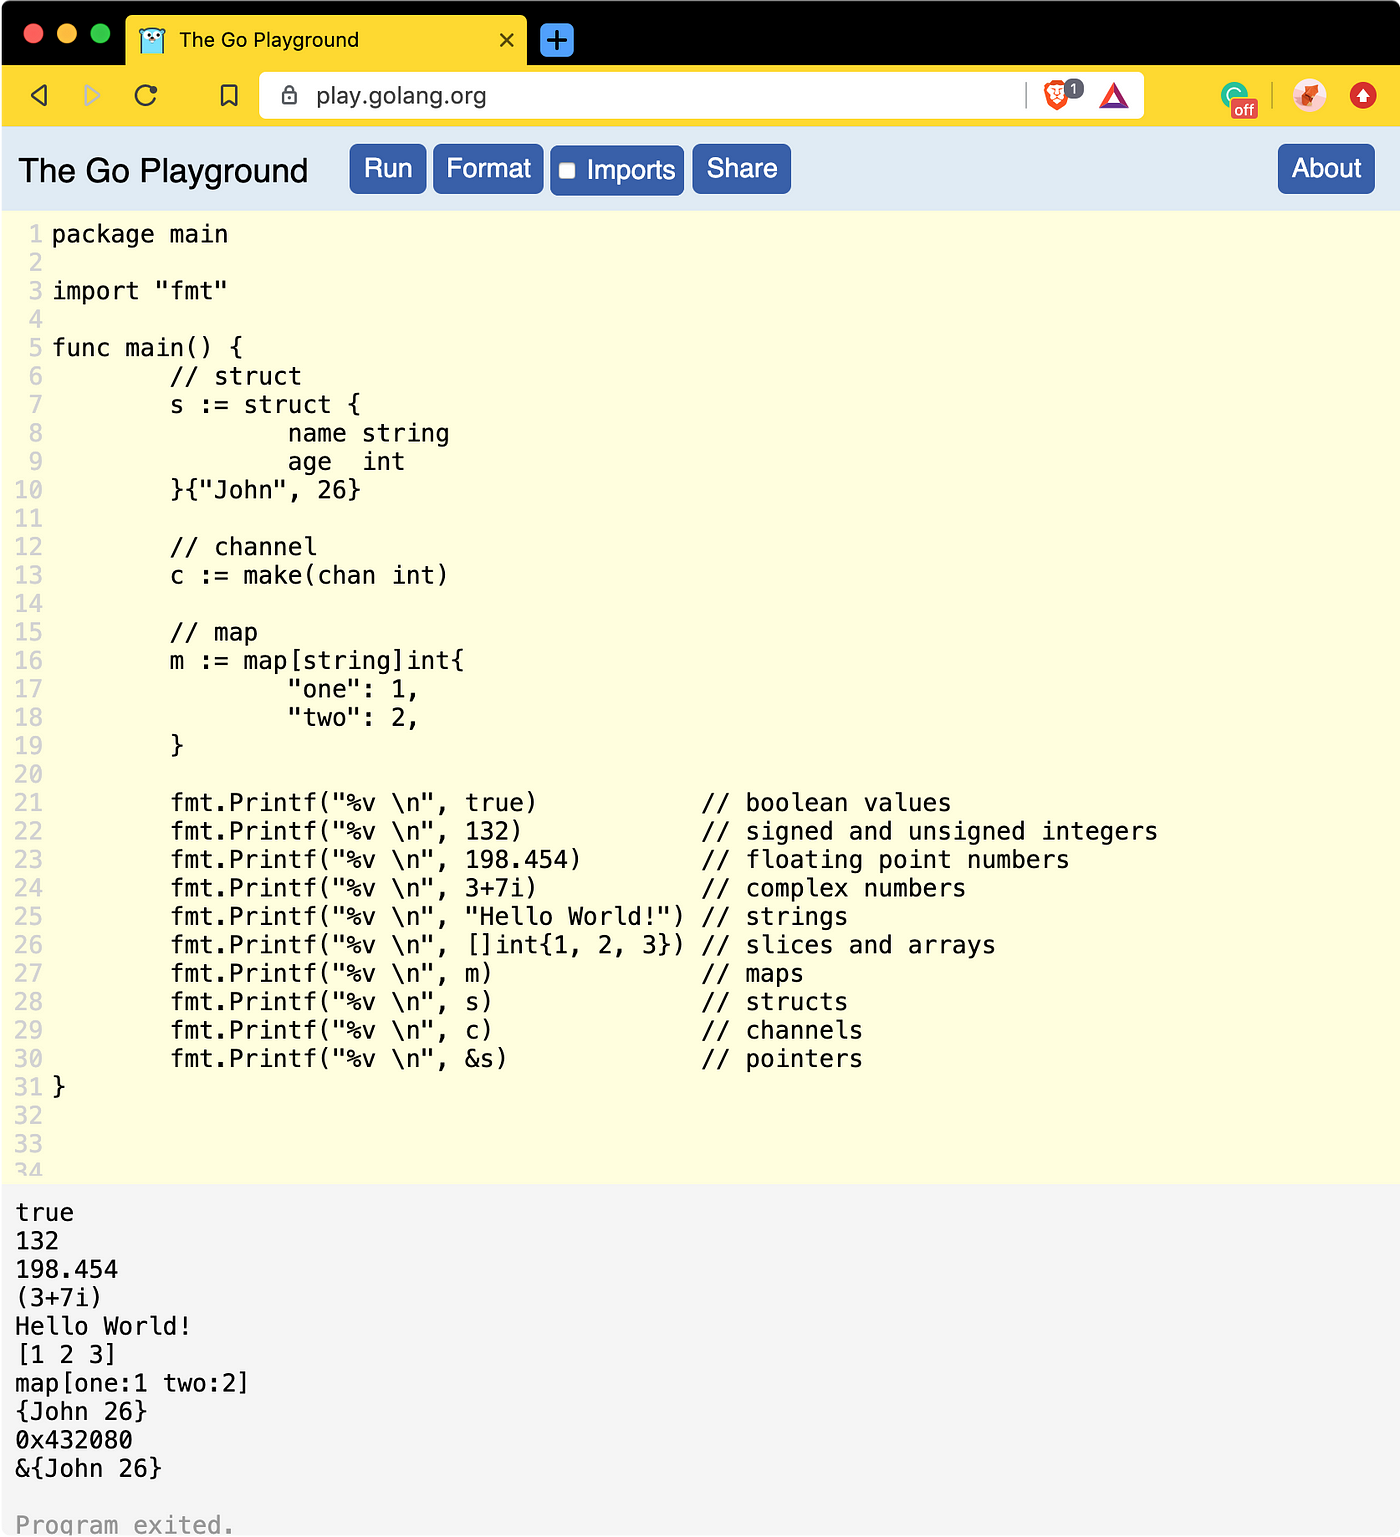
The most versatile verb is %v. It formats the value in a default, natural format. It's incredibly useful for quick debugging because it can handle almost any data type you give it.
The following image from the Go Playground demonstrates just how flexible %v is. It prints booleans, numbers, strings, and even more complex data structures like slices, maps, and structs, which we will cover in the next module.
3. A Systematic Guide to Formatting Verbs
While %v is great for general use, fmt provides a rich set of verbs for more specific and controlled formatting. As you requested, we'll use "Go by Example" as our main reference to explore these options systematically. This resource provides a comprehensive tour of the most common formatting tasks.
Go by Example: String Formatting
This guide from "Go by Example" is an excellent, compact reference for all the major formatting verbs and options in Go. We'll walk through it section by section.
Please read through the examples on this page. Focus on understanding what each verb does. Start with the general verbs (%v, %+v, %#v) and the type-printing verb %T. Next, review the verbs for booleans and integers (%t, %d, %b, %c, %x). Notice how you can represent the same number in different bases. Continue with the verbs for floats, strings, and pointers (%f, %e, %s, %q, %p). We haven't formally covered pointers yet, but %p is how you'd print the memory address of a variable. Then, focus on how to control width and precision. This is key for creating aligned, table-like output. Finally, read about Sprintf, which lets you format a string into a variable instead of printing it directly to the console.
To see these concepts in action again, the following video from Tech With Tim provides a great live-coding walkthrough of many of the same verbs and techniques.
Golang Tutorial #4 - Printing to Console & fmt
This video tutorial covers printf and sprintf with a focus on the different format specifiers. It's a good visual supplement to the "Go by Example" reading.
You can use the timestamps below to jump to specific topics if you want to review them: General Specifiers: Watch the overview of %v, %T, and %% from this section. Booleans: See the %t verb in action at 02:39. Integers: Learn about base formatting (%b, %o, %d, %x) from this part. Floats: Understand %e, %f, and %g from this part. Strings: See the difference between %s and %q at 08:06. Width and Precision: This is a very useful section on controlling padding and decimal places, from this section.
4. Practice: Printing a Formatted Receipt
Now it's time to put all this together. Your task is to write a program that prints a neatly formatted receipt for a list of items. This will require you to use several different format verbs, as well as width and precision specifiers to make sure everything lines up perfectly.
Instructions:
- Create a new file named
receipt.go. - In this file, you'll need a
structto represent a shopping item. Astructis a way to group related data together, which we will cover in detail in the next module. For now, you can use the one provided. - Your goal is to loop through a slice of these items and print them in a table format, then print the total.
- Use
fmt.Printfwith width and justification flags (e.g.,%-15s,%10d,%10.2f) to align the columns.
Code Skeleton:
package main

import "fmt"

// A struct to hold item information
type item struct {
	name     string
	price    float64
	quantity int
}

func main() {
	// A slice of items
	items := []item{
		{"Milk", 2.99, 2},
		{"Bread", 3.45, 1},
		{"Apples", 0.99, 5},
		{"Avocado", 1.25, 3},
	}

	totalCost := 0.0

	// Print the table header
	// TODO: Use Printf to print a header: "Item", "Quantity", "Price", "Total"
	// Use width specifiers to space them out. For example, a left-justified string of width 15 is "%-15s".
	fmt.Printf("%-15s %10s %10s %10s\n", "Item", "Quantity", "Price", "Total")
	fmt.Println("--------------------------------------------------")

	// Loop through the items and print each one
	for _, i := range items {
		// Calculate the total for this line item
		lineTotal := i.price * float64(i.quantity)

		// TODO: Use Printf to print the details for each item.
		// - The name should be a left-justified string.
		// - The quantity should be a right-justified integer.
		// - The price and lineTotal should be right-justified floats with 2 decimal places.
		fmt.Printf("%-15s %10d %10.2f %10.2f\n", i.name, i.quantity, i.price, lineTotal)

		// Add the line total to the overall totalCost
		totalCost += lineTotal
	}

	// Print the footer
	fmt.Println("--------------------------------------------------")

	// TODO: Use Printf to print the final "Total Cost", aligned with the "Total" column.
	fmt.Printf("%-15s %10s %10s %10.2f\n", "", "", "Total Cost", totalCost)
}
Expected Output:
Item              Quantity      Price      Total
--------------------------------------------------
Milk                     2       2.99       5.98
Bread                    1       3.45       3.45
Apples                   5       0.99       4.95
Avocado                  3       1.25       3.75
--------------------------------------------------
                               Total Cost    18.13
Conclusion
In this lesson, you've gained fine-grained control over your program's console output. This skill is not just for making things look pretty; it's a fundamental part of a backend developer's toolkit for creating clear logs, debugging information, and even simple command-line interfaces.
Key Takeaways:
- Core Printing Functions: You now know the difference between
fmt.Print,fmt.Println(for simple output), andfmt.Printf(for complex formatting). - Formatting Verbs: You are familiar with the common verbs like
%v(default),%d(integer),%f(float),%s(string), and%t(boolean). - Width and Precision: You can use specifiers like
%10.2fto control the width, alignment, and decimal precision of your output, enabling you to create clean, table-like text. Sprintf: You know how to usefmt.Sprintfto create a formatted string and store it in a variable for later use, which is invaluable for building log messages or API responses.
In the next lesson, we will formally introduce pointers. We got a small preview today with the %p verb, which prints a variable's memory address. Understanding pointers is a crucial step towards mastering Go, as they are fundamental to how the language manages memory and data efficiently.