Welcome to the next lesson in our journey to becoming a backend engineer. In our previous session, we mastered the essential skill of managing Python dependencies with pip and requirements.txt, ensuring our projects are reproducible and stable. This laid a critical piece of our local development foundation.
Today, we're shifting our focus from our own machine to how our application will communicate with the rest of the world. We will dive into the Hypertext Transfer Protocol (HTTP), the fundamental protocol that powers the web. This lesson directly addresses the learning outcome: Explain the HTTP request-response cycle and identify common HTTP methods and status codes. Understanding HTTP is non-negotiable for a backend developer; it is the language your Django servers will use to talk to browsers, mobile apps, and other services.
By the end of this 60-minute lesson, you will be able to trace the journey of a web request from a user's browser to a server and back, and you'll understand the meaning behind the essential commands and codes that govern this exchange.
1. The Foundation: The Client-Server Model
At its core, the web operates on a client-server model. A client (like your web browser) requests information or a service, and a server (a powerful computer running specialized software) provides it. HTTP is the protocol, or set of rules, that structures this conversation.
The entire interaction can be summarized as a request-response cycle:
- The client sends an HTTP Request to the server.
- The server processes the request.
- The server sends an HTTP Response back to the client.
This simple diagram illustrates the fundamental flow. Your browser is the client, and the server-side systems include the web server that receives the request and potentially a database it queries to fulfill that request.
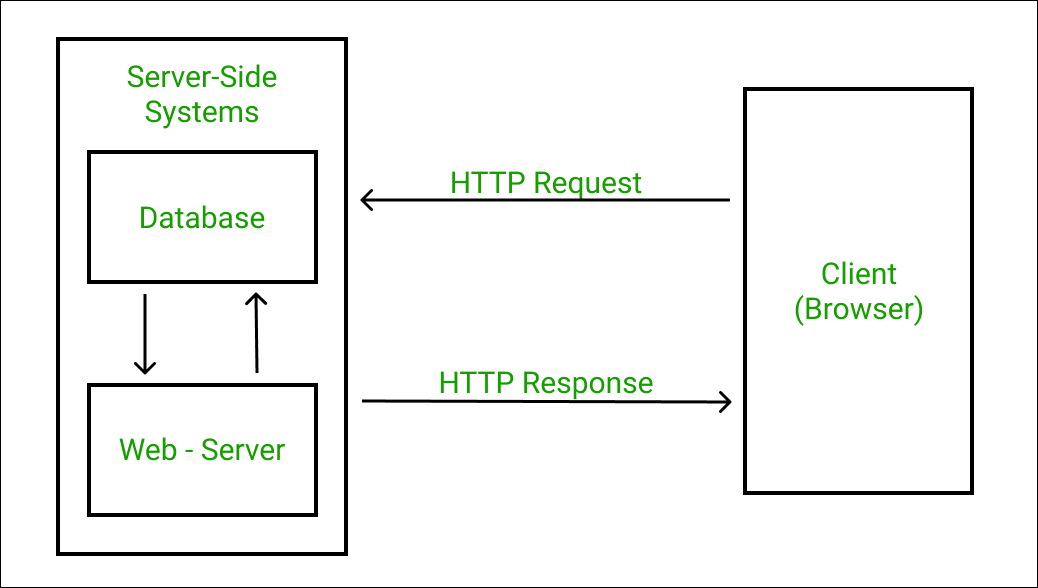
To get a solid grasp of this model, the Mozilla Developer Network (MDN) provides an excellent overview.
Overview of HTTP - MDN Web Docs
This document from MDN, the definitive resource for web developers, clearly explains the basic concepts of HTTP and the roles of the client and server.
Please read the first two main sections: Start with the initial introduction to understand HTTP's purpose. Continue to the section on system components. Pay close attention to the descriptions of the "Client: the user-agent" and "The Web server".
While this seems straightforward, several steps happen under the hood before an HTTP message is even sent. The article from DEV Community walks through this complete journey. It mentions Java, but the process described is universal for any backend technology, including the Python and Django stack you will be mastering.
Understanding the HTTP Request-Response Cycle
This article provides a more narrative walk-through of the entire cycle, adding useful context.
Focus on the section Initiating the Request. Read about how a URL is parsed, how the Domain Name System (DNS) works to find the server's address, and how a TCP connection is established. This gives you the full picture of what happens before your backend server even sees the request.
2. Anatomy of an HTTP Conversation
Now let's look at the structure of the HTTP messages themselves. Both requests and responses are made of plain text and have a similar structure: a start-line, headers, and an optional body.
The HTTP Request
A request message tells the server what the client wants to do. It consists of:
- Request-Line: Specifies the HTTP Method, the path to the resource, and the HTTP version. For example:
GET /products/123 HTTP/1.1. - Headers: Key-value pairs providing more information, like what kind of response the client accepts (
Accept: application/json) or authentication details (Authorization: Bearer ...). - Body (Optional): Contains data being sent to the server, used with methods like
POST.
The HTTP Method (or verb) is the most critical part, as it defines the intended action. The Traversy Media video below gives a great introduction to the main methods you'll use constantly as a backend developer.
HTTP Crash Course & Exploration
Brad Traversy provides a clear, practical explanation of the four primary HTTP methods.
Watch the segment from HTTP Methods to learn about GET, POST, PUT, and DELETE. Note the specific use case for each one.
To summarize the most common methods:
GET: Retrieves data from the server. (e.g., loading a user's profile page). This is generally a read-only operation.POST: Submits new data to be created on the server. (e.g., submitting a registration form).PUT: Updates an existing resource completely. (e.g., replacing a user's entire profile with new information).DELETE: Removes a resource from the server. (e.g., deleting a blog post).PATCH: Partially updates an existing resource. (e.g., changing only a user's email address, not their whole profile).
The HTTP Response
After processing the request, the server sends back a response, which includes:
- Status-Line: Contains the HTTP version, a status code, and a reason phrase. For example:
HTTP/1.1 200 OK. - Headers: Key-value pairs providing information about the response, such as the type of content being sent (
Content-Type: text/html). - Body (Optional): The actual content requested, like an HTML page, JSON data, or an image file.
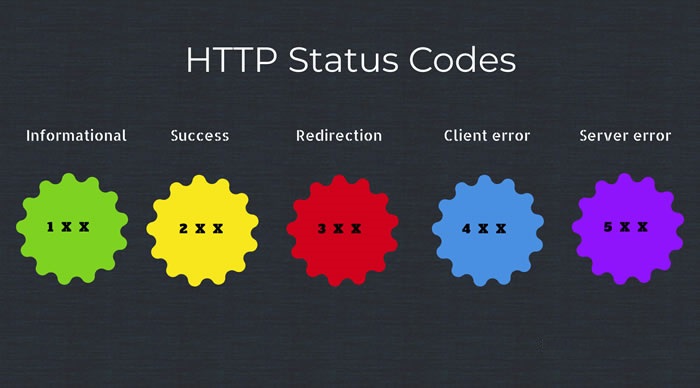
The Status Code is a three-digit number that tells the client the result of its request. Understanding these codes is crucial for debugging. This image gives a quick overview of the five main categories.
The ByteByteGo channel has an excellent, fast-paced video that explains the most important codes you need to know.
HTTP Status Codes Explained In 5 Minutes
This video uses simple analogies to make the meaning of different status codes very clear and memorable.
Watch the entire video, paying attention to the examples for each category: Success codes (2xx), like 200 OK and 201 Created. Client Error codes (4xx), like 400 Bad Request, 401 Unauthorized, 403 Forbidden, and the famous 404 Not Found. Server Error codes (5xx), such as 500 Internal Server Error. Redirection codes (3xx), explaining 301 Moved Permanently.
Here are the essential status codes you should commit to memory:
200 OK: The request was successful. The classic "everything worked."201 Created: The request was successful, and a new resource was created as a result (e.g., after aPOSTrequest).204 No Content: The server successfully processed the request but has no content to send back (e.g., after aDELETErequest).400 Bad Request: The server cannot process the request due to a client error (e.g., malformed syntax or invalid data in the request body).401 Unauthorized: The client must authenticate itself to get the requested response.403 Forbidden: The client does not have access rights to the content. The server knows who you are, but you're still not allowed.404 Not Found: The server cannot find the requested resource.500 Internal Server Error: The server encountered an unexpected condition that prevented it from fulfilling the request. This is a generic "something went wrong on our end" error.
3. Hands-On: See HTTP in Action
Theory is great, but let's see this happen in real-time. Your browser's developer tools are a powerful window into the HTTP conversations happening behind every webpage you visit.
Let's use the developer tools to inspect a real HTTP request and response. The "HTTP Crash Course" video we watched earlier has a perfect demonstration.
HTTP Crash Course & Exploration
This part of the video will walk you through using the Network tab in your browser's developer tools to inspect live HTTP traffic.
Watch the segment from Developer Tools Demo. Follow along with the steps in your own browser.
Your Task:
- Open a new tab in your browser and go to a website like
https://github.com. - Open the developer tools. You can usually do this by right-clicking anywhere on the page and selecting "Inspect," or by pressing
F12orCtrl+Shift+I(Windows/Linux) /Cmd+Opt+I(Mac). - Click on the Network tab.
- Reload the page (press
F5orCtrl+R/Cmd+R). You will see a long list of requests appear. - Click on the very first request in the list (it should be the main document for the page you loaded, e.g.,
github.com). - A new panel will open. Explore the Headers tab. Can you find the following?
- Request URL: The full URL you requested.
- Request Method: It should be
GET. - Status Code: It should be
200. - Response Headers: Look for
Content-Type. What is its value? - Request Headers: Look for
User-Agent. This tells the server about your browser.
- Now, try to generate a
404 Not Founderror. In the URL bar, type a non-existent address likehttps://github.com/this-page-does-not-existand press Enter. Look at the new entry in the Network tab. What is its status code?
This hands-on exercise makes the abstract concepts of headers, methods, and status codes tangible and shows you exactly what your future backend applications will be producing and consuming.
Conclusion
In this lesson, we've demystified the fundamental protocol of the web. You now understand that every web interaction is a structured conversation between a client and a server, governed by the rules of HTTP.
Key Takeaways:
- The web operates on a client-server model using a request-response cycle.
- HTTP Methods (
GET,POST,PUT,DELETE) define the action the client wants the server to perform. - HTTP Status Codes (
200,404,500, etc.) communicate the outcome of the request. - Your browser's Developer Tools are an indispensable utility for inspecting and debugging this HTTP traffic.
This knowledge is the bedrock for our next topic. Now that we understand the vocabulary of HTTP, we can learn the grammar. In the next lesson, we will explore the basic principles of RESTful API design. REST (Representational State Transfer) is an architectural style that uses HTTP methods and status codes in a standardized way to build scalable and predictable web APIs—exactly what you'll be doing at a company like Infilect.