In our last session, you mastered the art of making Celery tasks resilient by implementing automatic retries with exponential backoff. Your backend can now gracefully handle temporary failures, a crucial feature for any robust system. However, all our tasks so far have been triggered manually by a user's web request. What about tasks that need to run automatically, without any user intervention, like generating a daily sales report or cleaning up expired user sessions?
This lesson introduces Celery Beat, the scheduler component of the Celery ecosystem. You'll learn how to automate your backend processes by scheduling tasks to run at specific intervals or times. This skill is fundamental to building automated systems and directly addresses the Infilect job requirement to "handle automation, asynchronous processing" at scale.
By the end of this lesson, you will be able to:
- Explain the role of Celery Beat in a distributed task queue architecture.
- Schedule a simple task to run at a fixed interval using Django's settings.
- Use
crontabschedules for more complex, time-based scheduling. - Set up and use
django-celery-beatto manage periodic tasks from the Django Admin interface.
1. The Architecture of Automation
So far, your Django application has been the "producer," creating tasks and placing them on the Redis queue. Celery Beat introduces a second type of producer. It's a separate process whose only job is to act like a clock. It doesn't execute tasks itself; it simply checks its schedule and, when the time is right, places the scheduled task onto the message queue. From there, a Celery worker picks it up just like any other task.
Let's look at the full architecture, now including Celery Beat.
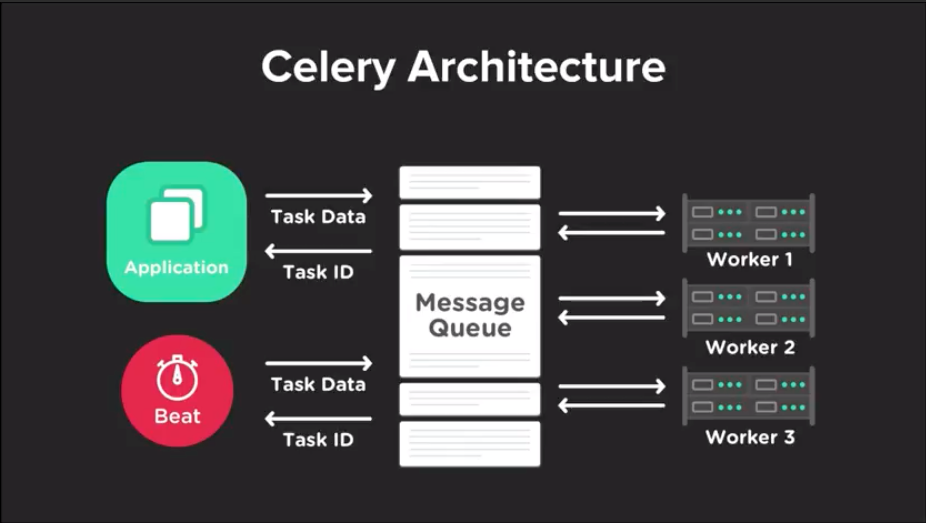
To run a fully automated system, you will need to have three services running simultaneously:
- Your Django web server.
- Your Celery worker(s).
- The Celery Beat scheduler.
2. Scheduling Tasks from Django Settings
The most direct way to schedule tasks is by defining the schedule within your Django project's settings.py file. This approach is excellent for static schedules that are integral to your application's logic and don't need to be changed often.
Let's create a new, simple task and schedule it to run every 30 seconds.
Step 2.1: Create a Periodic Task
First, open myapi/tasks.py and add a new task that simply logs a message. This will be our test subject for scheduling.
# myapi/tasks.py
from celery.utils.log import get_task_logger


# ... other imports and tasks ...

logger = get_task_logger(__name__)

@shared_task(name="periodic_log_task")
def periodic_log_task():
    """
    A simple task that logs a message.
    """
    logger.info("Heartbeat: Periodic task is running!")
I've given this task a custom name. While optional, it can make identifying tasks in logs and monitoring tools easier.
Step 2.2: Configure the Beat Schedule
Now, open myproject/settings.py and add the CELERY_BEAT_SCHEDULE configuration at the bottom, with your other Celery settings.
Handling Periodic Tasks in Django with Celery and Docker
The TestDriven.io article provides a clear example of how to configure CELERY_BEAT_SCHEDULE. We will follow this pattern.
Read the section Schedule the Task. It shows how to define a schedule using crontab. We'll start with an even simpler timedelta and then use crontab.
In myproject/settings.py, add the following:
# myproject/settings.py
from celery.schedules import crontab


# ... other settings ...


# Celery Beat Settings
CELERY_BEAT_SCHEDULE = {
    'log-every-30-seconds': {
        'task': 'periodic_log_task', # The name we gave our task
        'schedule': 30.0, # Run every 30 seconds
    },
}
Here, we've defined a schedule named log-every-30-seconds. We've pointed it to our periodic_log_task and set the schedule to 30.0, which Celery interprets as seconds.
Step 2.3: Run All The Things!
This is the moment of truth. You need to run three separate processes in three separate terminals. Make sure your virtual environment is activated in each one.
-
Terminal 1: Django Server
python manage.py runserver -
Terminal 2: Celery Worker (You've run this before)
celery -A myproject worker -l info -
Terminal 3: Celery Beat (This is the new one)
celery -A myproject beat -l info
After starting all three, watch the logs.
- The Beat terminal will show log entries like
Scheduler: Sending due task log-every-30-seconds. - The Worker terminal will then show that it has received and executed the task, printing our "Heartbeat" message.
This will repeat every 30 seconds, confirming your automated task is running!
3. Advanced Scheduling with Crontab
Running a task every N seconds is useful, but often you need more control, such as "run this task every day at midnight." This is where crontab schedules come in.
Modify your CELERY_BEAT_SCHEDULE in settings.py to use crontab. Let's change the schedule to run every minute.
# myproject/settings.py

CELERY_BEAT_SCHEDULE = {
    'log-every-minute': {
        'task': 'periodic_log_task',
        'schedule': crontab(minute='*/1'), # Run every minute
    },
}
Stop and restart your Celery Beat process (Ctrl+C in Terminal 3, then run the command again). It will pick up the new schedule and start dispatching the task once every minute. The crontab function is incredibly powerful, allowing you to specify minute, hour, day of week, day of month, and month of year.
4. The Production Way: Database-Backed Schedules
Hardcoding schedules in settings.py is simple, but inflexible. What if you need to change a schedule's timing or disable a task without redeploying your entire application? The solution is to store schedules in the database. The django-celery-beat extension provides exactly this functionality, even giving you a nice interface in the Django Admin.
Let's set this up.
Getting Started With Django Celery Beat
The video "Getting Started With Django Celery Beat" by Pretty Printed gives a concise walkthrough of setting up database-backed schedules. We'll follow these steps.
Watch the section on installation and migration. Then, see the new admin tables that are created. Finally, see the command to start Celery Beat with the database scheduler. We'll configure this in our settings to avoid typing the long command.
Step 4.1: Install and Configure django-celery-beat
- Stop all your running processes.
- Install the package:
pip install django-celery-beat - Add it to your
INSTALLED_APPSinmyproject/settings.py:INSTALLED_APPS = [ # ... 'myapi', 'django_celery_beat', # Add this ] - Run migrations to create the necessary database tables:
python manage.py migrate - Finally, tell Celery Beat to use the database as its source for schedules instead of the settings file. Add this line to
myproject/settings.py:# myproject/settings.py CELERY_BEAT_SCHEDULER = 'django_celery_beat.schedulers:DatabaseScheduler'
Step 4.2: Schedule a Task via Django Admin
With this configuration, the CELERY_BEAT_SCHEDULE dictionary in your settings file is now ignored. You can comment it out or delete it. All scheduling will now be done through the admin interface.
- Start your Django server (
python manage.py runserver) and log in to the admin panel (http://127.0.0.1:8000/admin/). - You'll see a new section called PERIODIC TASKS.
- First, let's create a schedule. Click on Intervals and then "Add interval schedule".
- Every: 15
- Period: Seconds
- Click Save.
- Now, go back to the admin home and click on Periodic tasks and "Add periodic task".
- Name: A descriptive name, e.g., "Log heartbeat from admin".
- Task (registered): A dropdown will show all discovered tasks. Select
periodic_log_task. - Interval: Select the "every 15 seconds" interval you just created.
- Click Save.
Step 4.3: Run the System
Now, start your three services again: the Django server, the Celery worker, and the Celery Beat scheduler. The commands are the same as before.
Because you set CELERY_BEAT_SCHEDULER, the celery beat process will now connect to your Django database, find the "Log heartbeat from admin" task you just created, and start sending it to the queue every 15 seconds. You can now enable, disable, or change schedules directly from the admin panel, and Celery Beat will pick up the changes automatically without a restart!
Conclusion
You have now mastered the fundamentals of backend automation with Celery. You've learned how to schedule tasks using both static configuration in settings.py and, more powerfully, using a database-backed scheduler that can be managed dynamically through the Django admin.
Key Takeaways:
- Celery Beat is a scheduler that enqueues tasks; it does not execute them.
- A complete Celery system with periodic tasks requires three running services: the web server, the worker, and the beat scheduler.
- Schedules can be defined in
settings.pyusingCELERY_BEAT_SCHEDULE, which is good for simple, static schedules. - Using
django-celery-beatprovides a flexible, database-driven approach to manage schedules through the Django Admin, which is ideal for production environments.
In the next module, we'll shift our focus. You've built a robust backend infrastructure for handling complex, asynchronous jobs. Now it's time to start integrating the "intelligence" that a company like Infilect is built on: Machine Learning models. We'll begin by understanding the core concepts of ML and how a backend system interacts with pre-trained models.