Welcome to Module 10. In our journey so far, we have built a robust Django backend for our retail intelligence platform. We started with the fundamentals, designed a data model, built a REST API, and even implemented a sophisticated state machine to manage our annotation pipeline. Your application now has several moving parts: the Django web server, a PostgreSQL database, and a Redis instance powering our Celery workers for asynchronous tasks.
Currently, this entire setup runs directly on your local machine. This approach is fragile. What happens when a new developer joins the team? They would need to manually install PostgreSQL, Redis, and the correct Python version with all its dependencies. Any small difference in their setup could lead to bugs. This is the classic "it works on my machine" problem. Today, we take the first and most crucial step toward professional deployment and scalability by learning to containerize our application.
This lesson introduces Docker and Docker Compose. You will learn to package your application and its services into isolated, portable units called containers. This ensures that your application runs identically everywhere—on your machine, on your teammate's machine, and most importantly, in the cloud. This directly addresses the "builds scalable backend/cloud applications" and lays the foundation for "deployment and monitoring" requirements from the Infilect job description.
By the end of this lesson, you will be able to:
- Explain the role of Docker in creating portable application environments.
- Write a
Dockerfileto create a standard image for your Django application. - Configure your Django project to use environment variables for database and service connections.
- Write a
docker-compose.ymlfile to define and run your entire application stack (web, database, cache, workers) with a single command.
What is Containerization?
Imagine you're shipping goods across the ocean. In the past, you'd have barrels, crates, and sacks of all different sizes, making them difficult to load, stack, and transport. The modern solution is the standardized shipping container. You put your goods inside, and from the outside, all containers look and behave the same, regardless of their contents.
Docker brings this concept to software. A Docker container packages your application code along with all its dependencies—libraries, system tools, and runtime—into a single, isolated unit. This unit, the container, can run on any machine that has Docker installed, solving the "it works on my machine" problem.
Our application isn't just one service; it's a collection of services that need to work together. This is where Docker Compose comes in. It's a tool for defining and running multi-container Docker applications. With a single configuration file, you can describe how your Django app, PostgreSQL database, and Redis cache connect and run together.
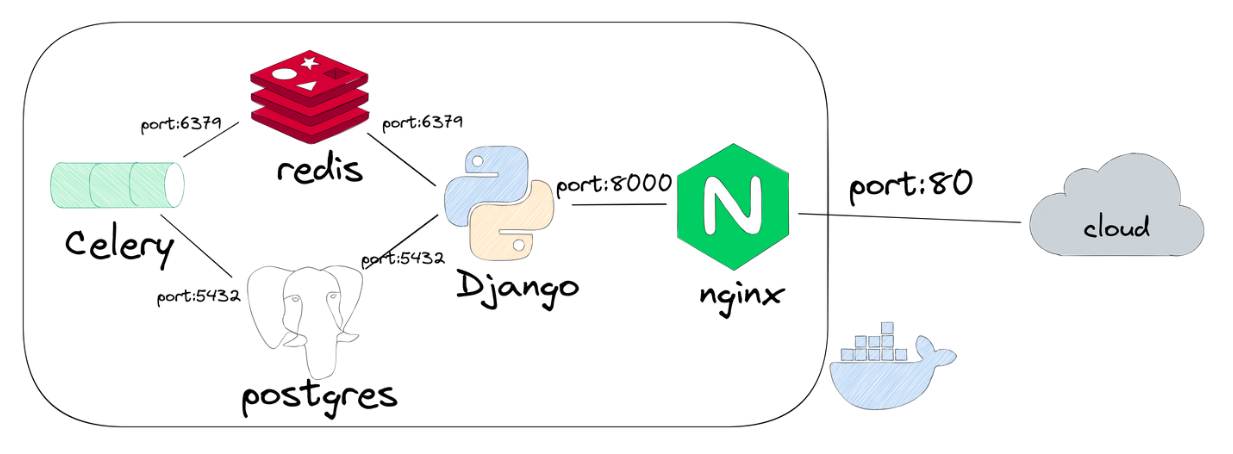
This diagram illustrates the architecture we're aiming to build, with each service running in its own container, orchestrated by Docker.
Step 1: Writing the Dockerfile for Django
The first step is to create a blueprint for our Django application container. This blueprint is a text file named Dockerfile. It contains a series of instructions that Docker follows to build a container image.
Create a new file named Dockerfile in the root directory of your project (the same directory that contains manage.py and your requirements.txt).
# Dockerfile


# Use an official Python runtime as a parent image
FROM python:3.12-slim


# Set environment variables to prevent Python from writing .pyc files
# and to run in unbuffered mode, which is recommended for containers
ENV PYTHONDONTWRITEBYTECODE=1
ENV PYTHONUNBUFFERED=1


# Set the working directory in the container
WORKDIR /app


# Install dependencies
# This is done in a separate step to leverage Docker's layer caching.
# The requirements are only re-installed if requirements.txt changes.
COPY requirements.txt .
RUN pip install -r requirements.txt


# Copy the rest of the application's source code from your host to your image
COPY . .


# Expose the port the app runs on
EXPOSE 8000


# The command to run when the container starts.
# For development, we use Django's built-in server.
# For production (in a later module), this will be replaced with Gunicorn.
CMD ["python", "manage.py", "runserver", "0.0.0.0:8000"]
Let's break down these instructions.
Docker - Django and PostgreSQL setup (with uv) from scratch!
The video "Docker - Django and PostgreSQL setup" by BugBytes provides an excellent from-scratch explanation of creating a Dockerfile for a Django project.
Watch the section that walks through building a Dockerfile step-by-step. Focus on the explanation for each command: FROM: Understand why we start with a base image. ENV and WORKDIR: Learn the purpose of these common environment and directory instructions. Layer Caching: Pay close attention to this part. It explains the crucial optimization of copying requirements.txt and installing dependencies before copying the rest of your code. EXPOSE and CMD: Understand how you declare the container's port and define its startup command. Note the use of 0.0.0.0 to make the server accessible from outside the container.
Step 2: Preparing Django for a Containerized Environment
Our settings.py currently has hardcoded values for the database, likely pointing to localhost. In Docker Compose, our services will have names like db and redis, and their IP addresses are managed by Docker. We need to make our Django settings flexible by reading these values from environment variables.
We'll use a popular package called django-environ for this.
-
Install the package:
pip install django-environ psycopg2-binarypsycopg2-binaryis the Python driver for PostgreSQL, which we'll need now that we're connecting to a proper PostgreSQL server instead of the development SQLite database. -
Update
requirements.txt:pip freeze > requirements.txt -
Create a
.envfile: In your project root, create a file named.env. This file will store our local development secrets and configuration. Crucially, add.envto your.gitignorefile immediately! This file should never be committed to version control.# .env # Django settings SECRET_KEY='your-development-secret-key-here' DEBUG=True # Database settings DATABASE_URL='postgres://user:password@db:5432/dbname' # Redis/Celery settings CELERY_BROKER_URL='redis://redis:6379/1'- Replace the values for
user,password, anddbnamewith ones you'll use. For example:postgres://infilytics:infilytics@db:5432/infilytics. - Notice the hostnames are
dbandredis. These are the service names we will define in Docker Compose.
- Replace the values for
-
Update
settings.py:
Now, let's modify your mainsettings.pyfile to read from this.envfile.
How to Set Up a Django + PostgreSQL + Redis Stack with Docker ...
The OneUptime blog provides a clean example of configuring Django settings to use django-environ.
Focus on the settings file example. You'll adapt this pattern to your own project. You need to import environ, initialize it, and then replace your hardcoded SECRET_KEY, DEBUG, DATABASES, and CELERY_BROKER_URL with calls to env().
Here is how your modified settings.py should look. Place this at the top of the file.
# infilytics/settings.py

import os
import environ # Add this import


# Initialize django-environ
env = environ.Env(


    # set casting, default value
    DEBUG=(bool, False)
)


# Assuming your .env file is in the project root
BASE_DIR = os.path.dirname(os.path.dirname(os.path.abspath(__file__)))
environ.Env.read_env(os.path.join(BASE_DIR, '.env'))


# --- Replace your existing settings with these ---


# SECURITY WARNING: keep the secret key used in production secret!
SECRET_KEY = env('SECRET_KEY')


# SECURITY WARNING: don't run with debug turned on in production!
DEBUG = env('DEBUG')

ALLOWED_HOSTS = ['*'] # For development; will be tightened in production


# ... your INSTALLED_APPS, MIDDLEWARE etc. ...


# --- Replace DATABASES config ---
DATABASES = {
    'default': env.db('DATABASE_URL')
}


# --- Replace Celery config ---
CELERY_BROKER_URL = env('CELERY_BROKER_URL')
CELERY_RESULT_BACKEND = env('CELERY_BROKER_URL') # Often the same as the broker
CELERY_ACCEPT_CONTENT = ["json"]
CELERY_TASK_SERIALIZER = "json"
Step 3: Orchestrating with docker-compose.yml
Now for the main event: the docker-compose.yml file. This file describes our entire application stack. Create it in your project root.
# docker-compose.yml
version: "3.8"

services:
  db:
    image: postgres:16-alpine
    volumes:
      - postgres_data:/var/lib/postgresql/data/
    environment:
      - POSTGRES_DB=infilytics
      - POSTGRES_USER=infilytics
      - POSTGRES_PASSWORD=infilytics
    healthcheck:
      test: ["CMD-SHELL", "pg_isready -U infilytics -d infilytics"]
      interval: 10s
      timeout: 5s
      retries: 5

  redis:
    image: redis:7-alpine
    healthcheck:
      test: ["CMD", "redis-cli", "ping"]
      interval: 10s
      timeout: 5s
      retries: 5

  web:
    build: .
    command: python manage.py runserver 0.0.0.0:8000
    volumes:
      - .:/app # Mount current directory to /app in container for live reload
    ports:
      - "8000:8000"
    env_file:
      - ./.env
    depends_on:
      db:
        condition: service_healthy
      redis:
        condition: service_healthy

  celery-worker:
    build: .
    command: celery -A infilytics worker -l info
    volumes:
      - .:/app
    env_file:
      - ./.env
    depends_on:
      web: # Worker depends on the app code
        condition: service_started
      redis:
        condition: service_healthy

  celery-beat:
    build: .
    command: celery -A infilytics beat -l info
    volumes:
      - .:/app
    env_file:
      - ./.env
    depends_on:
      web:
        condition: service_started
      redis:
        condition: service_healthy

volumes:
  postgres_data:
This file defines five services. Let's analyze the web and db services in detail.
Docker - Django and PostgreSQL setup (with uv) from scratch!
The same BugBytes video provides a wonderfully clear walkthrough of creating a docker-compose.yml file.
Watch these two key segments: Web Service: This explains the build, ports, and volumes directives for the Django container. The concept of a bind mount for live-reloading is very important for development. DB Service: This covers defining the PostgreSQL service using a pre-built image, using a named volume for data persistence, passing environment variables, and, critically, setting up healthcheck and depends_on to ensure the database is ready before the app starts.
Step 4: Launching the Application
You've defined the entire stack. Now, you can bring it to life with a single command. Make sure you have Docker Desktop installed and running on your machine.
-
Build and Run the Services:
Open a terminal in your project root and run:docker compose up --buildThe
--buildflag tells Docker Compose to build the image from yourDockerfilefor the first time or if theDockerfilehas changed. You will see a flood of logs as Docker pulls thepostgresandredisimages, builds yourwebimage, and starts all the containers. -
Run Database Migrations:
The services are running, but your new PostgreSQL database is empty. You need to run migrations. Open a second terminal (leave the first one running) and execute the following command:docker compose exec web python manage.py migratedocker compose execallows you to run a command inside a running container. Here, we're targeting thewebservice to run our standardmigratecommand. -
Create a Superuser (Optional but Recommended):
docker compose exec web python manage.py createsuperuser -
Verify Everything!
Your application should now be running.- Navigate to
http://127.0.0.1:8000/in your browser. You should see your Django API. - Navigate to
http://127.0.0.1:8000/admin/and log in with your new superuser credentials.
- Navigate to
To stop all the services, go back to the first terminal and press Ctrl+C. To stop them and remove the containers, you can run docker compose down.
Conclusion
Congratulations! You have successfully containerized your entire Django application stack. You've packaged the web application into a portable Docker image and used Docker Compose to orchestrate it with its database and caching dependencies. This is a monumental step in your journey as a backend engineer. Your development environment is now reproducible, isolated, and mirrors the structure of a modern production deployment.
Key Takeaways:
- A
Dockerfileis a recipe for building a single, portable container image for an application. docker-compose.ymlis a manifest that defines and links multiple services (containers) to form a complete application stack.- Volumes are essential for persisting data (
postgres_data) and enabling live code reloading during development (.:/app). - Environment variables (
.envfile) are the standard way to provide configuration to containerized applications, decoupling code from configuration. - The
docker compose execcommand is your tool for running management commands likemigrateinside your running containers.
In the next lesson, we will take our containerized application and deploy it to the cloud. You will learn how to provision the fundamental AWS services required to host a web application: EC2 for compute power, RDS for a managed database, and S3 for object storage.