Hello! Welcome to the first lesson in our course on thyroid pathology. Given your background in pathology and your goal to confidently return to practice, we'll start with the most critical hands-on skill: the gross examination of thyroidectomy specimens.
This lesson focuses on establishing a systematic and reproducible routine. Mastering this foundational step is essential, as the quality of the gross examination directly impacts the accuracy of the final diagnosis and staging. We will cover how to orient, ink, and section thyroid specimens according to established protocols.
Let's begin.
1. Initial Handling and Orientation
The first step upon receiving a thyroidectomy specimen is to understand what you have. This involves noting the type of procedure performed, weighing and measuring the gland, and, most importantly, correctly orienting it.
You'll recall from your previous experience that surgeons use various procedures. It's always wise to check the clinical history or operative note.
To quickly refresh your memory on the common surgical procedures for the thyroid, please review the 'Surgical procedures' section from this Pathology Outlines article.
Read the short section titled 'Surgical procedures'. This will help contextualize the type of specimen you might receive.
Once you've identified the specimen type (e.g., hemi- or total thyroidectomy), the next task is orientation. Correct orientation is non-negotiable for assessing margins and locating lesions accurately.
Key orientation clues include:
- Surgical Sutures: Often placed on the superior pole. Always confirm this convention with the surgeon if possible.
- Anatomical Shape: The anterior surface is typically convex (bulging outward), while the posterior surface is concave. The superior poles are often more tapered than the broader inferior poles.
- Isthmus: The presence and location of the isthmus or the cauterized isthmic margin is a key landmark.

The following video provides an excellent practical demonstration of these initial steps.
Grossing Hemi-Thyroidectomy Pathology Specimens | Department of Pathology and Laboratory Medicine
Watch the beginning of this video from Weill Cornell Medicine's Department of Pathology and Laboratory Medicine. It provides a clear, step-by-step guide to orienting and measuring a hemithyroidectomy specimen.
Watch from 00:39 to 03:58. Pay close attention to how the pathologist uses both surgical sutures and anatomical features (convex/concave surfaces) for orientation. Also, note the systematic approach to measuring the lobe and the isthmic margin.
2. Inking the Surgical Margins
Inking creates a permanent map of the specimen's surfaces, allowing you to identify the true surgical margins under the microscope. While the specific colors may vary between institutions, the principle is to have a consistent, documented system.
A common protocol is to use different colors for the anterior, posterior, and isthmic margins.
[PDF] Head and Neck Pathology Grossing Guidelines - UCLA Health
For a clear, written example of a multi-color inking protocol, please review this section from the UCLA Health Grossing Guidelines.
Read the bullet points under 'Procedure', focusing on the inking protocol described: 'Ink: anterior blue, posterior black, orange isthmic margin'.
Now, let's see a slightly different but equally valid approach in practice.
Grossing Hemi-Thyroidectomy Pathology Specimens | Department of Pathology and Laboratory Medicine
Continuing with the Weill Cornell video, watch this segment to see the inking process demonstrated.
Watch from 03:58 to 05:27. Notice that they use a two-color system: black for the entire capsule and yellow for the isthmic margin. This reinforces the point that the specific system is less important than its consistent application.
The key takeaway is that no matter the color code, you must be systematic and document your scheme so that anyone examining the slides can correctly identify the location of any microscopic findings.
3. Systematic Sectioning
After inking, the specimen is ready for sectioning. The goal is to slice the gland thinly and sequentially to reveal any nodules or other abnormalities. A standard thickness is 2-3 mm per slice. This ensures that even small lesions are not missed.
The direction of your cuts is an important part of the protocol and often depends on the size of the primary nodule of interest.
- Nodules > 2 cm: A coronal section is often preferred initially. This provides a broad view of the nodule and its relationship to the anterior and posterior capsule, which is useful for assessing large, potentially encapsulated lesions without causing them to bulge and create artifacts.
- Nodules < 2 cm (or no dominant nodule): Transverse (axial) sections from superior to inferior are standard. This gives a good cross-sectional view of the parenchyma.
The following video demonstrates this decision-making process and the sectioning technique.
Grossing Hemi-Thyroidectomy Pathology Specimens | Department of Pathology and Laboratory Medicine
This part of the video explains the rationale for choosing a sectioning method and demonstrates the process.
Watch from 05:27 to 07:20 to understand why a coronal cut is made for a nodule >2 cm. Then, watch from 12:02 to 14:10 to see how, after the initial coronal cut, the two halves are then serially sectioned transversely to examine the entire gland.
After sectioning, the slices should be laid out in order, maintaining their orientation. This allows for a thorough examination of the cut surfaces and accurate documentation of any findings.
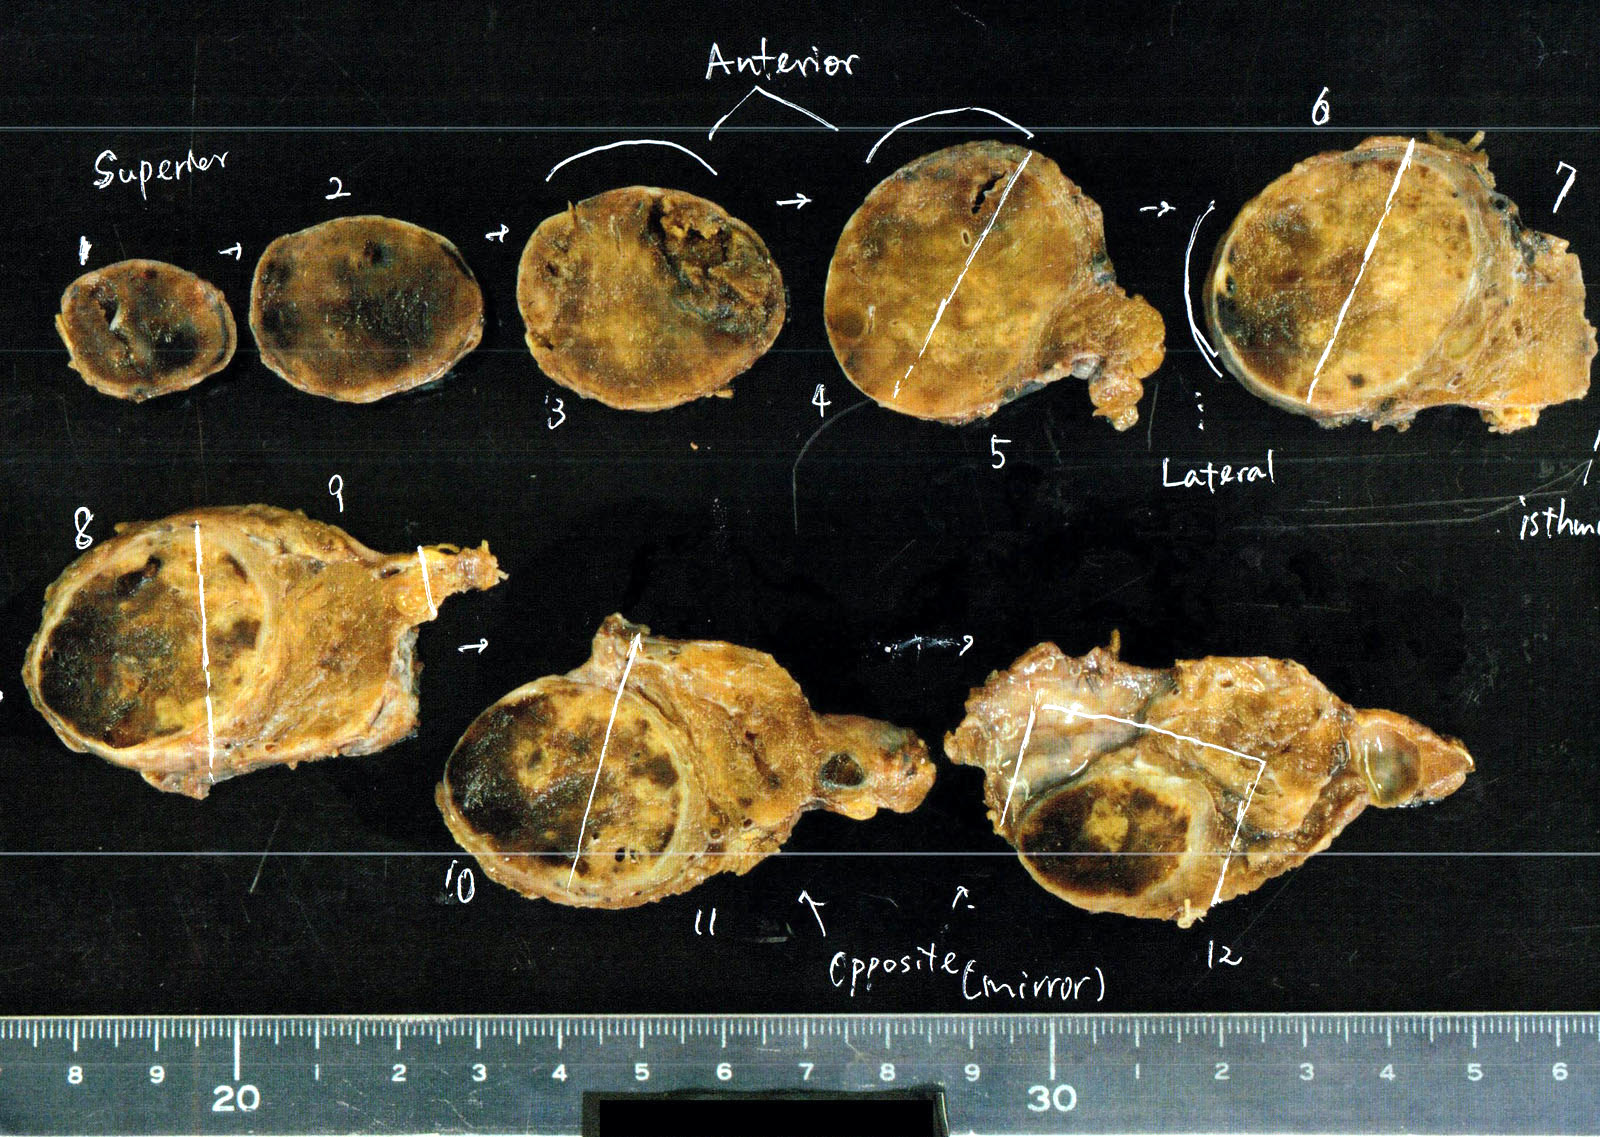
As you section, you must carefully describe the cut surfaces, noting the number, size, location, and characteristics (e.g., encapsulation, color, cystic change, calcification) of any nodules, as well as their distance to the inked margins.
Conclusion
In this lesson, we have refreshed the fundamental protocol for the gross examination of thyroidectomy specimens. A disciplined, systematic approach is the bedrock of accurate thyroid pathology.
Key Takeaways:
- Orientation is paramount: Use anatomical landmarks and surgical sutures to establish the superior/inferior and anterior/posterior axes before you make any cuts.
- Ink consistently: Apply a standard, documented inking scheme to mark all relevant surgical margins.
- Section methodically: Serially slice the gland at 2-3 mm intervals. The initial cutting plane (coronal vs. transverse) can be adapted based on the size of the primary lesion.
- Describe thoroughly: Document the gross findings from the cut surfaces, paying close attention to any nodules and their relationship to margins.
Now that the specimen has been properly oriented, inked, and sectioned, the next crucial step is deciding which pieces of tissue to submit for microscopic examination. This process of section selection is the topic of our next lesson. We will explore the evidence-based guidelines for sampling different types of lesions—from single encapsulated nodules to multinodular goiters—to ensure you capture all diagnostically and prognostically significant information.