Hello! Welcome to the first lesson of our second module, "Data Structures in Go."
In the previous module, we built a solid foundation covering Go's syntax, functions, and idiomatic error handling. Now, we'll shift our focus to how Go organizes and manages collections of data—a critical skill for any practical programming.
As a DevOps engineer, you constantly work with lists: lists of server hostnames, container IDs, log entries, or API endpoints. This lesson introduces slices, Go's powerful and flexible tool for managing such dynamic collections. We'll explore how to create them, add new items, and make safe, independent copies. This is the cornerstone for processing collections of data in your future Go tools.
What is a Slice? A View into an Array
You're familiar with lists in Python and arrays in Bash. Go's slices combine the flexibility of Python lists with the performance of low-level arrays.
The most important concept to grasp is that a slice is not an array. Instead, it's a lightweight data structure that provides a "view" into a section of an underlying array. This structure, often called a slice header, contains three pieces of information:
- A pointer to the first element of the underlying array that the slice can access.
- The length (
len), which is the number of elements the slice currently contains. - The capacity (
cap), which is the total number of elements in the underlying array from the start of the slice to the end of that array.
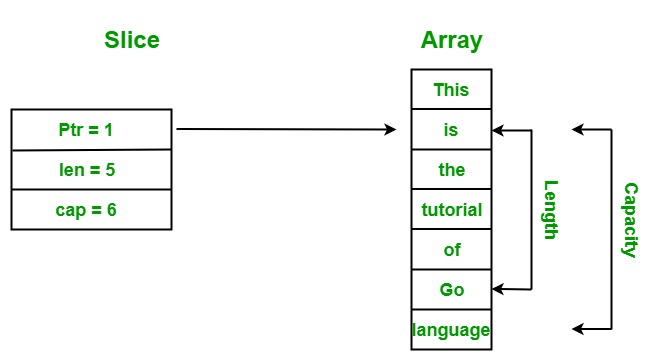
This design is what makes slices efficient. When you pass a slice to a function, you're only copying this small header, not the entire underlying array.
To solidify this core concept, read this section from the article 'Demystifying Golang Slices' by Andrei Boar. It clearly explains the internal structure of a slice.
Read the section titled 'The internal structure of a slice'. Focus on memorizing the three components: pointer, length, and capacity.
Creating Slices
Go provides a few straightforward ways to create slices. The method you choose depends on whether you know the elements upfront or need to allocate space dynamically.
Understanding Slices in Go: Dynamic Arrays in Action
This article, 'Understanding Slices in Go', provides excellent code examples for the three primary methods of slice creation.
Read the section 'Creating Slices'. Pay attention to the syntax for each of the three methods: using a composite literal, using make(), and slicing an existing array.
Let's summarize those three methods:
-
Composite Literal: Use this when you know the initial elements. Go automatically creates a backing array and a slice that points to it.
// len: 3, cap: 3 servers := []string{"web-01", "db-01", "cache-01"} -
Using
make(): This is the idiomatic way to create an empty slice with a predefined length and capacity. This is highly useful for performance when you know roughly how many items you'll be adding, as it can prevent repeated memory reallocations.// Create a slice to hold up to 100 log entries. // len: 0 (it's empty), cap: 100 (space is pre-allocated). logs := make([]string, 0, 100) -
Slicing an Existing Array or Slice: You can create a new slice from an existing one. The new slice will share the same underlying array.
// Create a new slice containing just the database and cache servers.
// dbAndCache shares the backing array with the 'servers' slice.
dbAndCache := servers[1:3] // Contains {"db-01", "cache-01"}
Managing Slices with append
The append built-in function is how you add elements to a slice. This is where the dynamic nature of slices comes into play.
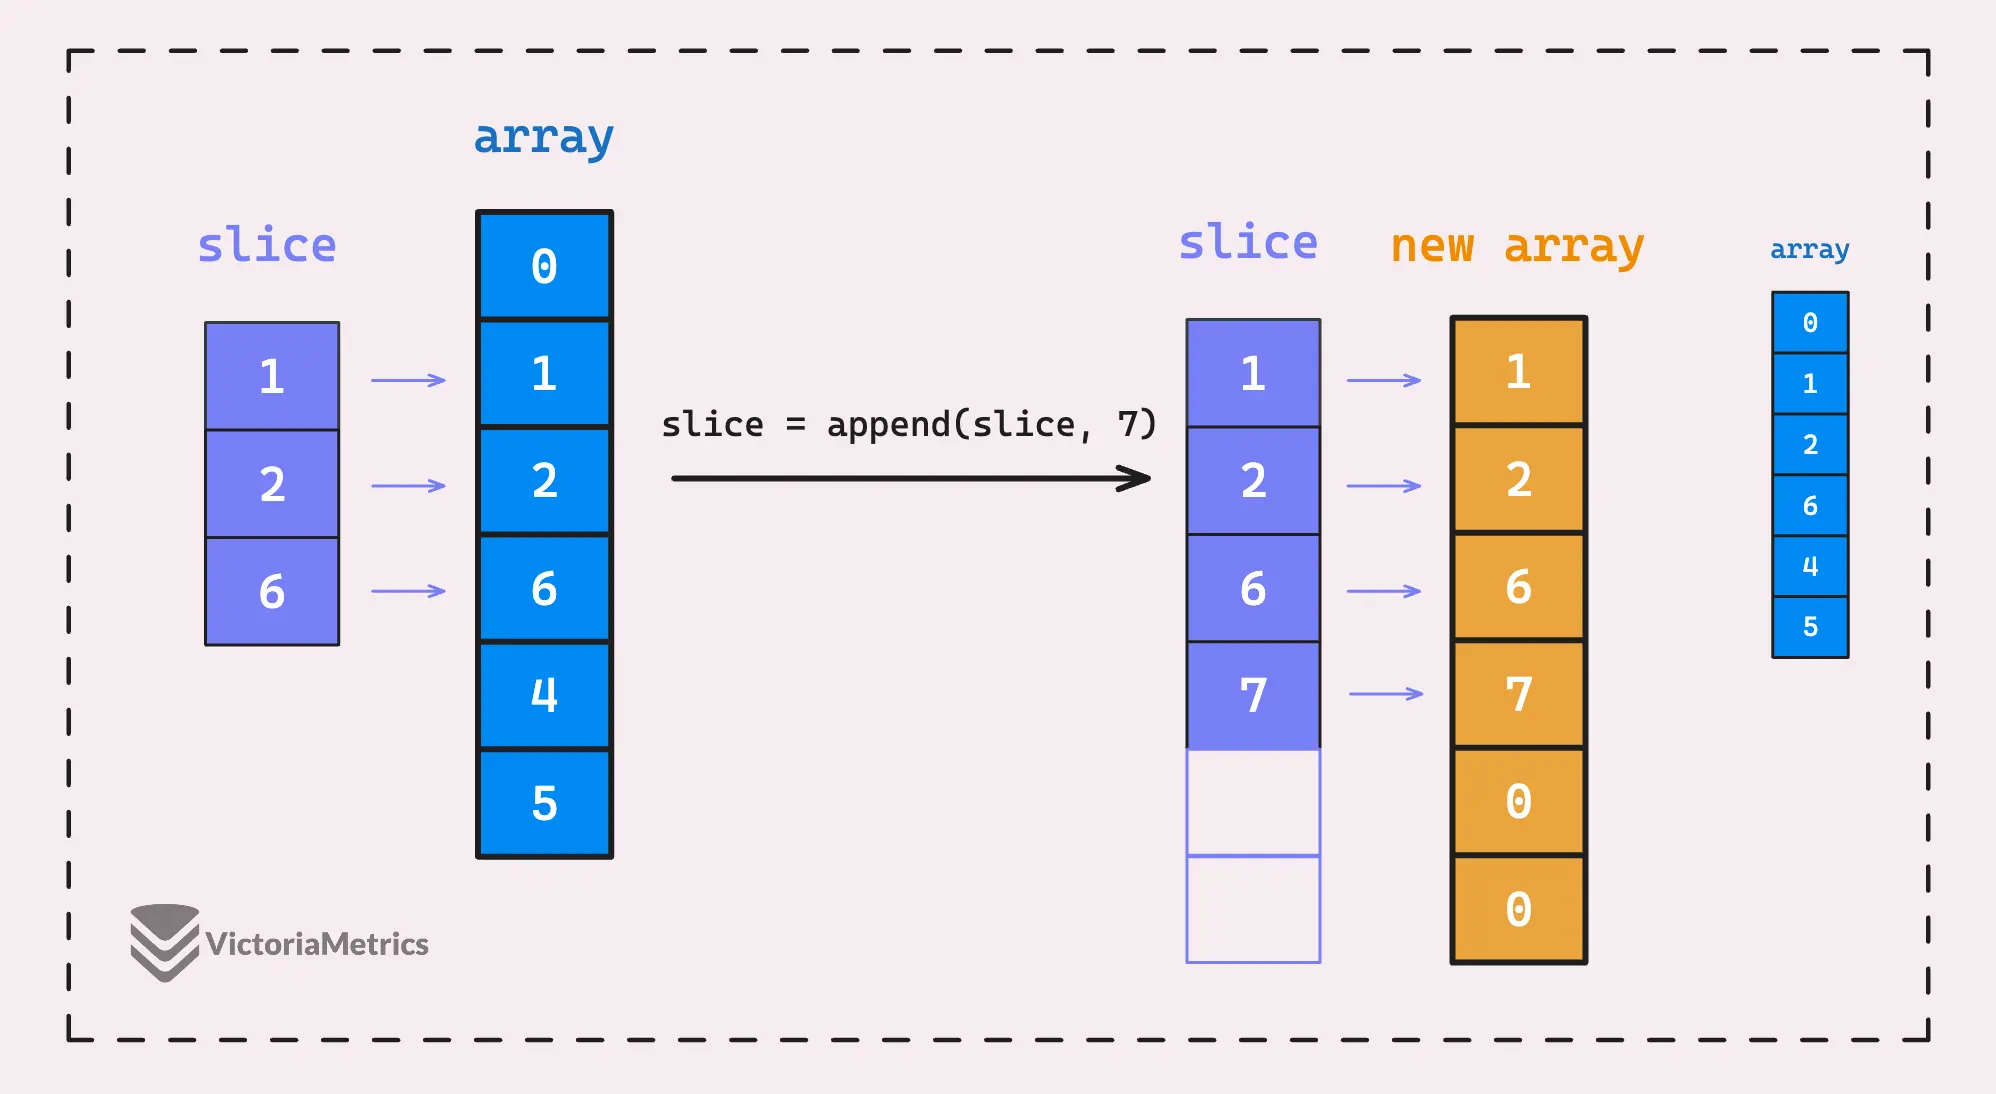
When you append to a slice, one of two things happens:
- If there is enough capacity (
cap) in the underlying array, the new element is added, and the slice'slenis increased. - If the capacity is full (
len == cap), the Go runtime allocates a new, larger underlying array, copies all the existing elements over, adds the new element, and updates the slice header to point to this new array.
Memory layout and mechanics of arrays and slices | Golang | intermediate level
This video provides an excellent visual explanation of how append works, especially the reallocation process.
Watch from 06:46 to 08:25. Focus on how the slice header's length, capacity, and pointer change when an append operation forces a reallocation.
The Most Important Rule of append
Because append might return a slice pointing to a new underlying array, you must always assign the result back to your slice variable.
// CORRECT: Assign the result of append back to the slice variable.
servers = append(servers, "web-02")

// WRONG: This change might be lost if a reallocation occurs.
append(servers, "web-02") // Don't do this!
This is a very common mistake for beginners. The pass-by-value nature of Go means that if append receives a copy of your slice header and creates a new backing array, the original slice variable in your function will still be pointing to the old, smaller array unless you update it with the return value.
You can also append all elements from another slice using the ... syntax:
new_servers := []string{"worker-01", "worker-02"}
all_servers := append(servers, new_servers...)
Test your understanding!
You have a slice defined as s := make([]int, 2, 4). Its initial state is [0, 0], with len=2 and cap=4.
What will be the length and capacity of s after running s = append(s, 1, 2, 3)?
Show answer
The slice s starts with a length of 2 and capacity of 4.
- Appending the first two elements (
1and2) fits within the existing capacity. The slice becomes[0, 0, 1, 2]withlen=4andcap=4. - Appending the third element (
3) exceeds the capacity. Go allocates a new backing array, typically doubling the old capacity. - The final slice will be
[0, 0, 1, 2, 3]. Its length will be5, and its new capacity will be8.
Independent Copies with copy
Since slicing an existing slice creates a new view over the same data, modifying one can affect the other. This can lead to unexpected behavior.
s1 := []string{"a", "b", "c"}
s2 := s1[0:2] // s2 is {"a", "b"}

s2[0] = "z" // Modify the first element of s2

// The change is reflected in s1 because they share the same backing array!
fmt.Println(s1) // Output: [z b c]
To create a truly independent slice with its own backing array, you use the built-in copy function. This is essential when you want to work on a duplicate of the data without side effects.
The copy(dst, src) function copies elements from the source slice (src) to the destination slice (dst). It returns the number of elements copied, which will be the minimum of len(dst) and len(src).
Understanding Slices in Go: Dynamic Arrays in Action
The copy function is fundamental for creating independent data sets. This article explains its behavior and provides clear examples.
Read the section '4. copy(dst, src): Copying Elements'. Note how the number of copied elements is limited by the destination's length.
Here is a practical example:
// Original list of production servers
prod_servers := []string{"web-01", "db-01", "cache-01"}

// Create an independent copy for a staging environment test
staging_servers := make([]string, len(prod_servers))
num_copied := copy(staging_servers, prod_servers)

// Now, changing staging_servers won't affect prod_servers
staging_servers[0] = "staging-web-01"

fmt.Println("Prod:", prod_servers)       // Output: Prod: [web-01 db-01 cache-01]
fmt.Println("Staging:", staging_servers) // Output: Staging: [staging-web-01 db-01 cache-01]
Hands-On Practice: Managing a Server Pool
Let's apply these concepts to a typical DevOps scenario. You're managing a pool of servers for a service.
Your Task:
- Create a file named
main.go. - In your
mainfunction, start by creating a slice to represent the initial server pool:web-01,web-02,web-03. - A new server,
web-04, is provisioned. Useappendto add it to your server pool. Print the pool to verify. - You need to perform a security audit on a subset of your servers. Create a new, independent slice named
audit_targetscontaining justweb-02andweb-03. Usemakeandcopyto ensure it's a safe copy. - To simulate the audit, append the suffix
_under_auditto each server in theaudit_targetsslice. (Hint: you can use aforloop with an index). - Finally, print both the original
server_pooland theaudit_targetsslices. Confirm that only theaudit_targetsslice shows the changes.
Click to see the solution
package main

import "fmt"

func main() {
	// 1. Create the initial server pool
	server_pool := []string{"web-01", "web-02", "web-03"}
	fmt.Println("Initial pool:", server_pool)

	// 2. A new server is provisioned
	server_pool = append(server_pool, "web-04")
	fmt.Println("After adding a server:", server_pool)
	fmt.Printf("Pool size: len=%d, cap=%d\n\n", len(server_pool), cap(server_pool))

	// 3. Create an independent slice for an audit
	servers_to_audit := server_pool[1:3] // This creates a sub-slice: {"web-02", "web-03"}

	audit_targets := make([]string, len(servers_to_audit))
	copy(audit_targets, servers_to_audit)

	fmt.Println("Created independent audit targets:", audit_targets)

	// 5. Simulate the audit by modifying the audit_targets slice
	for i := range audit_targets {
		audit_targets[i] = audit_targets[i] + "_under_audit"
	}
	fmt.Println("After modifying audit targets:", audit_targets)

	// 6. Print both slices to confirm they are independent
	fmt.Println("\n--- Final State ---")
	fmt.Println("Original server pool:", server_pool) // Should be unchanged
	fmt.Println("Audit targets:", audit_targets) // Should show the modifications
}
Expected Output:
Initial pool: [web-01 web-02 web-03]
After adding a server: [web-01 web-02 web-03 web-04]
Pool size: len=4, cap=6

Created independent audit targets: [web-02 web-03]
After modifying audit targets: [web-02_under_audit web-03_under_audit]

--- Final State ---
Original server pool: [web-01 web-02 web-03 web-04]
Audit targets: [web-02_under_audit web-03_under_audit]
Conclusion
You've now learned the fundamentals of Go's most important data structure. Slices are the workhorse for handling sequences of data, and you will be using them in nearly every Go program you write.
Key Takeaways:
- Slices are lightweight views over an underlying array, defined by a pointer, length, and capacity.
- The
appendfunction is used to add elements. It may reallocate the underlying array, so you must always assign its return value back to your slice variable. - The
copyfunction creates a true, independent copy of a slice's elements, preventing unintended modifications to the original data. - Slicing an existing slice (
s[i:j]) is efficient but creates a new slice that shares the same backing array. Be mindful of this to avoid bugs.
Next Up
We've covered ordered collections with slices. In the next lesson, we'll explore maps, Go's built-in tool for managing key-value data. Maps are perfect for representing unstructured data like JSON responses, configuration files, or resource labels in Kubernetes.